
1. Introduction and Overview
This user manual provides detailed instructions for the MESTEK Infrared Thermometer Gun, Model IR01D-1. This non-contact digital laser thermometer is designed for accurate temperature measurement across a wide range of applications, from cooking and home maintenance to industrial use. It features a color LCD, adjustable emissivity, and high/low temperature alarms for enhanced functionality and safety.

Figure 1: MESTEK Infrared Thermometer Gun, Model IR01D-1, with its packaging and included AAA batteries.
2. Safety Information
- Important: This infrared thermometer is designed for measuring the temperature of inanimate objects only. It is NOT FOR HUMAN OR ANIMAL USE, as readings for living beings will be inaccurate.
- Do not point the laser directly at eyes or indirectly off reflective surfaces. The laser power is less than 1mW.
- Do not use the device in environments with explosive gas, vapor, or dust.
- Keep the device away from electromagnetic fields produced by arc welders or induction heaters.
- Do not expose the device to extreme temperatures or humidity.
- Handle with care; avoid dropping or subjecting the device to strong impacts.
3. Package Contents
Upon opening the package, please verify that all items listed below are present and in good condition:
- 1 x MESTEK Infrared Thermometer Gun
- 2 x AAA 1.5V Batteries
- 1 x K-Type Thermocouple Probe (for contact temperature measurement)
- 1 x English User Manual
4. Product Features
High Accuracy Measurement
Equipped with a French HTU20 temperature sensor and 13-point laser guidance, this thermometer provides highly accurate readings with a distance-to-spot ratio of 12:1. It offers an accuracy of ±1.5% and a rapid response time of less than 0.5 seconds.

Figure 2: The 13-point laser guidance system ensures precise targeting for accurate temperature readings.
Adjustable Emissivity and Temperature Alarm
The emissivity can be adjusted from 0.10 to 1.00, allowing for precise measurements on various surfaces. It also features a high/low temperature warning system, where the display turns red if the measured temperature exceeds the set limits.
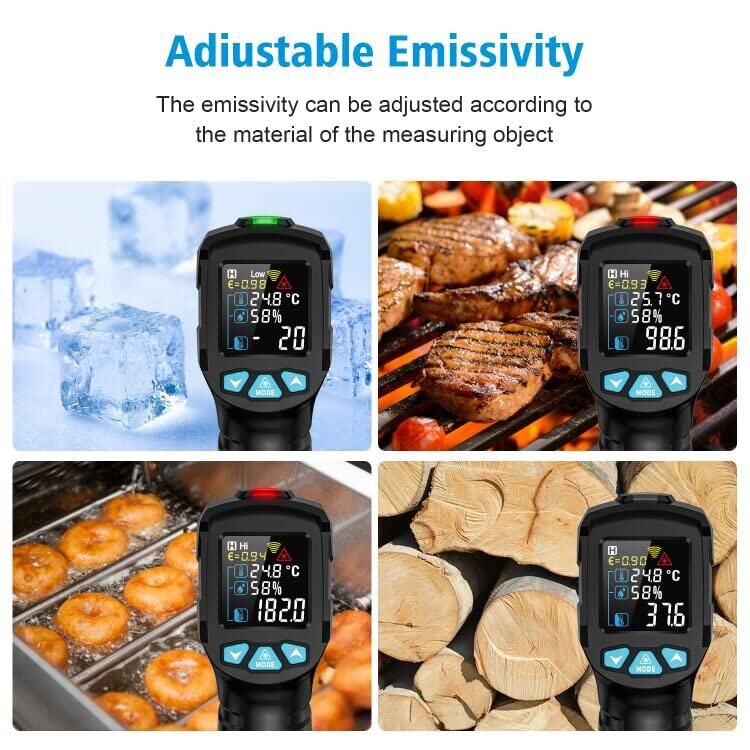
Figure 3: Adjustable emissivity ensures accurate readings for different material types.

Figure 4: The high/low temperature alarm feature provides visual alerts when limits are exceeded.
Convenient Functions and Display
Features include an HD colorful VA display with backlight for clear visibility, data hold function, environment humidity measurement, and unit switching between Celsius (℃) and Fahrenheit (℉). It also has a low battery indicator and an auto-off function after 30 seconds to conserve battery life.
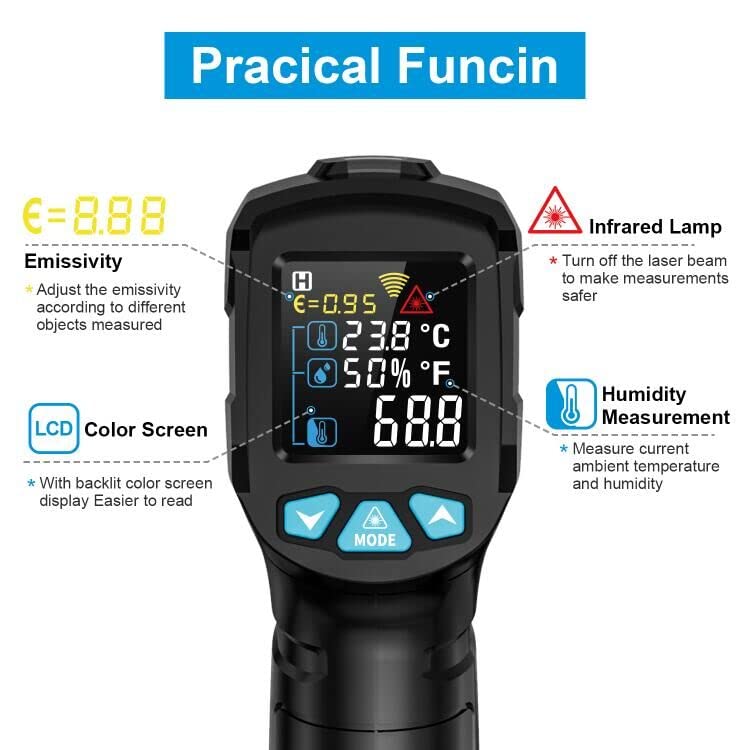
Figure 5: The clear color LCD displays multiple readings including ambient temperature and humidity.

Figure 6: Easily switch between Celsius and Fahrenheit temperature units.
Internal Structure and Design
The device incorporates a precision Switzerland HTU20 temperature and humidity sensor, a high-precision temperature sensor, and a custom aluminum tube to minimize the impact of ambient temperature on sensor accuracy.

Figure 7: Internal components designed for accuracy and reliability.
5. Setup
5.1 Battery Installation
The MESTEK Infrared Thermometer Gun requires 2 AAA 1.5V batteries (included).
- Locate the battery compartment on the handle of the thermometer.
- Open the battery compartment cover.
- Insert the two AAA batteries, ensuring correct polarity (+/-) as indicated inside the compartment.
- Close the battery compartment cover securely.
5.2 Initial Power On
Once batteries are installed, the device is ready for use. Press the trigger to power on the thermometer. The color LCD will illuminate.
6. Operating Instructions
6.1 Basic Temperature Measurement
To measure the temperature of an object:
- Point the laser beam towards the target object.
- Hold down the trigger. The display will show the live temperature reading.
- Release the trigger to hold the current reading on the screen. The device will automatically turn off after 30 seconds of inactivity.

Figure 8: Simple two-step operation for quick temperature readings.
6.2 Adjusting Emissivity (E)
Emissivity is a measure of an object's ability to emit infrared energy. Different materials have different emissivity values. For accurate readings, adjust the emissivity setting to match the material being measured.
- Press the "MODE" button to navigate to the emissivity setting.
- Use the Up and Down arrow buttons to adjust the emissivity value (0.10 to 1.00).
- Refer to common emissivity tables for typical values of various materials.
6.3 Switching Temperature Units (℃/℉)
To switch between Celsius and Fahrenheit:
- With the device powered on, press the "MODE" button until the temperature unit icon flashes.
- Use the Up or Down arrow buttons to select your desired unit.
6.4 Using High/Low Temperature Alarms
You can set high and low temperature limits. If the measured temperature falls outside these limits, the display will turn red and show "Hi" or "Low".
- Press the "MODE" button repeatedly to cycle through settings until you reach the High Alarm or Low Alarm setting.
- Use the Up and Down arrow buttons to set your desired temperature limit.
- Press the "MODE" button again to confirm and exit the setting.
6.5 K-Type Thermocouple Probe Usage
For contact temperature measurements, connect the K-Type Thermocouple Probe to the designated port on the thermometer. The device will automatically switch to contact measurement mode.

Figure 9: The thermometer is suitable for a wide range of applications.
7. Maintenance
- Keep the thermometer clean. Use a soft, damp cloth to wipe the casing. Do not use abrasive cleaners or solvents.
- Ensure the lens is clean for accurate readings. Use a soft cloth or cotton swab with a small amount of alcohol to gently clean the lens.
- Do not immerse the device in water or any other liquid. The product care instructions state: "Do Not Soak".
- Store the device in a dry, cool place when not in use.
- Remove batteries if the device will not be used for an extended period to prevent leakage.
8. Troubleshooting
If you encounter issues with your MESTEK Infrared Thermometer Gun, consider the following common solutions:
- No Display/Power On: Check if the batteries are correctly installed and have sufficient charge. Replace batteries if necessary.
- Inaccurate Readings:
- Ensure the lens is clean and free from obstructions.
- Verify the emissivity setting is appropriate for the material being measured.
- Confirm the distance-to-spot ratio (12:1) is being observed. Measuring too close or too far can affect accuracy.
- Avoid measuring highly reflective surfaces directly; use matte tape if possible.
- "Hi" or "Low" Alarm Constantly On: Check your high/low temperature alarm settings and adjust them if they are too restrictive for your measurement range.
If the problem persists after attempting these steps, please contact MESTEK customer service for further assistance.
9. Specifications
| Specification | Value |
|---|---|
| Temperature Range | -58℉ to 1472℉ (-50℃ to 800℃) |
| Accuracy | ±1.5% |
| Distance to Spot Ratio (D:S) | 12:1 |
| Response Time | <0.5 seconds |
| Emissivity | Adjustable 0.10 - 1.00 |
| Display Type | HD Colorful VA Display with Backlight |
| Unit Switch | ℃ / ℉ |
| Special Features | Alarm, Fast Reading System, High Accuracy, Low Battery Indicator, Ultra Clear Screen, Environment Humidity Measurement |
| Auto-Off | 30 seconds |
| Power Source | 2 x AAA 1.5V Batteries (included) |
| Product Dimensions | 6 x 4 x 1 inches |
| Item Weight | 7.4 ounces |
| Outer Material | Plastic |
10. Warranty and Support
MESTEK is committed to providing high-quality products and excellent customer service.
- Warranty: MESTEK provides 24 months of after-sale service from the date of purchase. If the temperature gun is damaged within this period, please contact us for a free replacement.
- Technical Support: Lifetime technical support is available for all MESTEK products.
- Customer Service: Our customer service team is available 7 days a week, 24 hours a day, to assist you with any questions or concerns.
For support, please refer to the contact information provided in your product packaging or visit the official MESTEK website.