
1. Introduction
This manual provides instructions for the safe and effective use of your BEAR FORCE Pressure Washer Brass Foam Cannon. Please read this manual thoroughly before operation and retain it for future reference. This foam cannon is designed to generate thick, dense foam for vehicle washing when connected to a compatible pressure washer.
2. Safety Information
- Always wear appropriate personal protective equipment, including eye protection, when operating a pressure washer and foam cannon.
- Ensure all connections are secure before operating the pressure washer to prevent leaks and accidental disconnections.
- Do not point the foam cannon at people, pets, or electrical outlets.
- Use only car wash soaps specifically designed for foam cannons and pressure washers. Follow the soap manufacturer's dilution instructions.
- Keep the foam cannon and chemicals out of reach of children.
- Always relieve pressure from the system before disconnecting the foam cannon or performing any maintenance.
3. Package Contents
Verify that all items are present in your package:
- Brass Foam Cannon Body with 1/4" Quick Connector
- 32 oz (946 ml) Soap Bottle
- 1.25mm Orifice Nozzle (pre-installed)
- 1.10mm Orifice Nozzle (extra, for lower PSI pressure washers)
- Silicone Pickup Tube with Weighted Stainless Steel Ball Filter

The image above illustrates the various components of the foam cannon, including the soap regulator, 1/4 inch quick fitting, large mouth opening, transparent tank, thickened blade, silicone pickup tube, weighted stainless steel ball with filter, and wide stable base. These parts are designed for easy assembly and maintenance.
4. Setup
- Select the Correct Orifice Nozzle: The foam cannon comes with a 1.25mm orifice nozzle pre-installed, suitable for pressure washers between 1850 PSI and 5000 PSI. For electric pressure washers with lower pressure (800 PSI to 1850 PSI), replace the 1.25mm nozzle with the included 1.10mm nozzle. To change the nozzle, use a flat screwdriver to carefully disassemble the 1.25mm nozzle and then install the 1.10mm nozzle.
- Prepare the Soap Solution: Fill the 32 oz soap bottle with your desired car wash shampoo and water. A common mixing ratio for dense foam is 1 part car wash shampoo to 5 parts water (1:5 ratio). Adjust this ratio based on the specific soap and desired foam thickness. The bottle is translucent with measuring marks for easy mixing.
- Attach the Foam Cannon: Securely screw the brass foam cannon body onto the filled soap bottle. Ensure the silicone pickup tube is properly inserted into the bottle and the weighted filter is at the bottom to draw all the solution.
- Connect to Pressure Washer: Attach the 1/4" quick connector of the foam cannon to your pressure washer's spray gun wand. Ensure it clicks securely into place.

This image demonstrates the two orifice nozzles provided: the 1.25mm nozzle for higher pressure washers (1850-5000 PSI) and the 1.10mm nozzle for lower pressure washers (800-1850 PSI). Selecting the correct nozzle is crucial for optimal foam generation.

The diagram above shows how to properly connect the foam cannon to your pressure washer. The foam cannon features a 1/4" quick plug that fits into a spray gun wand equipped with a 1/4" quick connector.
5. Operating Instructions
- Adjust Soap Mixture Ratio: The top knob on the foam cannon allows you to adjust the soap mixture ratio. Turn the knob clockwise for less soap (thinner foam) and counter-clockwise for more soap (thicker foam).
- Adjust Spray Pattern: The front nozzle of the foam cannon can be rotated to adjust the spray angle from a narrow pencil stream (0°) to a wide fan spray (60°). You can also rotate the entire nozzle assembly 360° to change the spray direction (vertical or horizontal).
- Apply Foam: With the pressure washer running, activate the spray gun trigger to begin applying foam to the desired surface. Work from bottom to top for best coverage.
- Rinse: After allowing the foam to dwell for the recommended time (refer to soap manufacturer's instructions), disconnect the foam cannon and rinse the vehicle thoroughly with clean water using your pressure washer.
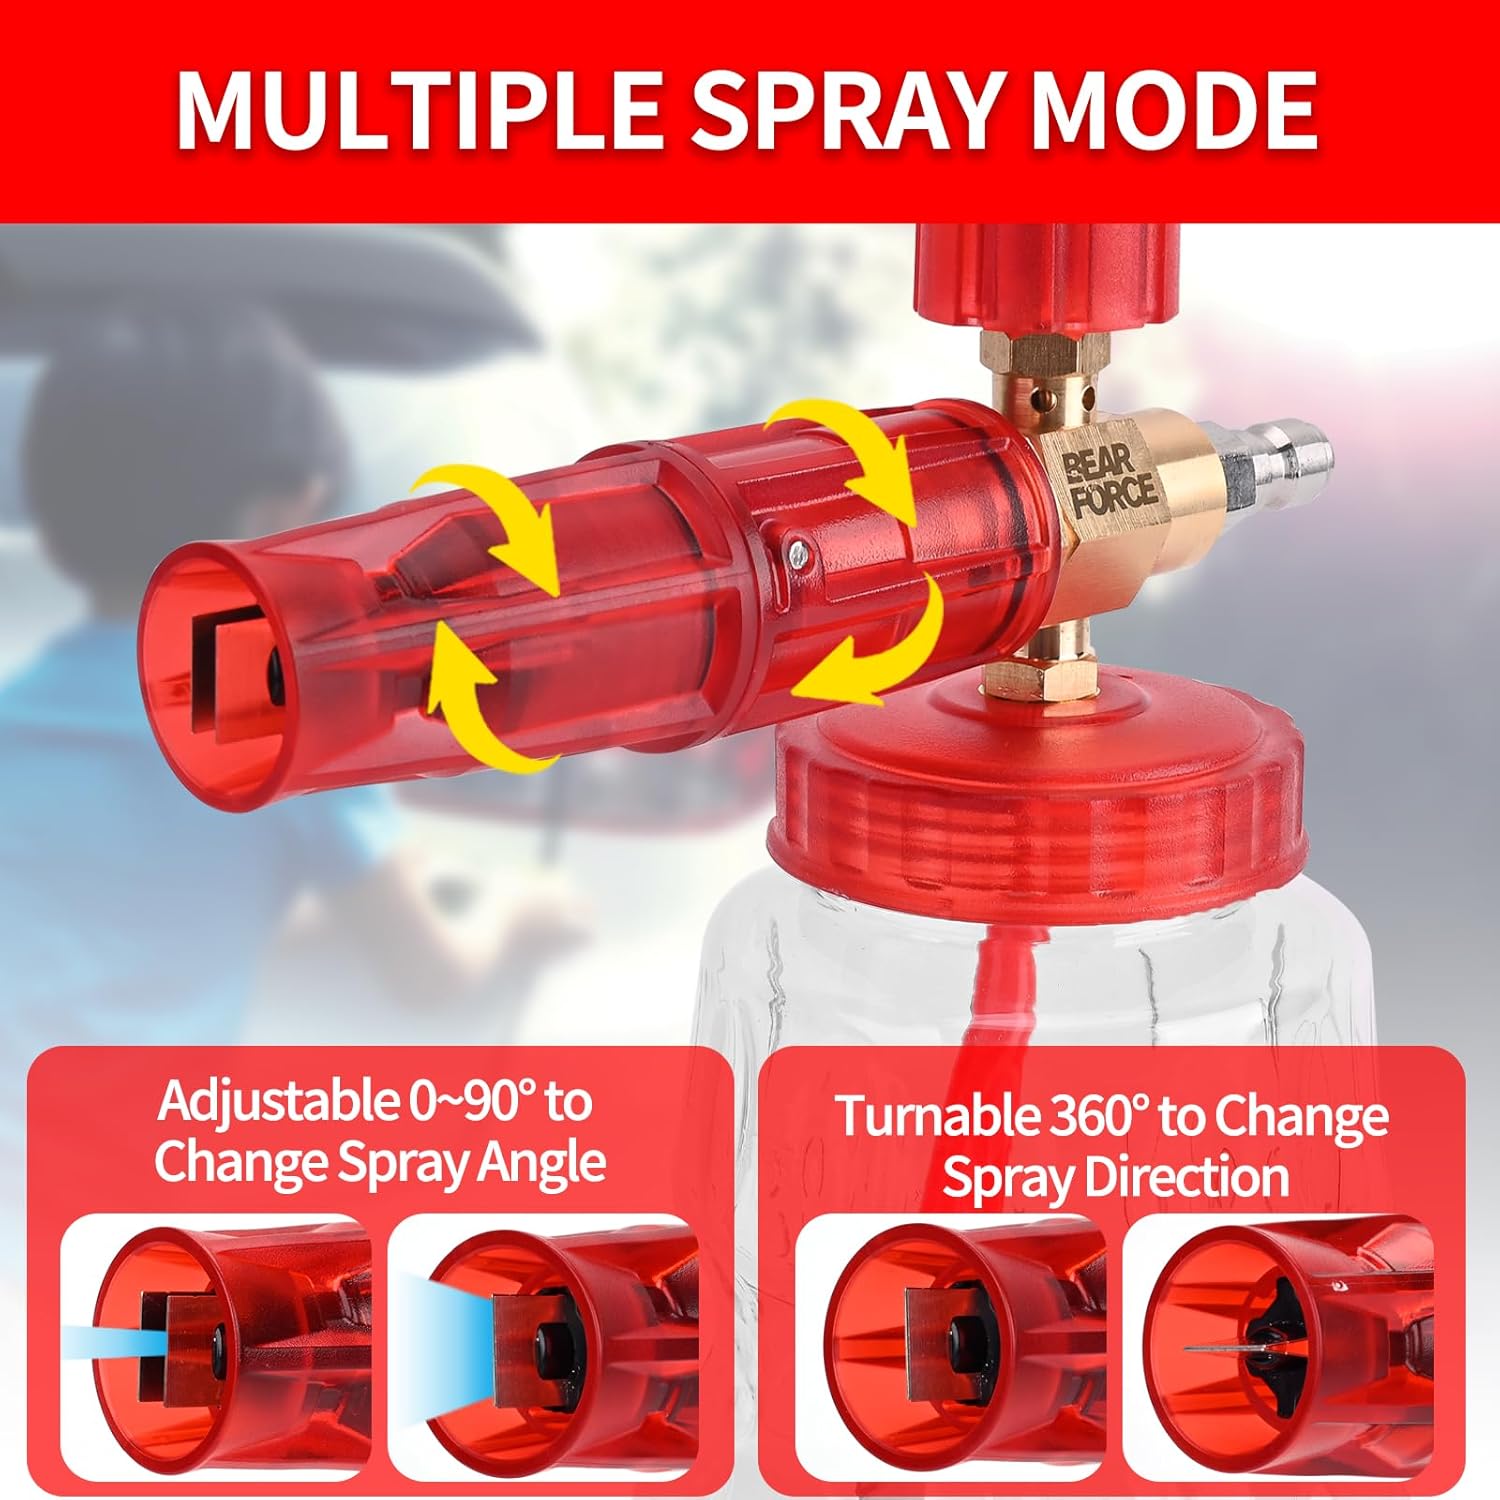
This image illustrates the foam cannon's adjustable spray capabilities. Users can modify the spray angle from a narrow stream to a wide fan and rotate the nozzle 360 degrees to switch between vertical and horizontal spray patterns.

The image above shows the foam cannon in use, applying a thick layer of foam to a vehicle. This demonstrates the effective coverage achieved during the washing process.

This split image visually compares a car before and after foam application, showcasing the dense and even coverage provided by the foam cannon.
Official Product Videos
BEAR FORCE Pressure Washer Brass Foam Cannon
This video demonstrates the BEAR FORCE Pressure Washer Brass Foam Cannon in use, showcasing its foam generation capabilities and ease of operation.
BEARFORCE Pressure Washer Brass Foam Cannon for Portland Husky Ryobi
This video provides a demonstration of the BEAR FORCE Pressure Washer Brass Foam Cannon, specifically highlighting its compatibility and performance with pressure washer brands like Portland, Husky, and Ryobi.
6. Maintenance
Proper maintenance ensures the longevity and optimal performance of your foam cannon.
- Flush After Each Use: After each use, empty any remaining soap solution from the bottle. Fill the bottle with clean water and run the foam cannon for 30-60 seconds to flush out any soap residue from the internal components. This prevents clogging.
- Clean the Filter: Periodically check the weighted stainless steel ball filter on the end of the pickup tube for debris. Clean it if necessary to ensure unrestricted soap flow.
- Inspect Connections: Regularly inspect all connections and O-rings for wear or damage. Replace any worn parts to prevent leaks.
- Storage: Store the foam cannon in a clean, dry place, away from direct sunlight and extreme temperatures.

This exploded view highlights the individual components of the foam cannon, such as the adjustable nozzle, micro detergent regulation, thickened blade, foam maker, brass manifold, orifice nozzle, and stainless steel ball with filter. The design allows for easy disassembly, facilitating thorough cleaning and maintenance.
7. Troubleshooting
| Problem | Possible Cause | Solution |
|---|---|---|
| No foam or thin foam |
|
|
| Water leaking from connections |
|
|
| Foam cannon not drawing soap |
|
|
8. Specifications
| Feature | Specification |
|---|---|
| Model Number | 2207BBUS |
| Material | Brass (manifold), Nylon (cover, bottle) |
| Maximum Operating Pressure | 5000 PSI |
| Outlet Connection Type | 1/4 inch NPT Quick Connector |
| Orifice Nozzle Sizes | 1.25mm (installed), 1.10mm (extra) |
| Bottle Capacity | 32 oz (approximately 946 ml) |
| Adjustable Spray Angle | 0° to 60° (pencil to fan) |
| Adjustable Spray Direction | 360° rotatable |
9. Warranty and Support
For warranty information or technical support, please refer to the product packaging or contact BEAR FORCE customer service through the retailer where the product was purchased. Keep your purchase receipt as proof of purchase.