Introduction
The VEDINDUST HDMI Extender Splitter is designed to extend HDMI audio/video signals up to 1080p@60Hz to eight simultaneous video outputs. It utilizes Cat6/7 Ethernet cables for long-distance transmission and includes one HDMI loop output. This device is suitable for various applications such as education, digital signage, conference rooms, and home theater systems.
Package Contents
Verify that all items listed below are included in your package:
- 1x HDMI Extender Splitter (Transmitter)
- 8x HDMI Extender Receivers
- 1x DC12V Power Adapter
- 2x Fixed Brackets
- 1x User Manual

Image: The package includes the main transmitter unit, eight receiver units, a DC12V power adapter, two fixed brackets, and a user manual.
Product Overview
The VEDINDUST HDMI Extender Splitter system consists of a Transmitter (TX) unit and eight Receiver (RX) units. Familiarize yourself with the ports and indicators on both units.
Transmitter (TX) Unit
- Power Switch: Turns the device on or off.
- RJ45 CAT6/7 Output Ports (CAT1-CAT8): Connect to the Receiver units via Cat6/7 Ethernet cables.
- HDMI IN: Connects to the HDMI source device.
- HDMI LOOP OUT: Provides a local HDMI output for monitoring or connecting an additional display.
- DC12V: Power input port.
- LED Indicator: Displays power and signal status.
- EDID Setting: DIP switches for EDID management.
Receiver (RX) Unit
- HDMI OUT: Connects to the display device.
- RJ45 CAT6/7 Input Port: Connects to the Transmitter unit via a Cat6/7 Ethernet cable.
- LED Indicator: Displays power and signal status.

Image: Detailed view of the Transmitter (TX) unit's front and back panels, highlighting the power switch, RJ45 output ports, HDMI input/loop out, DC12V power, LED indicators, and EDID settings. Also shows the Receiver (RX) unit with its HDMI output, RJ45 input, and LED indicator.
Setup Instructions
Follow these steps to set up your HDMI Extender Splitter system:
- Connect HDMI Source: Connect your HDMI source device (e.g., Blu-ray player, PC, game console) to the HDMI IN port on the Transmitter (TX) unit using an HDMI cable.
- Connect Local Display (Optional): If desired, connect a local HDMI display to the HDMI LOOP OUT port on the Transmitter (TX) unit using an HDMI cable.
- Connect Receivers: Connect each of the eight Receiver (RX) units to the RJ45 CAT6/7 Output Ports (CAT1-CAT8) on the Transmitter (TX) unit using individual Cat6 or Cat7 Ethernet cables. Ensure the cabling method is 568B for optimal performance, especially for distances up to 50 meters (165 feet).
- Connect Displays: Connect each Receiver (RX) unit to its respective display device (e.g., TV, monitor, projector) using an HDMI cable.
- Power On: Connect the provided DC12V power adapter to the DC12V port on the Transmitter (TX) unit. Plug the adapter into a power outlet.
- Activate: Turn on the Power Switch on the Transmitter (TX) unit. The LED indicators on both the Transmitter and Receiver units should illuminate, indicating power and signal presence.
Note on Power Over Cable (POC): The system utilizes POC technology, meaning only the Transmitter (TX) unit requires external power. The Receiver (RX) units receive power through the Ethernet cable from the Transmitter.
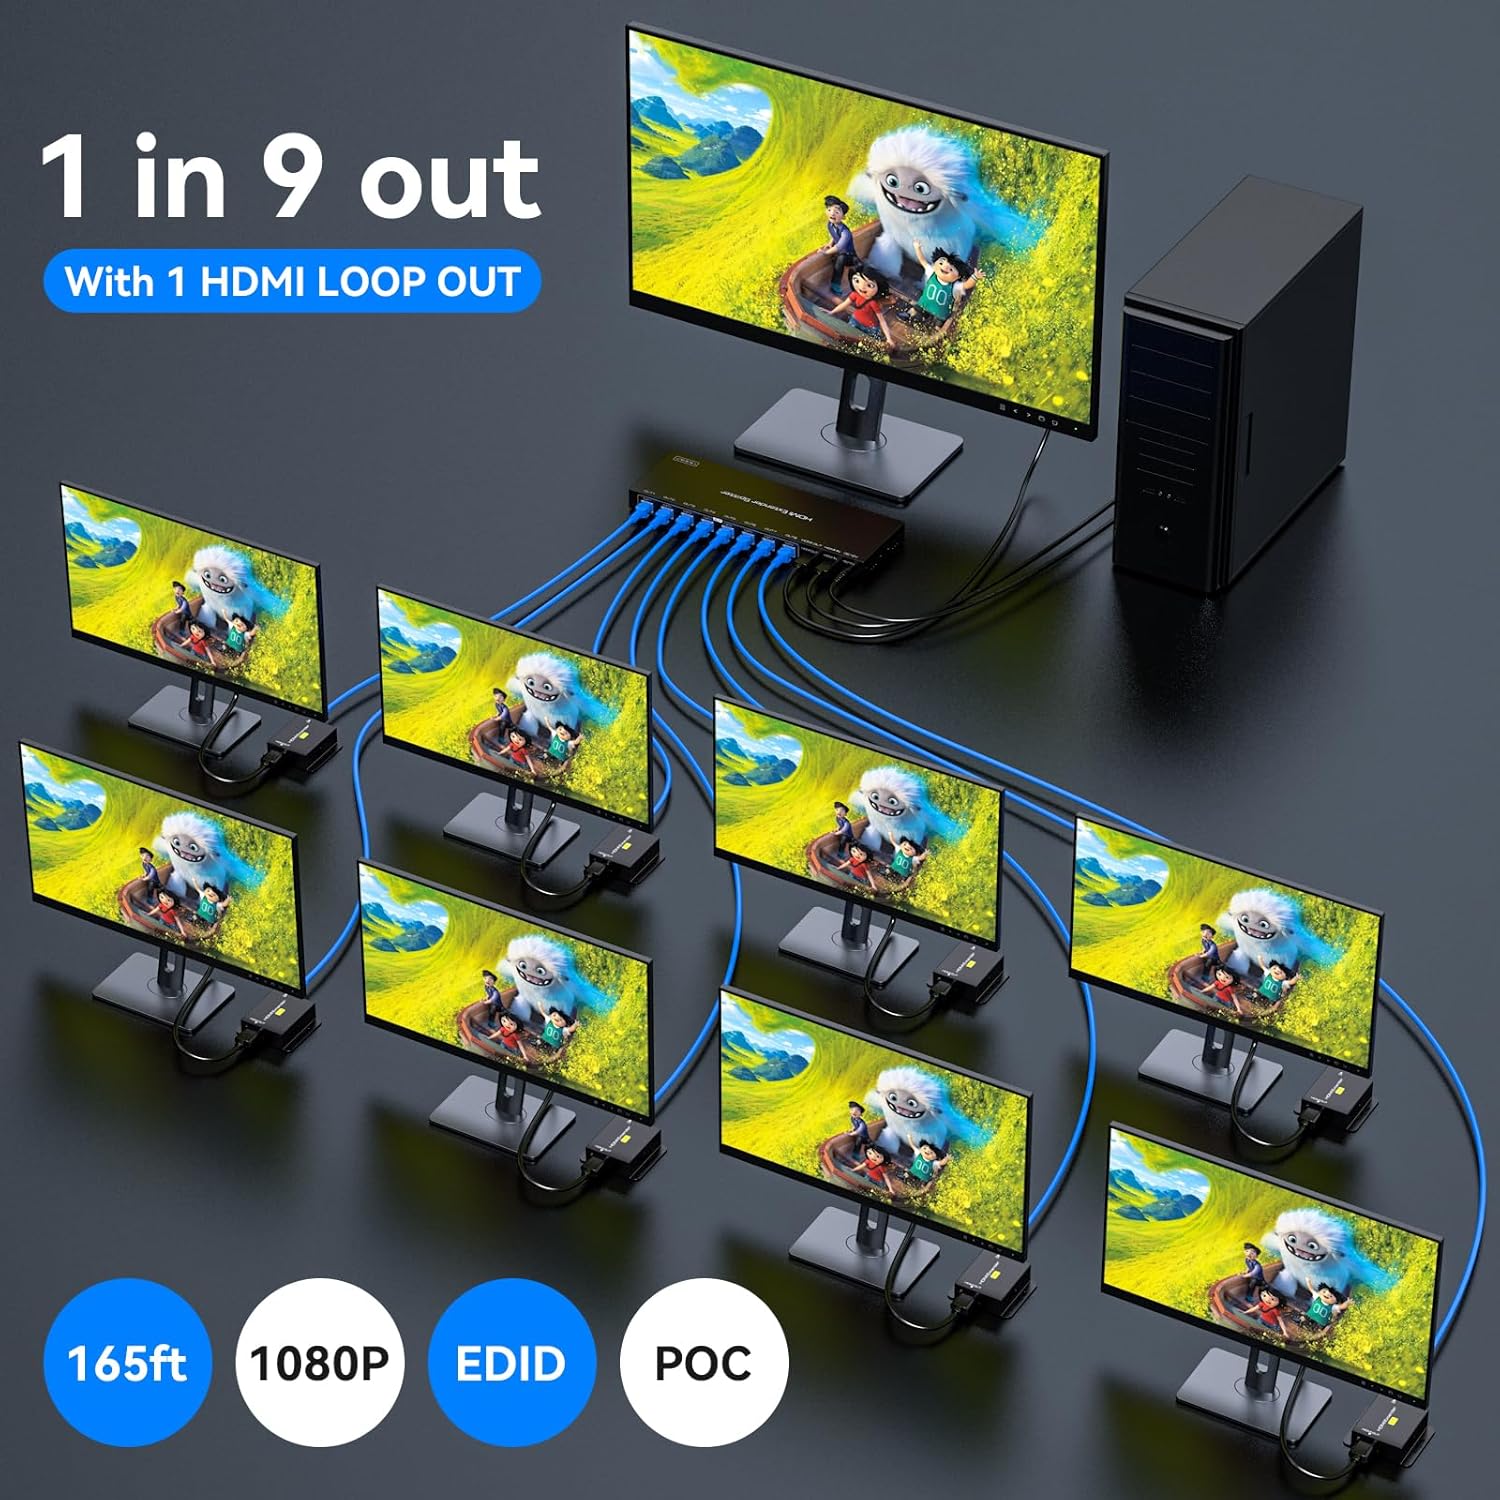
Image: A schematic diagram illustrating the complete setup, from the HDMI input source to the Transmitter, then distributing the signal via Cat6/7 cables to eight Receiver units, each connected to an HDMI output display. An additional HDMI loop out from the Transmitter is also depicted.

Image: This image highlights the Power Over Cable (POC) feature, showing the DC12V power connection to the Transmitter and an RX unit receiving power directly through the network cable, eliminating the need for a separate power supply for the receivers.
Operating Instructions
Once the system is set up, ensure all devices are powered on. The HDMI Extender Splitter will automatically detect and transmit the HDMI signal.
EDID Management
The Transmitter unit features EDID (Extended Display Identification Data) management via DIP switches. EDID allows the source device to recognize the display's capabilities (resolution, audio formats). Adjusting these settings can improve compatibility and optimize video/audio output.
Refer to the table below for EDID mode specifications:

Image: This image displays the EDID DIP switch configuration on the Transmitter unit, along with a table that specifies different EDID modes (e.g., 1080P 2CH, 1080P 7.1CH, 3D 2CH, 3D 5.1CH, 3D 7.1CH, 1920x1200 2CH, Copy HDMI OUT) and their corresponding switch positions (000 to 111).
| 1 | 2 | 3 | EDID Specification | Description |
|---|---|---|---|---|
| 0 | 0 | 0 | 1080P 2CH | Fixed output mode, requiring the display to support the resolution and 3D function. |
| 0 | 0 | 1 | 1080P 5.1CH | Fixed output mode, requiring the display to support the resolution and 3D function. |
| 0 | 1 | 0 | 1080P 7.1CH | Fixed output mode, requiring the display to support the resolution and 3D function. |
| 0 | 1 | 1 | 3D 2CH | Fixed output mode, requiring the display to support the resolution and 3D function. |
| 1 | 0 | 0 | 3D 5.1CH | Fixed output mode, requiring the display to support the resolution and 3D function. |
| 1 | 0 | 1 | 3D 7.1CH | Fixed output mode, requiring the display to support the resolution and 3D function. |
| 1 | 1 | 0 | 1920x1200 2CH | With support of both the display and signal source, up to 1920x1200 resolution can be output. |
| 1 | 1 | 1 | Copy HDMI OUT | Copies the EDID from the HDMI OUT port. When there are multiple displays, connect the HDMI OUT port to the display with the lowest resolution for copying. |
Recommendation: If using the EDID COPY mode (111), connect the HDMI OUT port to the display with the lowest resolution to ensure compatibility across all connected displays.
Maintenance
To ensure the longevity and optimal performance of your VEDINDUST HDMI Extender Splitter, follow these maintenance guidelines:
- Cleaning: Use a soft, dry cloth to clean the device. Do not use liquid or aerosol cleaners.
- Ventilation: Ensure the device is placed in a well-ventilated area. The metal casing with cooling holes is designed for heat dissipation. Do not block ventilation openings.
- Power: Always use the provided DC12V power adapter. Disconnect power during lightning storms or when unused for long periods.
- Environment: Avoid exposing the device to excessive moisture, extreme temperatures, or direct sunlight.
Troubleshooting
If you encounter issues with your HDMI Extender Splitter, refer to the following common problems and solutions:
No Power
- Check Power Adapter: Verify that the power adapter is securely plugged into a working power outlet and into the DC12V port on the Transmitter unit.
- Power Switch: Ensure the power switch on the Transmitter unit is in the "ON" position.
- Power Indicator: Check if the power LED indicator on the Transmitter unit is illuminated.
No Image or Incorrect Image Display
- Signal Indicator: Verify that the green signal indicator LED on both the Transmitter and Receiver units is illuminated.
- Cable Length: Ensure that the Cat6/7 network cables used for extension are less than 50 meters (165 feet) in length.
- Cable Type and Wiring: Use high-quality Cat6 or Cat7 oxygen-free copper cables with 568B wiring for optimal performance.
- HDMI Cables: Check all HDMI cable connections between source, Transmitter, Receivers, and displays. Ensure they are securely connected and not damaged.
- EDID Settings: Adjust the EDID DIP switches on the Transmitter unit to match the capabilities of your displays. If using multiple displays, try setting the EDID to "Copy HDMI OUT" (111) and connect the HDMI OUT port to the display with the lowest resolution.
- Display Input: Confirm that your display devices are set to the correct HDMI input source.
- Resolution Compatibility: Ensure your source device's output resolution is compatible with your displays and the extender's capabilities (up to 1080p@60Hz).
Specifications
| Feature | Detail |
|---|---|
| Brand | VEDINDUST |
| Model Number | 20230904 |
| Product Dimensions (Package) | 32.6 x 9.7 x 6.2 cm; 1.2 kilograms |
| Input | 1x HDMI |
| Outputs | 8x RJ45 (Cat6/7), 1x HDMI Loop Out |
| HDMI Version | HDMI 1.4 |
| Max Resolution | 1080p@60Hz (3D/1080p/1080i/720p/576p/576i/480p/480i) |
| Data Transfer Rate | 10.2 Gbps |
| Transmission Distance (Cat6/7) | Up to 50 meters (165 feet) |
| Transmission Distance (HDMI Loop Out) | Up to 10 meters (standard HDMI cable) |
| Audio Format Support | DTS-HD/LPCM7.1/DTS/DSD |
| Special Features | HDMI to Ethernet, Power Over Cable (POC), EDID Management |
| Power Supply | DC12V (Transmitter only) |
| Ethernet Cable Category | Category 6 or higher (568B wiring recommended) |
| Compatible Devices | Monitors, Televisions |
| Recommended Uses | Education, Digital Signage, Churches, Classrooms, Conference Rooms, Projects, Gaming, Videoconferencing, Multimedia Home Theater |


