
1. Introduction
This manual provides instructions for the SIYEGK 10000mAh Emergency Weather Alert Radio. This device is designed to provide essential communication and utility functions during emergencies, outdoor activities, or daily use. It features multiple power sources, radio bands, lighting options, and a power bank function.

Image 1.1: The SIYEGK 10000mAh Emergency Weather Alert Radio, showcasing its compact design and integrated flashlight.
2. Package Contents
Verify that all items are present in the package:
- 1 x SIYEGK 10000mAh Emergency Radio with Built-in Li-ion Battery
- 1 x USB Type-C Charging Cable
- 1 x User Manual (this document)
- 1 x Mini Compass
- 1 x Portable Bag

Image 2.1: Diagram illustrating the radio's components and the items included in the package.
3. Product Diagram
Familiarize yourself with the various parts and controls of your emergency radio:
- Antenna: Extend for optimal radio reception.
- Battery Compartment: Houses optional AAA batteries.
- Hand Crank: Used for manual power generation.
- Compass: Integrated for navigation assistance.
- Far and Dipped Light (Flashlight): Provides illumination.
- SOS Red Flashing Light: Activates during SOS alarm.
- Operation Buttons: Control radio functions, volume, and tuning.
- Digital Display Screen: Shows frequency, mode, and battery status.
- Reading Lamp: Provides diffused light for reading.
- Type-C Input Port: For charging the radio via USB-C cable.
- Headphone Jack (3.5mm): For private listening.
- USB Output Port: For charging external devices.
4. Setup and Charging
The radio offers multiple methods for power and charging.
4.1 Initial Charging (Built-in 10000mAh Li-ion Battery)
Before first use, fully charge the radio using the USB Type-C cable.
- Connect the provided USB Type-C cable to the radio's Type-C Input Port (10).
- Connect the other end to a USB power adapter (not included) or a computer USB port.
- The battery indicator on the digital display (8) will show charging status.
4.2 Solar Charging
The integrated solar panel provides a supplementary charging method, primarily for maintaining battery charge or slow charging in direct sunlight.
- Place the radio with the solar panel facing direct sunlight.
- Solar charging is most effective in strong, direct sunlight and is slower than USB-C charging.
4.3 Hand Crank Charging
The hand crank generates power manually, useful when other power sources are unavailable.
- Unfold the hand crank (3) from the back of the radio.
- Rotate the crank clockwise or counter-clockwise at a steady pace (approximately 120-150 RPM) for 3-5 minutes to generate sufficient power for short-term use.
4.4 AAA Battery Backup
For extended power backup, three AAA batteries (not included) can be installed.
- Open the battery compartment (2) on the side of the radio.
- Insert 3 x AAA batteries, ensuring correct polarity (+/-).
- Close the battery compartment securely.

Image 4.1: The radio's diverse power sources, including hand crank, solar panel, USB-C input, and AAA battery compartment.
5. Operating the Radio
5.1 Power On/Off
- Press the POWER/MODE button (7) to turn the radio on or off.
5.2 Radio Modes (AM/FM/SW/NOAA Weather Band)
- With the radio on, press the POWER/MODE button (7) repeatedly to cycle through available bands: FM, AM, SW (Shortwave), and WB (Weather Band).
- Extend the antenna (1) for improved reception, especially for FM, SW, and WB.
5.3 Tuning and Volume
- Tuning: Use the TUNE+ and TUNE- buttons (7) to manually adjust the frequency. Press and hold to auto-scan for the next available station.
- Volume: Use the VOLUME+ and VOLUME- buttons (7) to adjust the audio level.
- Scan: Press the SCAN button (7) to automatically scan and store available stations.
- Time/Preset: Use the TIME/PRESET button (7) to set the time or recall stored stations.
5.4 NOAA Weather Alert
The NOAA Weather Band (WB) provides continuous weather broadcasts and emergency alerts.
- Switch to WB mode using the POWER/MODE button.
- Tune to the local NOAA weather channel for your area. The radio will automatically alert you to severe weather warnings.

Image 5.1: The radio's display showing NOAA weather band frequency, indicating its readiness for emergency alerts.
5.5 Bluetooth Speaker Function
The radio can connect to a Bluetooth-enabled device to play audio.
- Ensure the radio is powered on.
- Switch to Bluetooth mode (indicated on the digital display).
- On your external device, search for Bluetooth devices and select "SIYEGK Radio" (or similar name).
- Once paired, audio from your device will play through the radio's speaker.
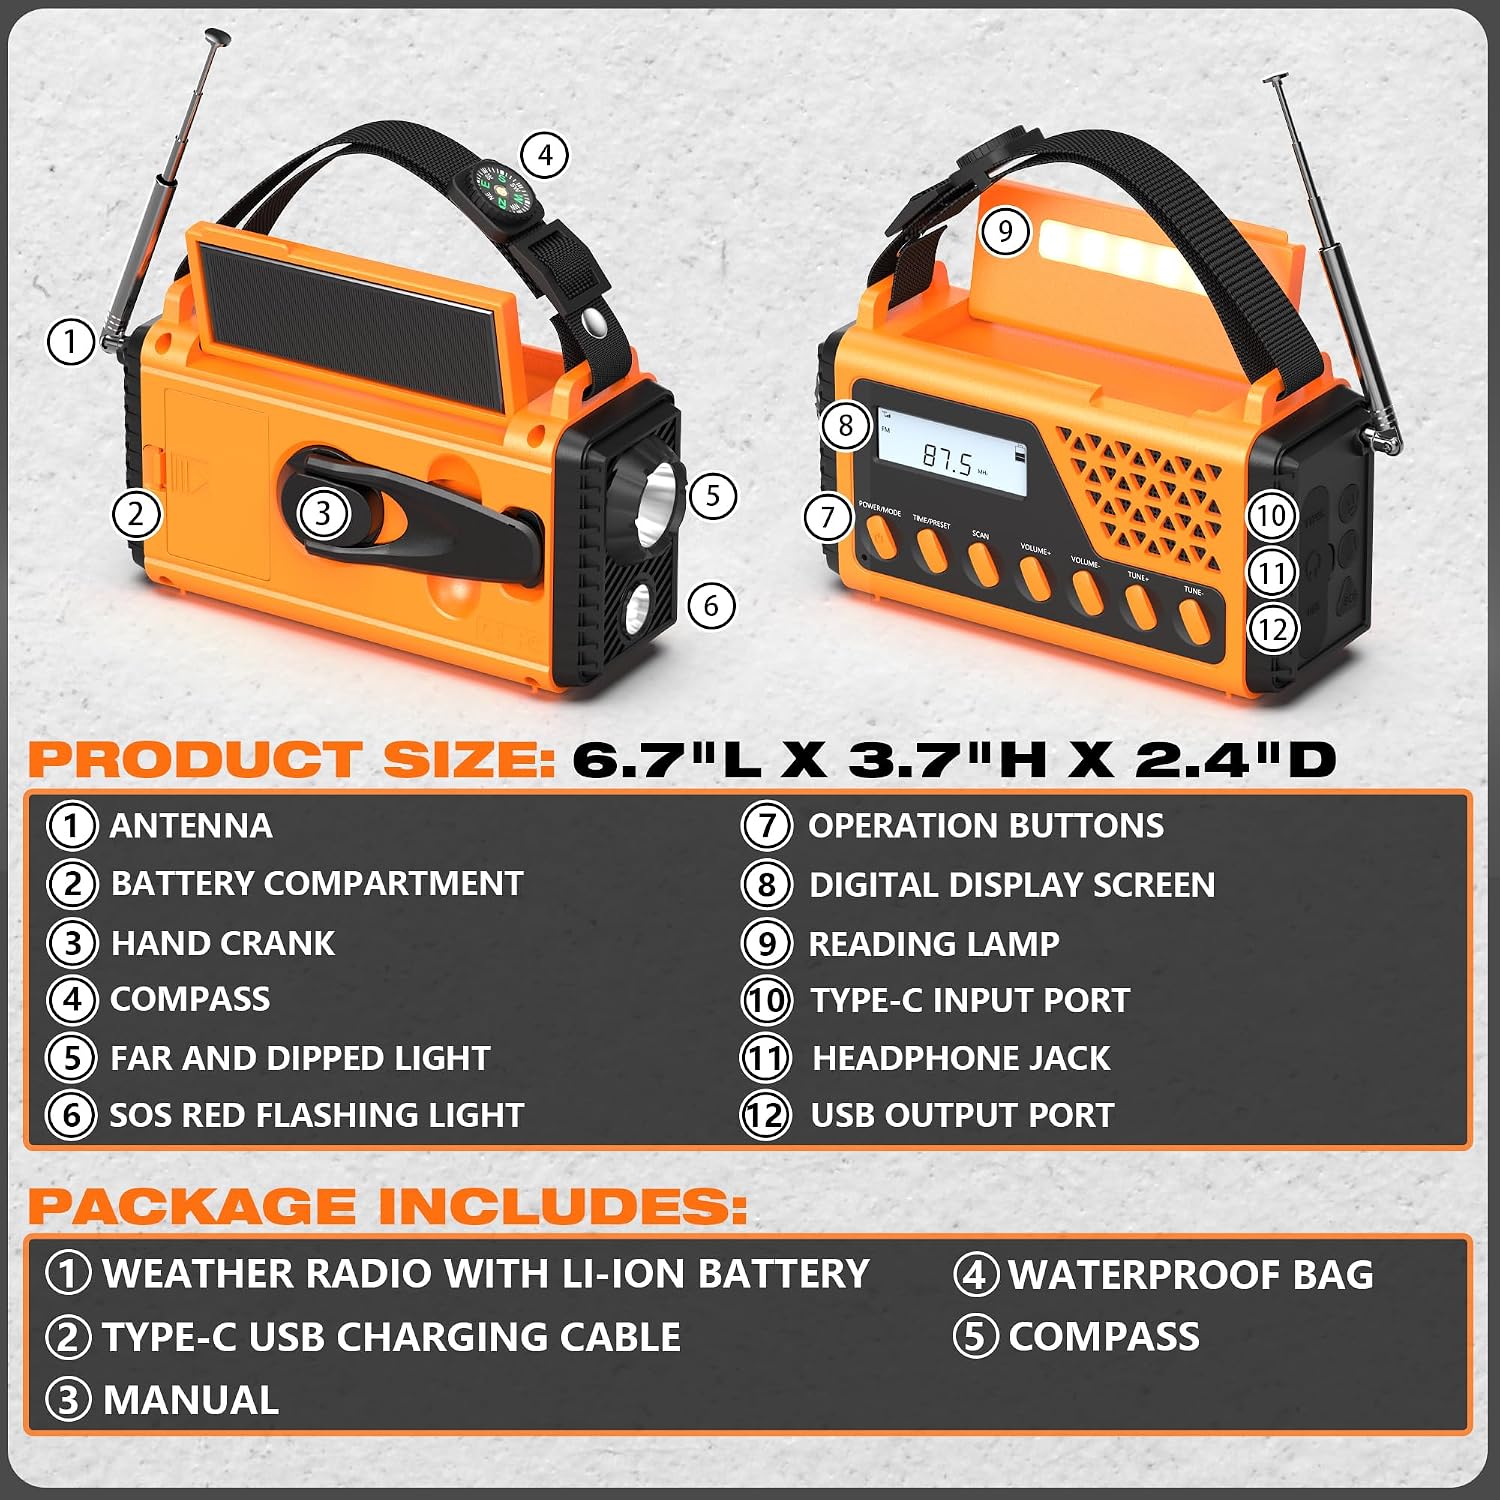
Image 5.2: Detailed view of the radio's control panel and ports, including the LCD display and operation buttons.
6. Lighting Functions
The radio includes multiple lighting options for various situations.
6.1 Torch Light (Flashlight)
- Press the dedicated flashlight button (usually located near the light source) to activate the front-facing torch light (5).
- Press again to cycle through different brightness modes or turn off.
6.2 Reading Lamp
- Lift the solar panel to reveal the reading lamp (9).
- Press the reading lamp button to turn it on or off.
6.3 SOS Strobe Light
- The red flashing light (6) activates automatically when the SOS alarm is triggered.

Image 6.1: The radio demonstrating its multiple lighting capabilities, including a powerful torch, a reading lamp, and an SOS strobe.
7. Emergency Features
7.1 SOS Alarm
The SOS alarm emits a loud siren and activates the red flashing light to signal for help.
- Press and hold the SOS button (usually located near the USB ports) to activate the alarm.
- Press the SOS button again to deactivate it.

Image 7.1: The radio's SOS alarm in operation, featuring a bright light and audible signal for emergency situations.
7.2 Power Bank Function (Charging External Devices)
The radio's internal 10000mAh battery can be used to charge external USB-powered devices.
- Connect your device's charging cable to the radio's USB Output Port (12).
- The radio will begin charging your device.
7.3 Compass
A mini compass (4) is integrated into the radio's strap for basic directional guidance.
8. Maintenance
8.1 General Care
- Keep the radio dry and clean. Avoid exposure to extreme temperatures or direct moisture.
- Clean the exterior with a soft, damp cloth. Do not use harsh chemicals or abrasive cleaners.
- Store the radio in a cool, dry place when not in use.
8.2 Battery Care
- For optimal battery life, fully charge the internal Li-ion battery at least once every three months if not in regular use.
- Remove AAA batteries if the radio will not be used for an extended period to prevent leakage.
9. Troubleshooting
If you encounter issues with your radio, refer to the following common problems and solutions:
| Problem | Possible Cause | Solution |
|---|---|---|
| Radio does not power on. | Low battery; internal battery depleted. | Charge the radio via USB-C, solar, or hand crank. Ensure AAA batteries are installed correctly if using as backup. |
| Poor radio reception. | Antenna not extended; weak signal area. | Fully extend the antenna. Reposition the radio for better signal. Use auto-scan to find stronger stations. |
| External device not charging. | Radio battery low; incorrect cable; device not compatible. | Ensure the radio has sufficient charge. Use the correct USB cable for your device. Verify device compatibility. |
| SOS alarm not working. | Button not pressed correctly; low battery. | Press and hold the SOS button firmly. Ensure the radio has adequate power. |
| Bluetooth pairing failure. | Radio not in Bluetooth mode; device too far. | Switch the radio to Bluetooth mode. Ensure your device's Bluetooth is on and within range. |
10. Specifications
| Feature | Detail |
|---|---|
| Model | B0CH831PKV |
| Dimensions (L x W x H) | 6.65 x 2.3 x 3.7 inches (16.9 x 5.8 x 9.4 cm) |
| Weight | 1.4 pounds (0.64 kg) |
| Battery Type | 10000mAh Built-in Lithium-Ion (rechargeable) |
| Backup Battery | 3 x AAA batteries (not included) |
| Charging Methods | USB Type-C, Solar Panel, Hand Crank |
| Radio Bands | AM, FM, SW, NOAA Weather Band (WB) |
| Connectivity | Bluetooth, USB (for charging external devices) |
| Special Features | Built-In Flashlight, Reading Lamp, SOS Alarm, Compass |
| Material | Plastic |
| Color | Orange |
11. Warranty and Support
SIYEGK provides the following support for your product:
- Online Service: 7 x 24 Hours Online Service.
- Replacement Service: 6 Months Replacement Service.
- After-sales Service: Lifetime After-sales Service.
For any questions or assistance, please contact SIYEGK customer support.


