1. Introduction
This manual provides comprehensive instructions for the waveshare RS232/485 to WiFi and Ethernet Converter, Model UART-WIFI232-B2. This device is an industrial-grade data acquisition and IoT gateway, integrating multiple functionalities such as serial server, Modbus gateway, MQTT gateway, and serial port to HTTPD Client. It facilitates seamless communication between serial devices and network environments (WiFi and Ethernet).
The converter supports various communication methods, including serial port to WiFi, serial port to Ethernet, and Ethernet to WiFi, making it a versatile solution for industrial automation and IoT applications.
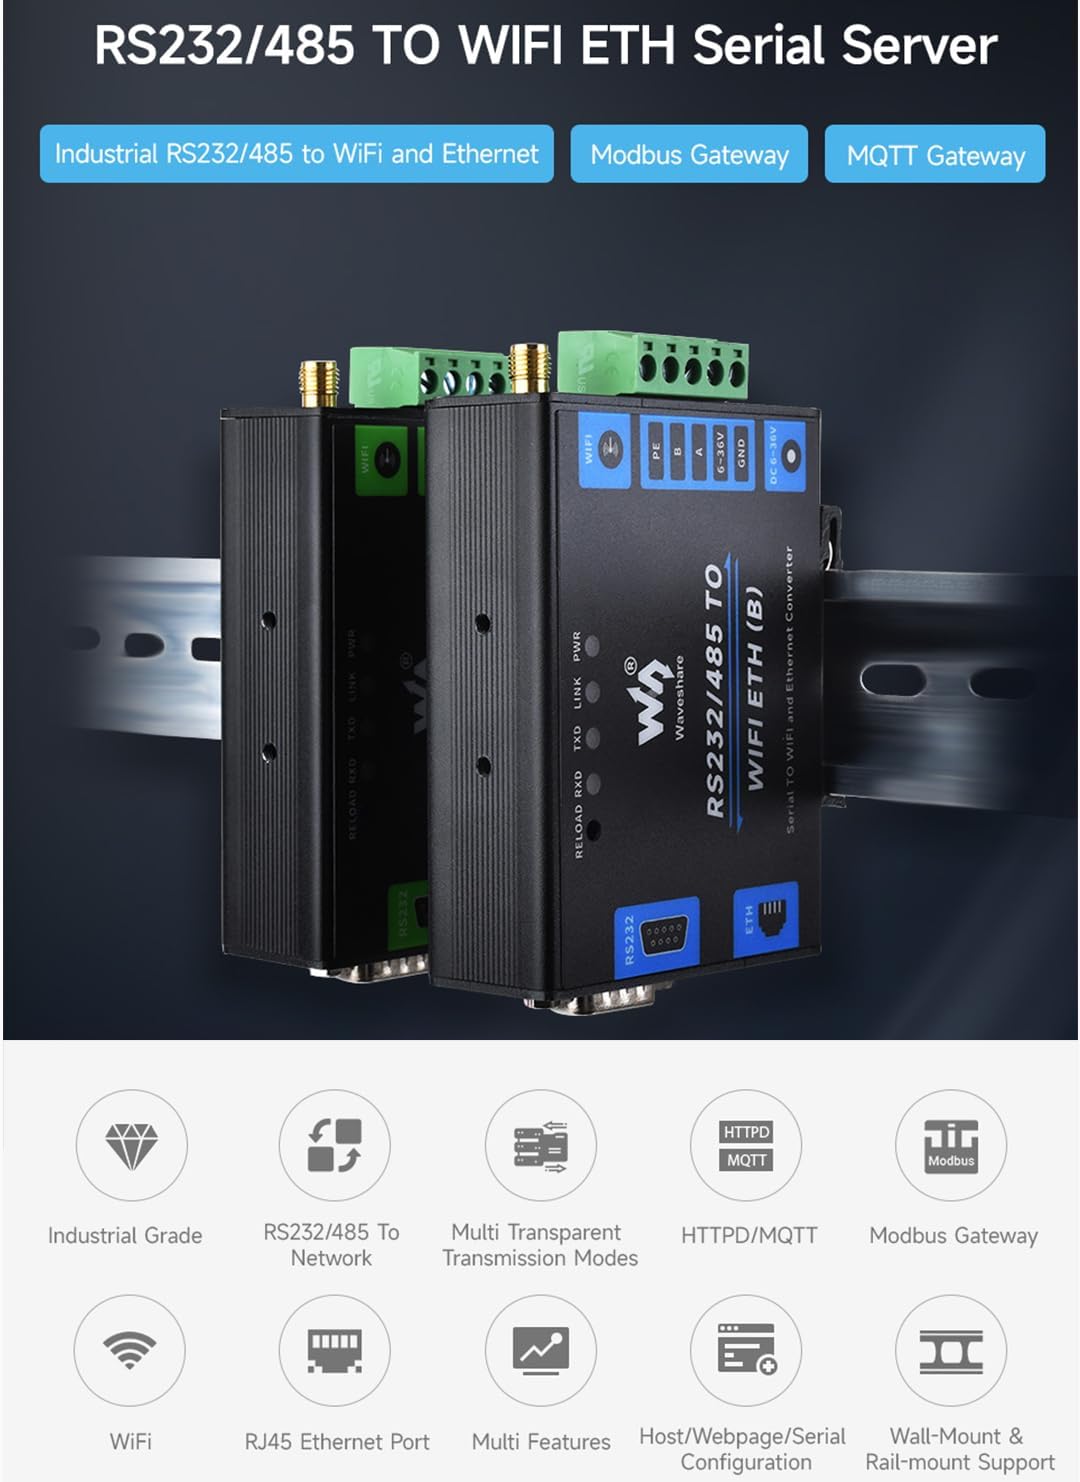
Figure 1.1: Overview of the waveshare RS232/485 to WiFi and Ethernet Converter highlighting its industrial grade, RS232/485 to network, multi-transparent transmission modes, HTTPD/MQTT, Modbus Gateway, WiFi, RJ45 Ethernet Port, multi-features, and wall/rail-mount support.
2. Safety Information
- Ensure the power supply voltage (DC 6~36V) is within the specified range to prevent damage to the device.
- Do not expose the device to extreme temperatures, humidity, or corrosive environments.
- Avoid physical shock or dropping the device.
- Disconnect power before performing any maintenance or connection changes.
- Only use the provided accessories or recommended replacements.
- This device is designed for industrial environments; handle with care and follow standard electrical safety procedures.
3. Package Contents
Verify that all items are present in the package:
- RS232/485 TO WIFI ETH (B) Converter x1
- 2.4G WiFi antenna x1
- Rail-mount buckle x1
- Screwdriver x1
- Screws pack x1

Figure 3.1: The RS232/485 to WiFi and Ethernet Converter along with its accessories: screwdriver, screws, rail-mount buckle, and 2.4G WiFi antenna.
4. Product Overview and Interface Introduction
The device features multiple interfaces for power, serial communication, and network connectivity. Understanding these interfaces is crucial for proper setup and operation.

Figure 4.1: Detailed view of the converter's interfaces, including the RS232 DB9 port, RJ45 Ethernet port (PoE optional on other models), DC Power Port, 6-36V Power Input screw terminal (A, B, Signal Ground), and WiFi Antenna Connector.
4.1. Interfaces
- RS232 Port: Standard DB9 male connector for RS232 serial communication.
- RS485 Terminal: Screw terminals (A, B, GND) for RS485 serial communication.
- Ethernet Port: RJ45 connector for 10/100M auto-negotiation Ethernet.
- WiFi Antenna Connector: SMA connector for the included 2.4G WiFi antenna.
- Power Input: DC 5.5 power port and screw terminal for DC 6~36V power supply.
- LED Indicators: RELOAD, RXD, TXD, LINK, PWR for status indication.
4.2. RS232 Pinout Definition
| DB9 Male (PIN) | RS232 PIN |
|---|---|
| 2 | RXD |
| 3 | TXD |
| 5 | GND |
| 1, 4, 6, 7, 8, 9 | N/C |
5. Setup
5.1. Hardware Connection
- Attach WiFi Antenna: Screw the provided 2.4G WiFi antenna onto the SMA connector on the device.
- Power Supply: Connect a DC 6~36V power supply to either the DC 5.5 power port or the screw terminal (PE, B, A, 6-36V, GND). Ensure correct polarity for the screw terminal.
- Ethernet Connection (Optional): Connect an Ethernet cable from your network router or switch to the RJ45 Ethernet port on the device.
- Serial Device Connection:
- For RS232: Connect your RS232 serial device to the DB9 port.
- For RS485: Connect your RS485 serial device to the A, B, and GND terminals.
- Mounting (Optional): Use the rail-mount buckle and screws to mount the device on a DIN rail or wall as needed.

Figure 5.1: The converter supports multiple power supply methods, including a DC 5.5 power port and a screw terminal for 6-36V DC input.
5.2. Initial Network Configuration
Upon first power-up, the device typically boots in Access Point (AP) mode, allowing direct connection for initial configuration.
- Connect to AP: On your computer or mobile device, search for available WiFi networks. The device will broadcast an SSID (e.g., "waveshare_XXXX"). Connect to this network.
- Access Web Interface: Open a web browser and navigate to the default IP address (refer to the product documentation or quick start guide for the specific IP, commonly 192.168.1.1).
- Login: Enter the default username and password (usually "admin" for both, or as specified in documentation).
- Configure Network Settings: Within the web interface, configure the desired operating mode (STA, AP+STA, etc.), WiFi credentials (SSID, password for STA mode), and Ethernet settings if applicable.
- Save and Reboot: Save your settings and reboot the device for changes to take effect.
6. Operating Modes
The converter supports various operating modes to suit different application requirements:
6.1. Wireless Networking Modes
- AP Mode (Access Point): The device acts as a WiFi hotspot, allowing other WiFi-enabled devices to connect to it directly. This is often the default mode for initial setup.
- STA Mode (Station): The device connects to an existing WiFi network (e.g., your home or industrial WiFi router) as a client.
- AP+STA Mode: The device functions as both an Access Point and a Station simultaneously, allowing local devices to connect to it while it also connects to an external WiFi network.

Figure 6.1: Visual representation of the three primary wireless networking modes: AP mode (device as hotspot), STA mode (device as client to existing network), and AP+STA mode (device as both hotspot and client).
6.2. Communication Methods
- Transparent Transmission Mode:
- TCP Server: The device listens for incoming TCP connections from clients.
- TCP Client: The device initiates a TCP connection to a remote TCP server.
- UDP Server: The device listens for incoming UDP packets.
- UDP Client: The device sends UDP packets to a specified remote host and port.
- Serial Command Mode: Allows control and configuration via serial AT commands.
- HTTPD Client: Enables the device to send serial data to a web server via HTTP requests.
- Modbus TCP to Modbus RTU: Functions as a Modbus gateway, converting Modbus TCP requests from the network to Modbus RTU commands for serial devices, and vice-versa.
- MQTT Gateway: Supports MQTT protocol for IoT cloud integration, allowing serial data to be published to MQTT brokers.
7. Configuration
The device can be configured using multiple methods:
7.1. Web Browser Configuration
This is the recommended method for comprehensive configuration.
- Ensure the device is powered on and connected to your network (either via AP mode or STA mode).
- Open a web browser and enter the device's IP address (default or assigned by DHCP).
- Log in with the correct credentials.
- Navigate through the web interface to configure network settings (WiFi, Ethernet), serial port parameters (baud rate, parity, data bits), operating modes, and advanced features like Modbus or MQTT.
- Always save changes and reboot the device when prompted.
7.2. Serial AT Command Configuration
For advanced users or automated setup, the device supports configuration via AT commands sent through the serial port.
- Connect a computer to the device's RS232 or RS485 port using a serial cable.
- Use a serial terminal program (e.g., PuTTY, Tera Term) with the correct serial port settings (baud rate, data bits, parity, stop bits).
- Send AT commands to query status or set parameters. Refer to the detailed AT command set documentation available from waveshare for specific commands and syntax.
7.3. Host Configuration Tool
Waveshare may provide a dedicated host configuration tool (software) for Windows or other operating systems. This tool simplifies the configuration process with a graphical user interface.
- Download and install the latest version of the configuration tool from the official waveshare website.
- Connect the device to your computer's network.
- Launch the tool and follow the on-screen instructions to discover and configure the device.
8. Specifications
Detailed technical specifications for the waveshare RS232/485 to WiFi and Ethernet Converter:
8.1. General
- Power Supply: DC 6~36V
- Power Supply Method: DC 5.5 power port, screw terminal
- Dimensions (L × W × H): 84.00 × 64.00 × 24.00mm
- Item Weight: 3.52 ounces

Figure 8.1: Outline dimensions of the converter, showing measurements of 84.00mm length, 64.00mm width, and 24.00mm height. Note: Dimensions are approximate and may have slight variations.
8.2. Communication
- Ethernet: 10 / 100M auto-negotiation RJ45 connector
- WIFI: 802.11b/g/n compliant
- Serial Port: RS232 (ESD/EFT), RS485 (ESD/EFT/surge protection)
8.3. Wireless Specification
- Frequency Band: 2.412 ~ 2.484 GHz
- Wireless Network: Station / AP / AP+Station Mode
- Security Mechanism: WPA-PSK / WPA2-PSK
- Encryption Type: TKIP / AES
- Transmitting Power:
- 802.11b: +19dBm (Max.@11Mbps)
- 802.11g: +18dBm (Max.@54Mbps)
- 802.11n: +17dBm (Max.@HT20, MCS7); +17dBm (Max.@HT40, MCS7)
- Receiving Sensitivity:
- 802.11b: -89dBm (@11Mbps)
- 802.11g: -81dBm (@54Mbps)
- 802.11n: -73dBm (@HT20, MCS7); -71dBm (@HT40, MCS7)
8.4. Serial Specification
- Baudrate: 300 ~ 460800 bps
- Parity Bit: none, odd, even, mark, space
- Data Bit: 5 ~ 9 bits
8.5. Software
- Protocol: TCP / UDP / ARP / ICMP / DHCP / DNS / HTTP / MQTT
- Configuration: Host, Web browser, Serial AT command
- Communication Method: TCP/IP direct communication, VCOM
- Operating Mode: Transparent transmission, serial command, HTTPD Client, Modbus TCP to Modbus RTU
8.6. Environment Requirement
- Operating Temperature: -40℃ ~ 85℃
- Humidity Range: 5% ~ 95% relative humidity
9. Maintenance
- Cleaning: Use a soft, dry cloth to clean the device. Do not use liquid cleaners or aerosols.
- Firmware Updates: Periodically check the official waveshare website for firmware updates. Updating firmware can improve performance, add features, or fix bugs. Follow the provided instructions carefully during updates.
- Environmental Conditions: Ensure the device operates within the specified temperature and humidity ranges to prolong its lifespan.
- Cable Connections: Regularly inspect all cable connections (power, Ethernet, serial) to ensure they are secure and free from damage.
10. Troubleshooting
| Problem | Possible Cause & Solution |
|---|---|
| Device not powering on |
|
| Cannot connect to WiFi AP (Access Point) |
|
| Cannot access web interface |
|
| Serial communication issues |
|
| Network connection unstable |
|
11. Warranty and Support
For warranty information, please refer to the warranty policy provided with your purchase or visit the official waveshare website. Waveshare products typically come with a standard manufacturer's warranty covering defects in materials and workmanship.
For technical support, troubleshooting assistance, or to access the latest documentation and software, please visit the waveshare official website or contact their customer support team. Online development resources are available at bit.ly/3L6Bk6m.
When contacting support, please have your product model number (UART-WIFI232-B2) and a detailed description of the issue ready.


