
Introduction
The SPW Rain Bird TBOS-BT1LT is a 9V battery-operated irrigation controller designed for commercial-level irrigation control. It offers convenient programming and adjustment via a smartphone using the free Rain Bird mobile application. This controller is ideal for locations without AC power, such as street medians, highway roundabouts, and other remote areas. Its robust, vandal-proof, and IP-68 rated waterproof casing ensures reliable operation in various environments, including high-traffic areas and submerged conditions.
This manual provides essential information for the setup, operation, maintenance, and troubleshooting of your TBOS-BT1LT controller.
Setup and Installation
1. Unpacking and Inspection
Carefully remove the controller from its packaging. Inspect the unit for any signs of damage. Ensure all components are present.
2. Battery Installation
The TBOS-BT1LT requires one 9V battery for operation. The battery is included with the unit.
- Locate the battery compartment on the controller.
- Open the compartment cover.
- Insert a fresh 9V alkaline battery, ensuring correct polarity.
- Securely close the battery compartment cover to maintain the IP-68 waterproof rating.
3. Physical Installation
The controller is designed for outdoor installation, often within a valve box or similar enclosure, especially in areas without AC power.

Image: Front view of the Rain Bird TBOS-BT1LT Bluetooth Irrigation Controller. This image shows the compact design and the blue cap for the battery compartment.
- Choose a suitable location for installation, preferably within a valve box to protect it from environmental elements and vandalism.
- Connect the controller's wires to the irrigation valve(s) according to the wiring diagram provided with your irrigation system. The TBOS-BT1LT is a single-station controller.
- Ensure all wire connections are secure and waterproof.
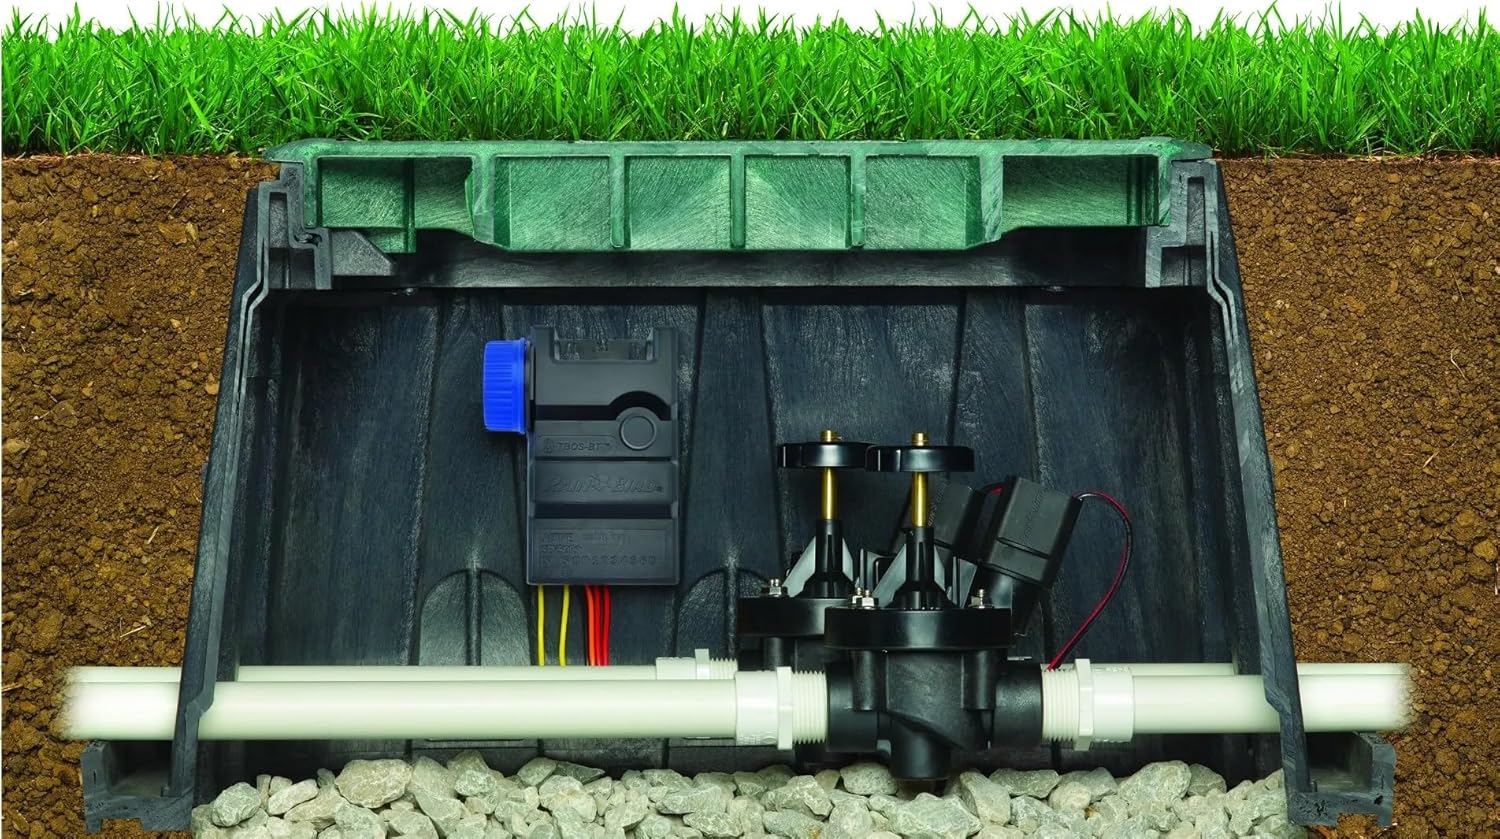
Image: The Rain Bird TBOS-BT1LT controller installed inside a typical underground irrigation valve box, connected to a valve. This illustrates a common installation scenario.
4. App Download and Connection
The controller is programmed exclusively via the Rain Bird mobile app.
- Download the free Rain Bird mobile app from your device's app store (iOS App Store or Google Play Store).
- Enable Bluetooth on your smartphone.
- Open the Rain Bird app and follow the on-screen instructions to discover and connect to your TBOS-BT1LT controller. You may need to be in close proximity to the controller for initial pairing.
- Once connected, you can customize the controller and station names within the app for easier identification.
Operating Instructions
All programming and operational adjustments for the TBOS-BT1LT are performed through the Rain Bird mobile application.
1. Programming Irrigation Schedules
- Within the Rain Bird app, select your connected TBOS-BT1LT controller.
- Navigate to the "Programs" or "Schedules" section.
- Create new programs with multiple start times as needed.
- Set watering durations for the connected station.
- Utilize the seasonal adjust feature to automatically modify watering times based on local weather conditions or seasonal changes.
2. Manual Irrigation Mode
The app allows for manual operation of the irrigation station.
- From the app's main screen for your controller, locate the "Manual" or "Run Now" option.
- Specify the desired duration for manual watering.
- Confirm to start manual irrigation. The station will run for the set time and then automatically shut off.
3. Language Settings
The user interface of the Rain Bird app is available in multiple languages, including English, French, Spanish, Portuguese, German, Italian, Turkish, Russian, Chinese, Japanese, and Arabic. Language settings are typically managed through your smartphone's system language settings or within the app's general settings.
Maintenance
1. Battery Replacement
The 9V battery should be replaced annually or when the app indicates a low battery level to ensure continuous operation. Use a high-quality alkaline 9V battery.
- Access the battery compartment.
- Remove the old battery.
- Insert a new 9V battery, observing polarity.
- Securely close the compartment cover.
2. General Care
Periodically check the controller and its wiring for any signs of wear or damage. Ensure the valve box (if used) is clear of debris to prevent obstruction or water accumulation around the controller.
Troubleshooting
| Problem | Possible Cause | Solution |
|---|---|---|
| Controller not connecting via Bluetooth |
|
|
| Station not watering |
|
|
| App displays "Controller Offline" |
|
|
Specifications
| Feature | Detail |
|---|---|
| Model Number | TBOS-BT1LT |
| Power Source | 1 x 9V Battery (included) |
| Control Method | Bluetooth via Rain Bird Mobile App |
| Number of Stations | 1 |
| Waterproof Rating | IP-68 |
| Material | Plastic |
| Product Dimensions | 2 x 3.8 x 5.1 inches |
| Item Weight | 1.1 pounds |
| Display Type | No Display (App-controlled) |
| Compatibility | Not compatible with TBOS-II Field Transmitter |
Warranty and Support
For warranty information and technical support, please refer to the official Rain Bird website or contact their customer service. Details regarding specific warranty periods and terms are typically provided with the product packaging or on the manufacturer's official support pages.
You can also find additional resources and FAQs within the Rain Bird mobile application or by visiting the Rain Bird official website.