1. Product Overview
The Vabches Coffee Table is designed to enhance your living space with its farmhouse and industrial aesthetic. It features integrated LED lighting, convenient sliding barn doors for storage, and adjustable glass shelves.

Image: Front view of the Vabches Coffee Table, showcasing its design, LED lighting, and sliding barn doors.
Key Features:
- Sliding Barn Doors: Offers concealed storage for personal items.
- LED Lights: Over 20 color options with remote control for adjustable brightness and dynamic modes.
- Adjustable Glass Shelves: Three removable and height-adjustable glass shelves for versatile storage.
- Durable Construction: Made from engineered wood with a rustic wash grey finish.
2. Safety Information
Please read and understand all safety warnings and assembly instructions before beginning assembly and using this product. Failure to follow these instructions may result in injury or product damage.
- Keep all small parts and packaging materials away from children.
- Assemble the product on a soft, clean surface to prevent scratches.
- Ensure all connections are securely tightened before use. Periodically check and re-tighten as necessary.
- Do not overload shelves or the tabletop. Refer to specifications for weight limits.
- Avoid placing hot items directly on the surface without protection.
- Do not stand or climb on the coffee table.
- Use only the provided LED light components. Do not modify the electrical system.
3. Setup and Assembly
Assembly is required for this coffee table. It is recommended to have two people for assembly. Please ensure all parts are present before starting.
3.1 Package Contents
Verify that all components listed in the assembly guide (included in the package) are present and undamaged. Each part is typically labeled for easy identification.
3.2 Tools Required
- Phillips Head Screwdriver (recommended)
- Hammer (optional, for dowels)
3.3 Assembly Steps
- Unpack and Identify Parts: Carefully remove all components from the packaging. Lay them out on a clean, soft surface. Match each part to the corresponding label in the assembly guide.
- Assemble the Base Frame: Connect the side panels to the bottom base using the provided hardware (dowels, screws, cam locks). Ensure all connections are snug.
- Install Inner Dividers and Back Panel: Attach the central divider and any back panels according to the instructions.
- Attach the Top Panel: Secure the tabletop to the assembled frame using the appropriate fasteners.
- Install Sliding Door Tracks: Mount the upper and lower tracks for the barn doors.
- Assemble Sliding Barn Doors: Construct the barn doors, including the mesh inserts and handles.
- Insert Sliding Barn Doors: Carefully place the assembled barn doors onto their tracks. Test their smooth operation.
- Install Glass Shelves: Place the adjustable glass shelves into the designated slots. Adjust their height as desired.
- Connect LED Lighting: Install the LED light strips in the designated areas. Connect the power cable and remote receiver.
- Final Check: Ensure all screws are tightened and the table is stable.

Image: Close-up view of the sliding barn door mechanism, showing the track and door handle.

Image: Diagram illustrating the adjustable and removable glass shelves within the coffee table compartments.
4. Operating Instructions
4.1 Sliding Barn Doors
To access the storage compartments, gently slide the barn doors along their tracks. The doors can be positioned to cover any section of the storage area.
4.2 LED Lighting System
The coffee table includes an integrated LED lighting system controlled by a remote. Ensure the LED power cable is connected to a USB power source (e.g., a USB wall adapter, not included).
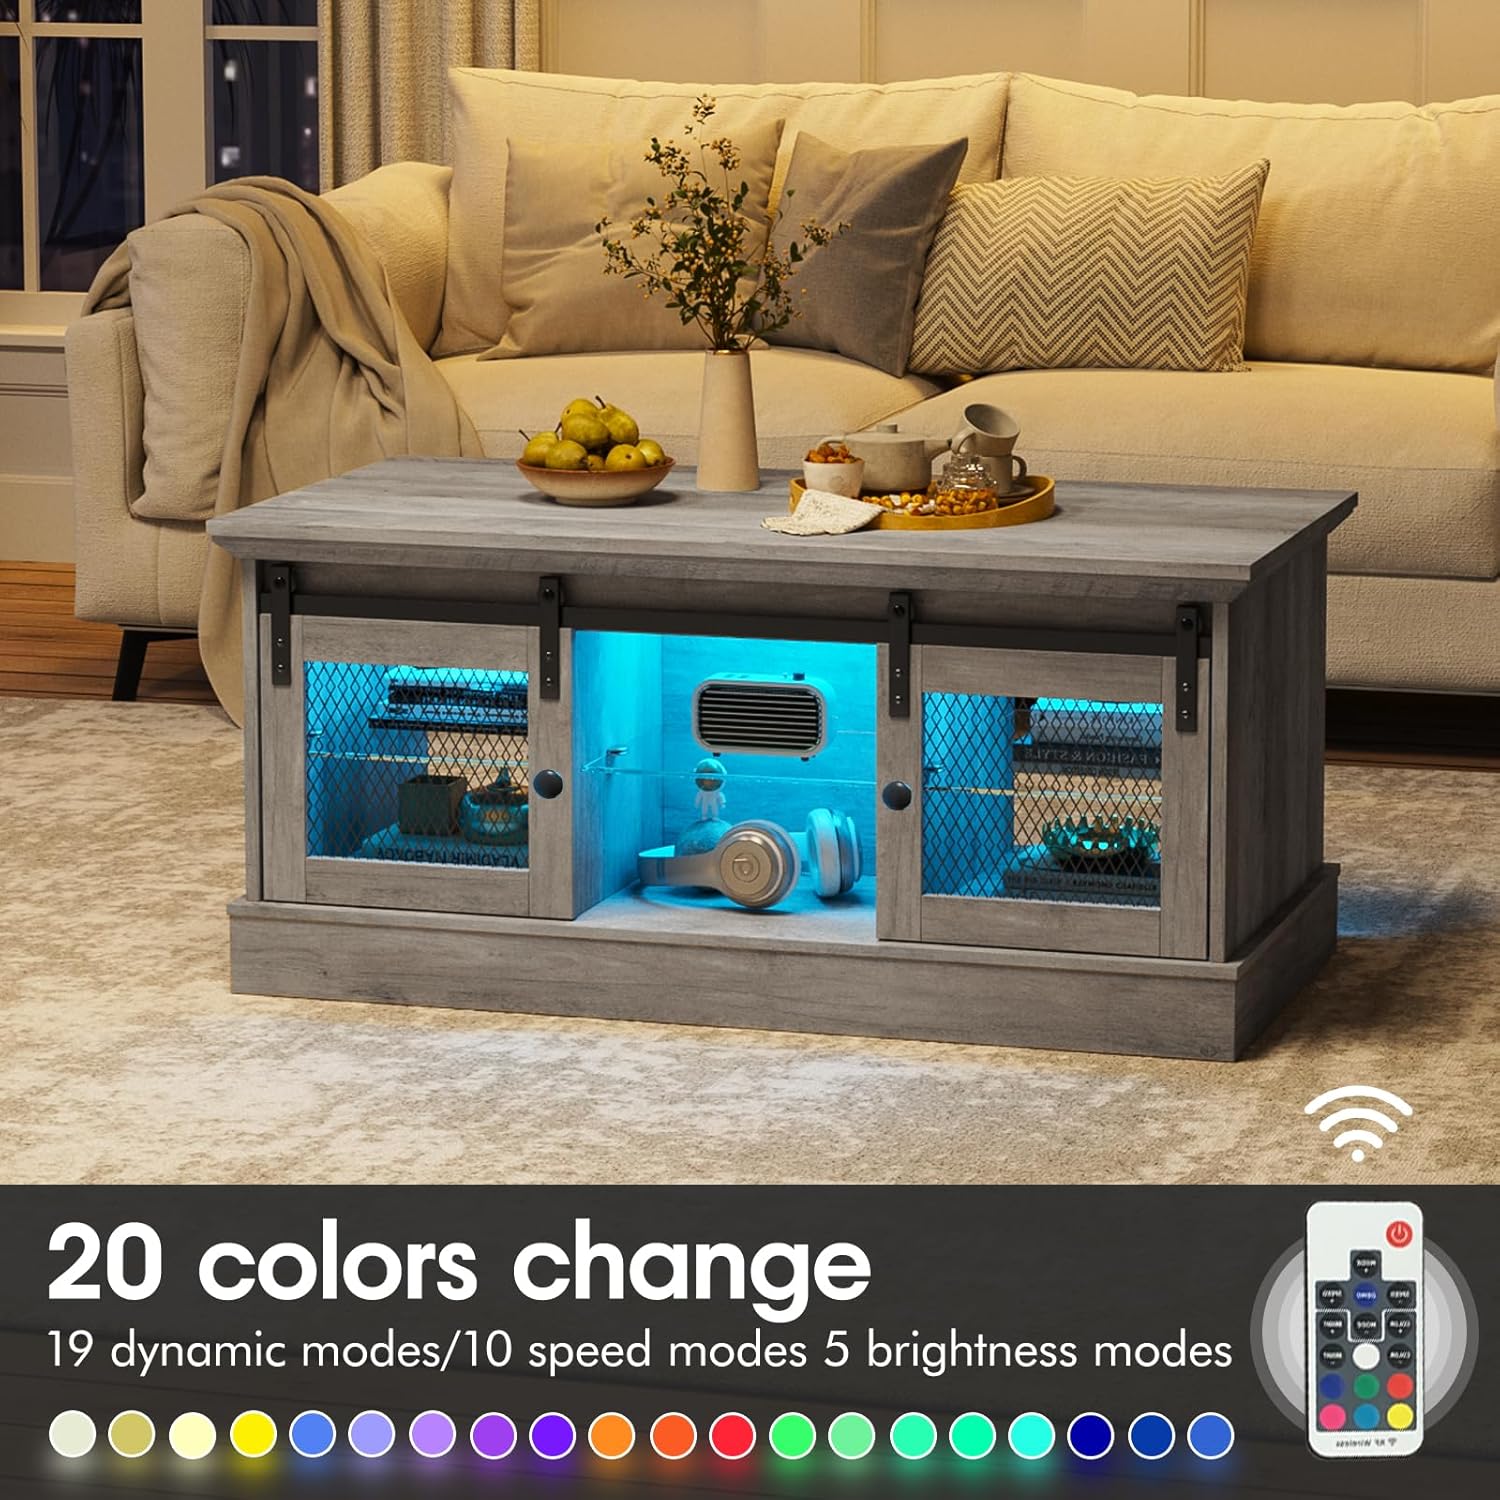
Image: The coffee table illuminated by LED lights, with an image of the remote control and various color options displayed below.
- Power On/Off: Press the power button on the remote to turn the lights on or off.
- Color Selection: Use the color buttons on the remote to choose from over 20 static colors.
- Brightness Adjustment: Use the brightness up/down buttons to adjust the intensity of the lights.
- Dynamic Modes: Select from 19 dynamic modes (e.g., flash, strobe, fade, smooth) for various lighting effects.
- Speed Adjustment: For dynamic modes, use the speed up/down buttons to control the transition speed.
4.3 Adjustable Shelves
The glass shelves can be removed or repositioned to accommodate items of different heights. To adjust, carefully lift the shelf and place it into a different set of support pins. Ensure the shelf is stable before placing items on it.
5. Maintenance and Care
- Cleaning: Wipe the wood surfaces with a soft, damp cloth. Avoid harsh chemicals or abrasive cleaners. For glass shelves, use a standard glass cleaner.
- Spills: Clean spills immediately to prevent staining, especially on the wash grey finish.
- Dusting: Regularly dust all surfaces with a dry, soft cloth.
- Hardware Check: Periodically check all screws and fasteners to ensure they remain tight. Re-tighten if necessary.
- LED Lights: If LED lights malfunction, ensure the USB power connection is secure. Do not attempt to repair the LED strip yourself; contact customer support.
6. Troubleshooting
| Problem | Possible Cause | Solution |
|---|---|---|
| LED lights do not turn on. |
|
|
| Sliding doors stick or do not move smoothly. |
|
|
| Table feels unstable or wobbly. |
|
|
7. Specifications

Image: Diagram showing the detailed dimensions of the Vabches Coffee Table.
| Feature | Detail |
|---|---|
| Brand | Vabches |
| Model Number | B0CGXFY158 |
| Product Dimensions (D x W x H) | 19.8"D x 40.9"W x 18.7"H |
| Frame Material | Engineered Wood |
| Top Material Type | Engineered Wood |
| Color | Wash Grey |
| Style | Farmhouse, Industrial |
| Assembly Required | Yes |
| Indoor/Outdoor Usage | Indoor |
| Included Components | Assembly Guide |
8. Warranty and Support
For warranty information or customer support, please refer to the documentation included with your product or contact Vabches customer service directly. Please have your model number (B0CGXFY158) available when contacting support.
For further assistance, you may visit the Vabches Store on Amazon.


