1. Introduction
Thank you for choosing the ANCTOR King Bed Frame with Charging Station. This manual provides essential information for the safe assembly, operation, and maintenance of your new bed frame. Please read these instructions carefully before assembly and retain them for future reference.

Image 1.1: The ANCTOR King Bed Frame with Charging Station, showcasing its design and integrated features in a bedroom environment.
2. Safety Information
To ensure safe use of this product, please observe the following precautions:
- Keep all small parts and packaging materials away from children and pets to prevent choking hazards.
- Assemble the bed frame on a soft, clean surface (e.g., carpet) to prevent scratches or damage.
- Ensure all bolts and screws are securely tightened before use. Periodically check and re-tighten as necessary.
- Do not exceed the maximum weight capacity of the bed frame.
- For electrical components (charging station), ensure the power cord is not pinched or damaged. Do not overload the outlets.
- Use only in dry indoor environments. Avoid exposure to moisture or direct sunlight.
- Two people are recommended for assembly to ensure safety and ease of installation.
3. Package Contents
Before beginning assembly, verify that all parts are present and undamaged. If any parts are missing or damaged, please contact ANCTOR customer support.
- Headboard with integrated charging station and storage
- Side rails (left and right)
- Footboard
- Support legs
- Wooden slats and support beams
- Assembly hardware (bolts, screws, washers, Allen wrench)
- Instruction manual
4. Assembly Instructions
Assembly typically requires two adults and takes approximately 2-3 hours. Follow the numbered steps provided in the included assembly guide. Ensure all parts are correctly oriented before tightening screws.
- Unpack all components and lay them out on a clean, soft surface.
- Attach the side rails to the headboard and footboard using the provided hardware. Do not fully tighten bolts until all major components are connected.
- Install the central support beam and its legs.
- Place the wooden slats onto the bed frame. Ensure the Velcro fixings align and secure the slats.
- Once all components are in place, fully tighten all bolts and screws.
- Connect the charging station power cord to a wall outlet.

Image 4.1: Detailed diagram illustrating the dimensions and key structural elements of the King size bed frame, including the headboard, side rails, and slat system.

Image 4.2: Illustration of the robust frame structure, highlighting the easy installation, noise-free design, and strong wooden slats that provide mattress support.
5. Operating Instructions
5.1. Charging Station
The integrated charging station in the headboard provides convenient power access for your electronic devices.
- It features two standard 110V/12A AC outlets and two 5V/2A USB ports.
- To use, ensure the bed frame's power cord is securely plugged into a functional wall outlet.
- Plug your devices directly into the available outlets or USB ports.

Image 5.1: A detailed view of the built-in charging station, showing the two AC outlets and two USB ports, along with their power specifications and the 5-foot power cord.
5.2. Storage Headboard
The headboard offers both open shelving and hidden storage compartments.
- The tiered shelf provides an accessible space for items like phones, books, or decorative objects.
- The hidden storage compartment can be accessed by lifting a section of the headboard, offering discreet storage for personal belongings. A back cover prevents items from falling behind the bed.
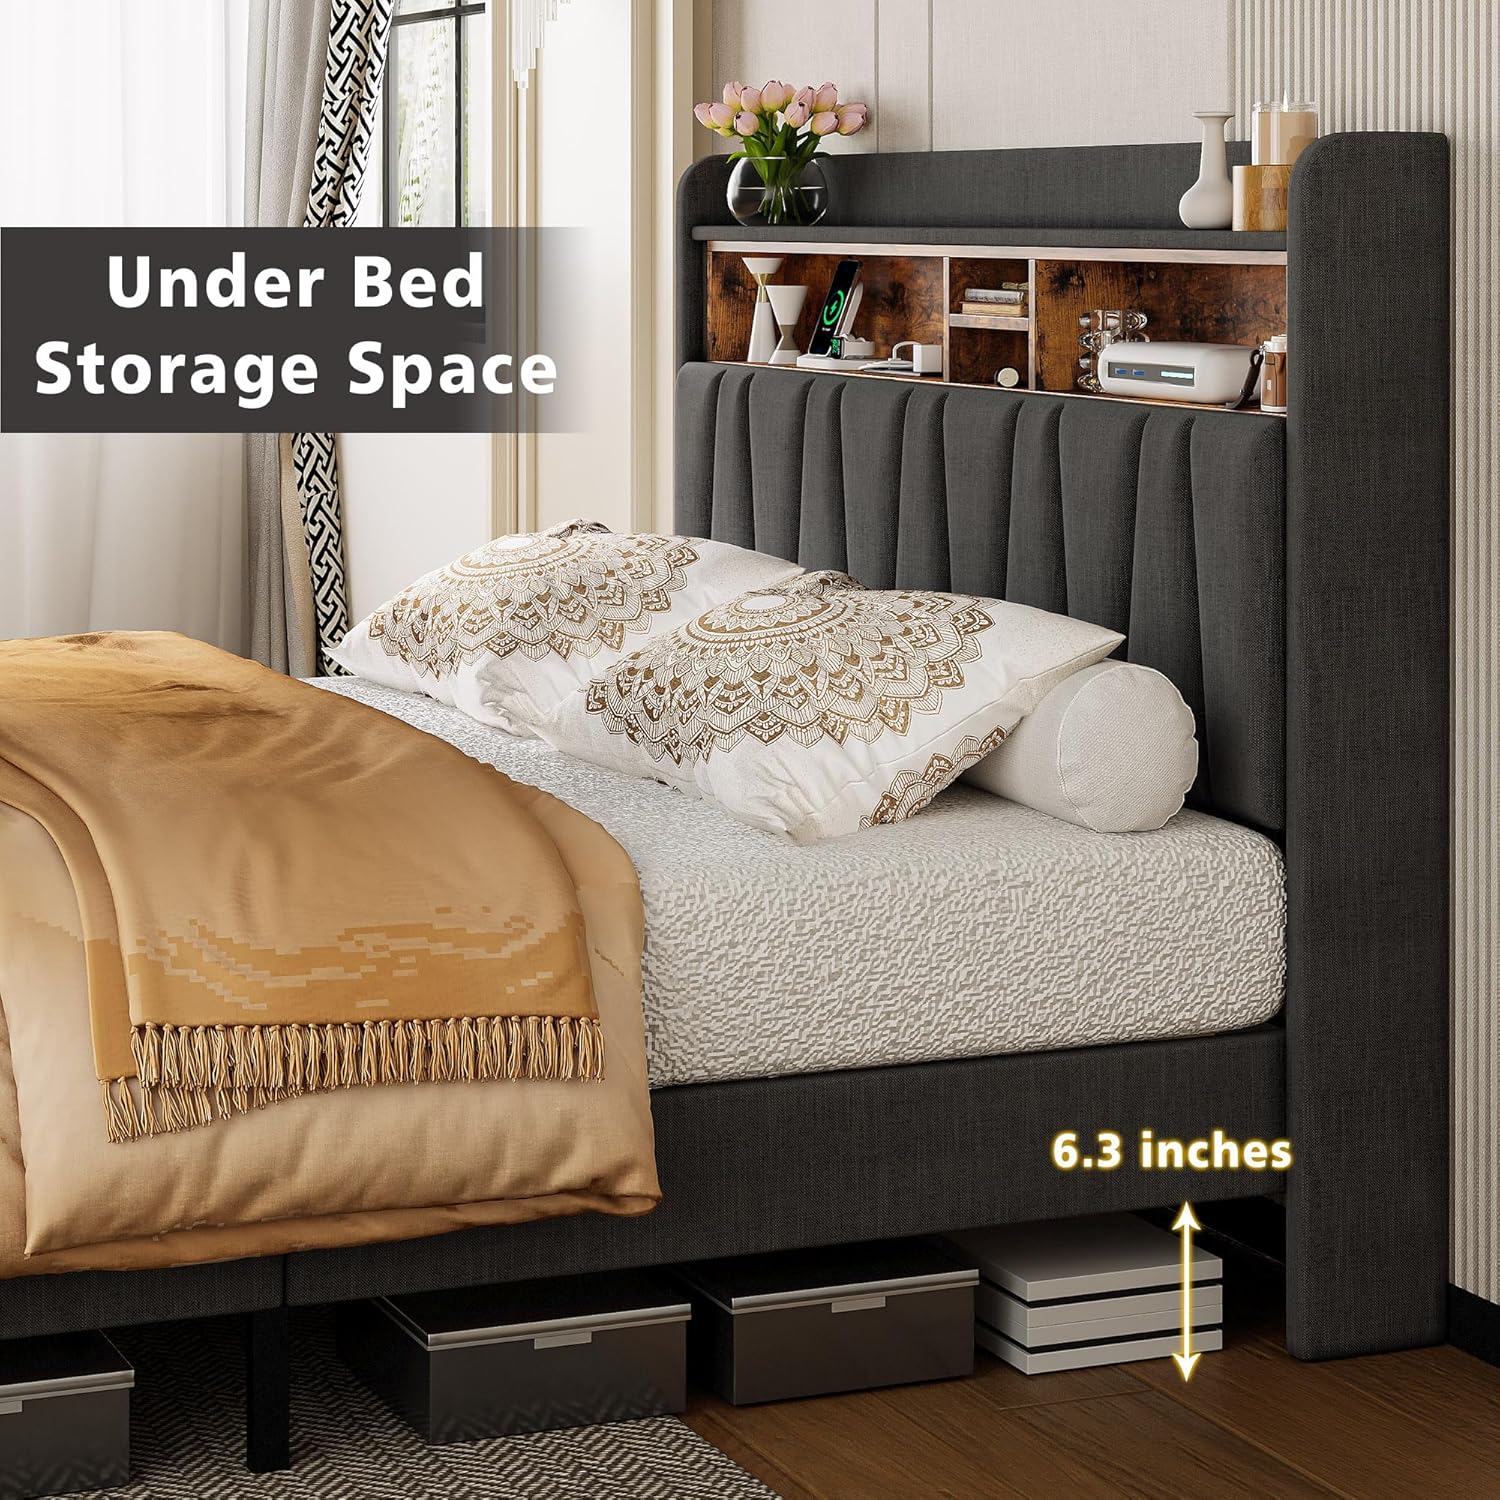
Image 5.2: This image demonstrates the practical storage headboard, featuring open shelves for display and a hidden compartment accessible by lifting a panel, designed with a back cover to prevent items from dropping.
5.3. Under Bed Storage Space
The bed frame provides approximately 6.3 inches of clearance underneath, suitable for storing slim containers or boxes.

Image 5.3: An illustration highlighting the available under-bed storage space, indicating a clearance of 6.3 inches for various storage solutions.
6. Maintenance
- Cleaning Fabric: For general cleaning, gently vacuum the upholstered fabric to remove dust. For spills, blot immediately with a clean, dry cloth. For stubborn stains, use a mild fabric cleaner according to its instructions, testing on an inconspicuous area first.
- Cleaning Wood/Metal: Wipe wooden and metal surfaces with a soft, damp cloth. Avoid harsh chemicals or abrasive cleaners.
- Hardware Check: Periodically (every 3-6 months) check all bolts and screws to ensure they remain tight. Re-tighten as necessary to maintain stability and prevent squeaking.
- Electrical Components: Ensure the charging station and its cord are free from dust and debris. Do not attempt to disassemble or repair the electrical components yourself.
7. Troubleshooting
| Problem | Possible Cause | Solution |
|---|---|---|
| Bed frame is squeaking. | Loose hardware; uneven floor; slats not properly secured. | Check and tighten all bolts and screws. Ensure the bed is on a level surface. Verify slats are correctly positioned and secured with Velcro. |
| Charging station not working. | Power cord not plugged in; wall outlet not functional; device issue; overloaded circuit. | Ensure the bed frame's power cord is fully plugged into a live wall outlet. Test the wall outlet with another device. Check if the device you are trying to charge is working. Avoid plugging in high-power appliances. |
| Parts missing or damaged upon arrival. | Shipping damage or packaging error. | Do not proceed with assembly. Contact ANCTOR customer support immediately with your purchase details. |
| Difficulty assembling. | Incorrect part orientation; missing steps; insufficient tools. | Review the assembly instructions carefully. Ensure parts are oriented as shown in diagrams. Confirm all necessary tools are available. Consider having a second person assist. |
8. Specifications
- Brand: ANCTOR
- Model Number: HK-KBF-6
- Size: King
- Material: Wood, Linen Fabric, Metal
- Color: Dark Grey
- Special Features: Charging Station, Storage Headboard, Squeak Resistant
- Item Weight: Approximately 55.5 kg (122.3 lbs)
- Dimensions (LxWxH): 2.18 x 2 x 1.21 Meters (85.8 x 78.7 x 47.8 inches)
- Assembly Required: Yes
- Charging Station:
- 2 x 110V/12A AC Outlets
- 2 x 5V/2A USB Ports
- 5-foot Power Cord
9. Warranty and Support
ANCTOR is committed to providing high-quality products. For any questions, concerns, or assistance with your bed frame, please contact ANCTOR customer support. Please have your purchase details and model number (HK-KBF-6) ready when contacting support.
Specific warranty details may vary by region and retailer. Please refer to your purchase documentation or contact ANCTOR directly for comprehensive warranty information.


