Introduction
This manual provides detailed instructions for the safe and efficient operation of your AGARO Galaxy Cordless Tyre Inflator. Please read this manual thoroughly before using the device and retain it for future reference.
Safety Information
- Ensure the device is fully charged before first use.
- Do not operate the inflator near flammable liquids or gases.
- Keep out of reach of children.
- Avoid over-inflating. The device features an automatic shut-off function to prevent this.
- Allow the device to cool down for 3-5 minutes after every 10 minutes of continuous use to maintain optimal performance and prevent overheating.
- Do not expose the device to extreme temperatures or direct sunlight for prolonged periods.
Package Contents
Verify that all items are present in the package:
- 1 x AGARO Galaxy Cordless Tyre Inflator Main Unit
- 1 x Air Tube (Hose Pipe)
- 3 x Nozzles (for various inflation needs)
- 1 x USB Type-C Charging Cable

Image: The AGARO Galaxy Cordless Tyre Inflator shown with its complete set of accessories, including the main unit, air hose, three different nozzles, and a USB charging cable.
Product Overview
The AGARO Galaxy Cordless Tyre Inflator is a versatile 3-in-1 device designed for convenience and portability. It functions as a tyre inflator, an LED flashlight, and a power bank.

Image: The AGARO Galaxy inflator showcasing its three primary functions: tyre inflator, flashlight, and power bank, with a 1-year warranty badge.

Image: A hand holding the compact and cordless AGARO Galaxy inflator, demonstrating its portable design.
Setup
Initial Charging
Before first use, fully charge the device. Connect the provided USB Type-C cable to the charging port on the bottom of the inflator and plug the other end into a suitable USB power adapter (not included). Charging typically takes 3-4 hours.

Image: An X-ray view of the AGARO Galaxy inflator, highlighting its internal 4000 mAh (2x2000 mAh) rechargeable batteries. A note advises charging for 3-4 hours before first use.
Operating Instructions
Follow these steps to inflate an item:
- Connect the Hose: Remove the valve cap from the item you wish to inflate. Securely connect the air tube (hose pipe) to the valve.
- Power On: Press the power button on the inflator to turn on the device. The digital display will illuminate.
- Select Mode and Set Pressure:
- Short press the mode button (often indicated by a square icon) to cycle through pre-set inflation modes (e.g., car, bike, ball).
- To manually set the desired pressure, use the '+' and '-' buttons.
- To change pressure units (PSI, KPA, BAR, KG/CM²), long press the mode button.
- Start Inflation: Once the desired pressure is set, press the power button again to begin inflation. The real-time pressure will be displayed.
- Automatic Shut-off: The inflator will automatically stop once the pre-set pressure is reached, preventing over-inflation.
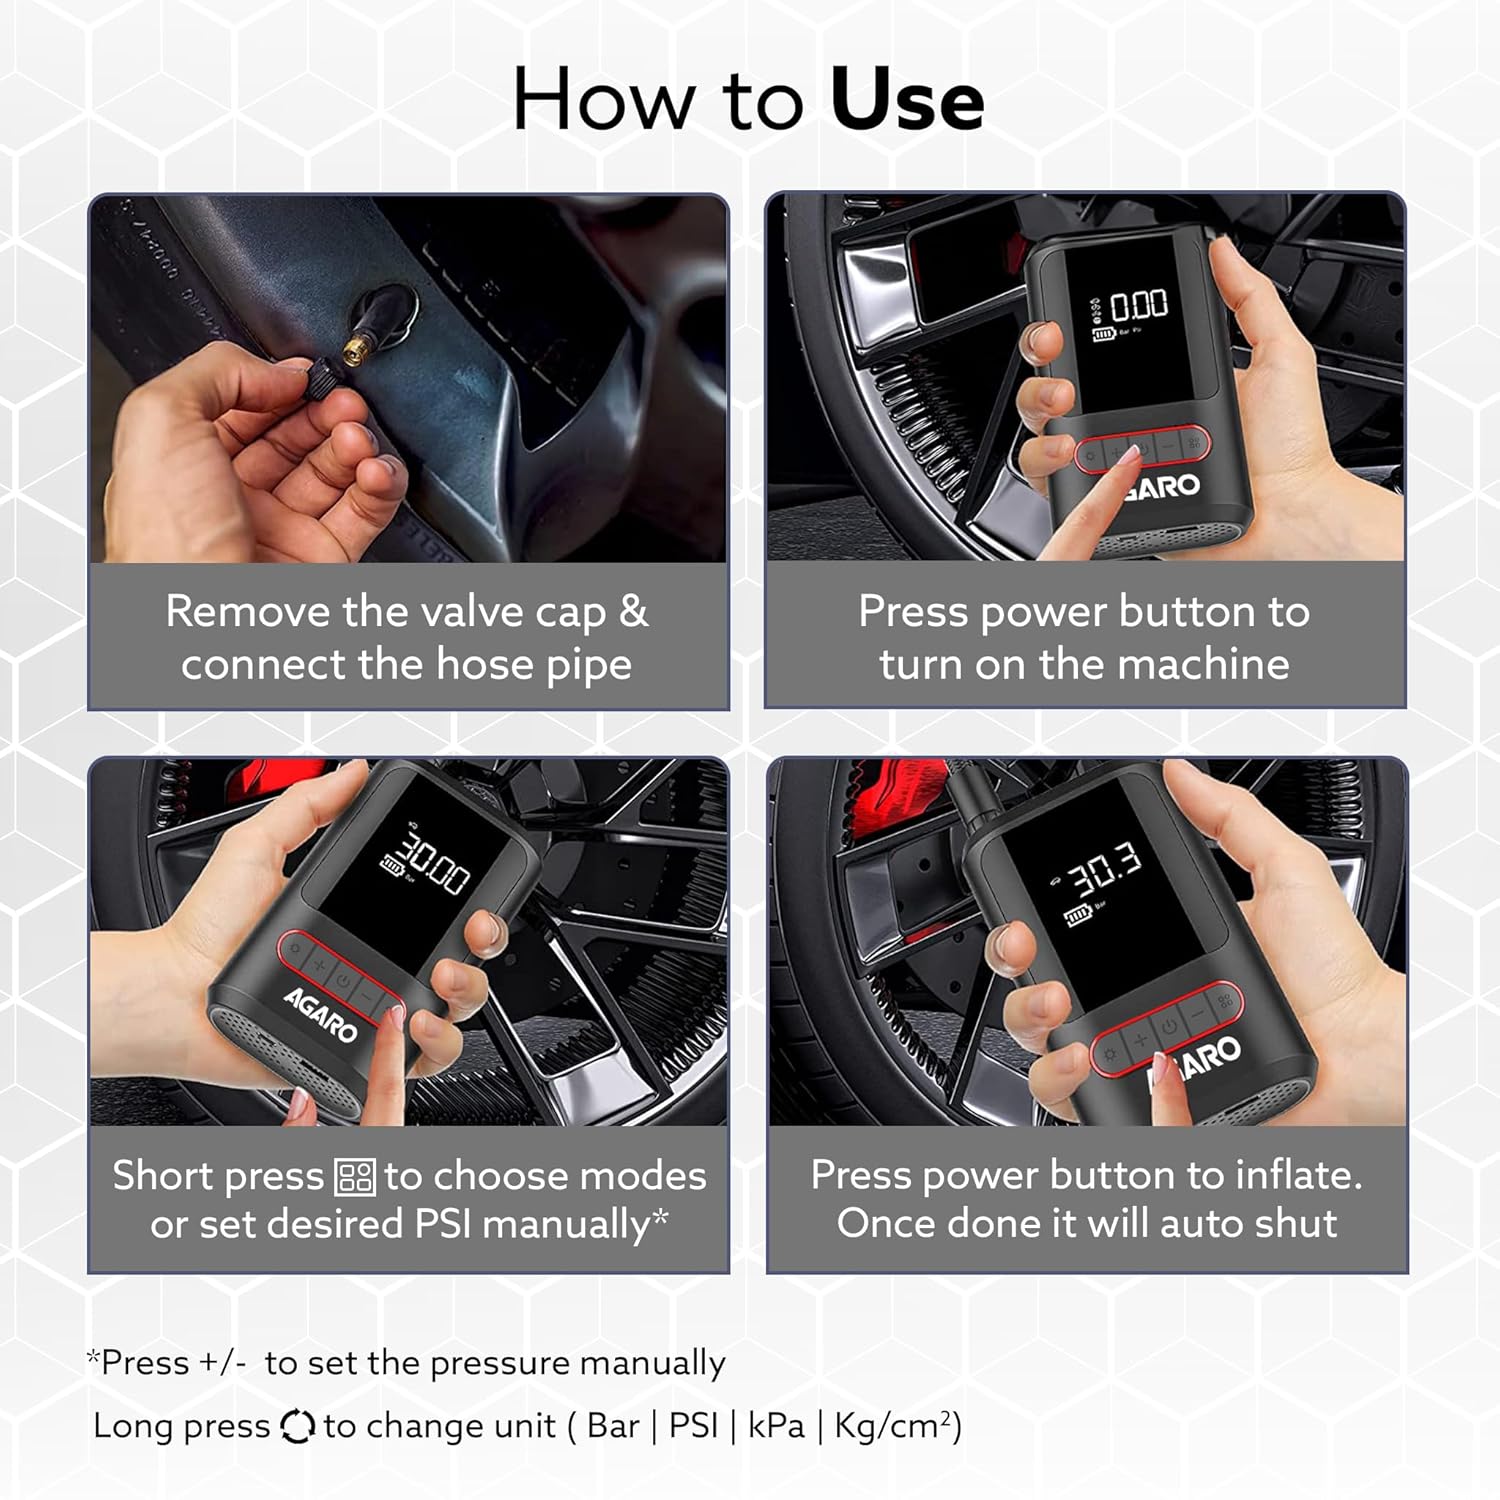
Image: A visual step-by-step guide demonstrating how to use the AGARO Galaxy inflator: connecting the hose, powering on, selecting modes/setting pressure, and initiating inflation with auto shut-off.

Image: The AGARO Galaxy inflator connected to a car tire, illustrating its automatic cut-off feature to prevent over-inflation.
Multi-Purpose Use
The inflator comes with multiple nozzles to accommodate various items:
- Car/Bike Tires: Standard nozzle for vehicle tires.
- Bicycles: Specific nozzle for bicycle tires.
- Sports Balls: Needle nozzle for footballs, basketballs, etc.
- Inflatables: Cone nozzle for floating tubes, air mattresses, etc.

Image: The AGARO Galaxy inflator demonstrating its versatility by inflating tires for cars, bikes, bicycles, and sports balls.

Image: A collage showing the multi-purpose use of the AGARO Galaxy inflator for car/bike tires, floating tubes, bicycles, and playing balls.
Additional Functions
- LED Flashlight: The inflator features a 3-mode LED light on top, useful for inflating in low-light conditions, changing tires at night, or as a warning light.
- Power Bank: The USB output port on the bottom allows the inflator to function as an emergency power supply for charging electronic devices.
Maintenance
- Cleaning: Wipe the device with a soft, dry cloth. Do not use abrasive cleaners or immerse in water.
- Storage: Store the inflator and its accessories in a cool, dry place, away from direct sunlight and extreme temperatures. The bendable air hose can be stored on the appliance.
- Battery Care: For optimal battery life, charge the device regularly, even if not in frequent use. Avoid completely draining the battery.
Troubleshooting
| Problem | Possible Cause | Solution |
|---|---|---|
| Inflator does not turn on. | Battery is depleted. | Charge the device fully using the provided USB cable. |
| Inflator stops prematurely. | Pre-set pressure reached. | This is normal operation (auto shut-off). Check the tire pressure. |
| Slow inflation or low airflow. | Hose not securely connected; Battery low; Device overheating. | Ensure hose is tightly connected. Charge the battery. Allow device to cool down for 3-5 minutes. |
| Inaccurate pressure reading. | Sensor issue; Incorrect unit selected. | Ensure the hose is properly connected. Verify the correct pressure unit (PSI, BAR, KPA, KG/CM²) is selected. |
Specifications
| Feature | Specification |
|---|---|
| Model | Galaxy |
| Brand | AGARO |
| Material | Plastic |
| Color | Black |
| Item Weight | 408 Grams |
| Product Dimensions (LxWxH) | 9 x 4.5 x 14 cm |
| Power Source | Battery Powered (2x2000 mAh Lithium Ion) |
| Air Flow Capacity | 17 Liters Per Minute |
| Maximum Pressure | 150 PSI (Pound per Square Inch) |
| Operation Mode | Automatic |
| Hose Length | 21 Inches |
| Special Features | Automatic Shut Off, Digital Display, Portable, LED Flashlight, Power Bank Function |
Warranty and Support
The AGARO Galaxy Cordless Tyre Inflator comes with a 1-year warranty from the date of purchase. For warranty claims, technical support, or any product-related inquiries, please contact AGARO customer service. Refer to your purchase documentation for specific contact details.


