
Fabater Fabaterpr7x5uqgk6
Fabater Kitchen Sink Faucet User Manual
Model: Fabaterpr7x5uqgk6
1. Introduction
Thank you for choosing the Fabater Kitchen Sink Faucet. This manual provides detailed instructions for the installation, operation, and maintenance of your new faucet. Designed for modern kitchens, this faucet features a pull-out waterfall spray, multiple water outlet modes, and a durable stainless steel construction. Please read this manual thoroughly before installation and use to ensure proper function and longevity of the product.
2. Safety Information
Please observe the following safety precautions to prevent injury or damage to the product:
- Always turn off the main water supply before beginning any installation or maintenance work.
- Wear appropriate personal protective equipment, such as safety glasses and gloves, during installation.
- Ensure all connections are secure and leak-free before restoring water supply.
- Do not use abrasive cleaners or harsh chemicals on the faucet's finish, as this may cause damage.
- If you are unsure about any part of the installation process, consult a qualified plumber.
3. Package Contents
Verify that all components are present before beginning installation:
- Kitchen Sink Faucet Assembly (Main Unit)
- Handle
- Instruction Manual (This Document)
- Hot and Cold Water Pipes (Pre-attached or separate)
- Mounting Hardware (Nuts, washers, gaskets)
- Counterweight (for pull-down hose)

Image: Main faucet unit with included counterweight and hoses, illustrating the complete set of components.
4. Product Specifications
| Feature | Detail |
|---|---|
| Brand | Fabater |
| Model Name | Fabaterpr7x5uqgk6 |
| Material | Stainless Steel |
| Finish Type | Brushed Nickel |
| Mounting Type | Deck Mount (Single Hole) |
| Number of Handles | 1 (Lever) |
| Spout Design | Pull Down Waterfall |
| Water Outlet Modes | Waterfall + 3 Nozzle Modes |
| Item Weight | 5.29 pounds |
| Package Dimensions | 23.2 x 11.5 x 3.4 inches |

Image: Detailed dimensions of the faucet, including overall height (38cm/15in), spout reach (21cm/8.3in), and base measurements.
5. Setup & Installation
Follow these steps for proper installation:
- Prepare the Sink Area:
- Turn off the main water supply to your kitchen.
- Clear the area under the sink and ensure the mounting hole is clean and free of debris.
- Install the Faucet Base:
- Insert the faucet's main body through the mounting hole in the sink or countertop.
- From underneath the sink, place the rubber gasket, then the metal washer, and finally thread the mounting nut onto the faucet shank.
- Tighten the mounting nut securely with a basin wrench, ensuring the faucet is aligned correctly.
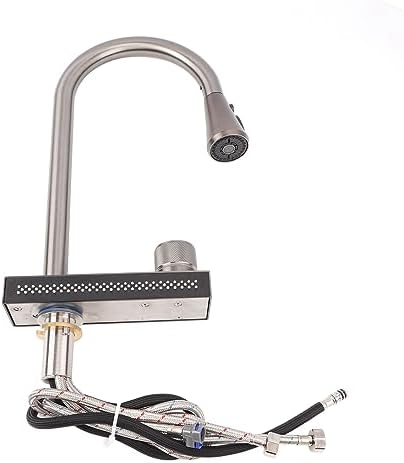
Image: View of the faucet's underside, illustrating the connection points for water lines and the mounting mechanism.
- Connect Water Supply Lines:
- Connect the hot and cold water supply lines from the faucet to your home's hot and cold water valves. The hoses are typically color-coded (red for hot, blue for cold) or marked.
- Ensure all connections are hand-tight, then use a wrench to tighten them an additional quarter turn. Do not overtighten.

Image: Close-up of the flexible braided water supply hoses, showing the standard G1/2 interface connections.
- Install the Counterweight:
- Locate the pull-down hose under the sink.
- Attach the counterweight to the pull-down hose at a point that allows the spray head to retract fully into the spout. Typically, this is about 6-8 inches from the bottom of the spout.
- Test for Leaks:
- Slowly turn on the main water supply.
- Check all connections for leaks. If leaks are present, tighten the connections slightly until they stop.
- Run water through the faucet for a few minutes to flush out any debris.
6. Operating Instructions
Your Fabater Kitchen Sink Faucet offers versatile water delivery options:
6.1. Water Flow Control

Image: Detailed view of the single lever control knob, showing the hot (red) and cold (blue) indicators for temperature adjustment.
- Single Lever Handle: The single lever handle controls both water temperature and flow volume.
- Lift the handle to increase water flow.
- Move the handle left for hot water and right for cold water.
6.2. Water Outlet Modes
This faucet features a unique waterfall outlet and a pull-down spray head with three additional modes.

Image: The faucet demonstrating its wide waterfall spray from the base and the pull-down spray head with its various spray patterns.
- Waterfall Outlet: The primary water outlet from the base of the faucet provides a wide, gentle waterfall flow, ideal for washing fruits and vegetables or filling large pots.
- Pull-Down Spray Head: The spray head can be pulled out from the main spout for extended reach and flexibility.
- Stream Mode: Provides a steady, aerated stream for general washing.
- Spray Mode: Delivers a powerful spray for rinsing dishes and cleaning the sink.
- Blade/Sweep Mode: A strong, wide blade of water for stubborn food residue.
- Switching Modes: Press the button(s) on the spray head to cycle through the different spray modes.
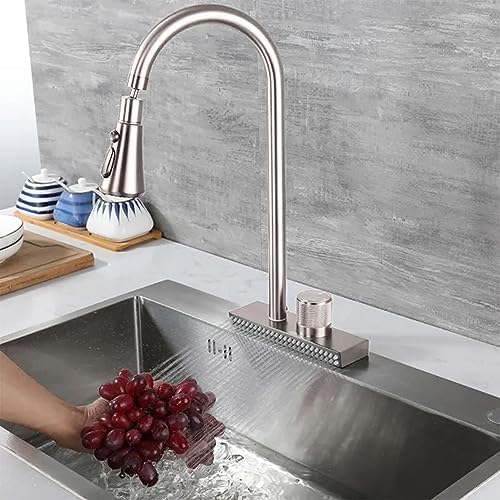
Image: A hand washing grapes under the wide waterfall flow of the faucet, highlighting its utility for delicate items.
7. Maintenance
Regular cleaning and maintenance will help preserve the finish and functionality of your faucet.
7.1. Cleaning the Faucet
- Clean the faucet regularly with a soft cloth and mild soap or a non-abrasive liquid cleaner.
- Rinse thoroughly with clean water and dry with a soft cloth to prevent water spots.
- Avoid using abrasive cleaners, steel wool, or harsh chemicals (e.g., ammonia, bleach, acids) as they can damage the finish.
7.2. Aerator Maintenance
- If water flow becomes restricted or uneven, the aerator on the spray head may need cleaning.
- Unscrew the aerator from the spray head (if removable).
- Rinse out any debris or mineral deposits. For stubborn deposits, soak the aerator in a solution of equal parts white vinegar and water.
- Reattach the aerator securely.
8. Troubleshooting
Refer to the table below for common issues and their solutions:
| Problem | Possible Cause | Solution |
|---|---|---|
| Low Water Flow | Clogged aerator; partially closed shut-off valve; kinked supply line. | Clean aerator; ensure shut-off valves are fully open; check supply lines for kinks. |
| Leaking at Faucet Base | Loose mounting nut; damaged gasket. | Tighten mounting nut; inspect and replace gasket if damaged. |
| Leaking from Spray Head | Mineral buildup; worn internal seals. | Clean spray head nozzles; contact customer support for replacement parts if seals are worn. |
| Water Temperature Issues | Incorrect hot/cold supply line connection; water heater issues. | Verify hot and cold lines are connected correctly; check water heater settings. |
| Spray Head Does Not Retract Fully | Counterweight improperly positioned or too light; hose obstructed. | Adjust counterweight position; ensure hose path is clear under the sink. |
If the problem persists after attempting these solutions, please contact Fabater customer support.
9. Warranty & Support
9.1. Warranty Information
Fabater products are manufactured to high-quality standards and are backed by a limited warranty against defects in materials and workmanship. Please retain your proof of purchase for warranty claims. Specific warranty terms and duration may vary; refer to your purchase documentation or contact customer support for details.
9.2. Customer Support
For technical assistance, replacement parts, or warranty inquiries, please contact Fabater customer support through the following channels:
- Website: Visit the official Fabater website for FAQs and contact forms.
- Email: [Insert Fabater Customer Support Email Here, if available]
- Phone: [Insert Fabater Customer Support Phone Number Here, if available]
When contacting support, please have your product model number (Fabaterpr7x5uqgk6) and purchase date ready.
Ask a question about this manual
Ask about setup, troubleshooting, compatibility, parts, safety, or missing instructions. Manuals+ will review the question and use this page’s manual context to help answer it.