1. Introduction
Thank you for purchasing the PPLEE RGB Digital Alarm Clock, Model CR1008R. This clock is designed to provide accurate timekeeping, customizable alarm functions, and convenient charging options. Please read this manual thoroughly before use to ensure proper operation and to maximize your product experience.
2. Safety Information
- Ensure the power adapter is compatible with your local power supply (100-240V).
- Do not expose the device to water or excessive humidity.
- Avoid placing the clock near heat sources or in direct sunlight.
- Use only the provided power adapter.
- Keep out of reach of children.
- Insert AAA batteries correctly for backup function (not included).
3. Package Contents
Verify that all items are present in your package:
- 1 x PPLEE RGB Digital Clock
- 1 x Power Adapter
- 1 x Power Cord
- 1 x User Manual (this document)

Image: The package includes the RGB digital clock, power adapter, power cord, and user manual.
4. Product Overview
Familiarize yourself with the main components of your alarm clock.

Image: Front view of the PPLEE RGB Digital Alarm Clock displaying time with RGB digits and a smartphone charging via its USB port.
Front Panel: Large LED display for time, AM/PM indicator, DST indicator, Alarm indicator.
Top Panel: Snooze/Light bar, Hour button, Minute button.
Rear Panel:
- DC IN Port: For power adapter connection.
- USB Charging Port: For charging external devices.
- Type-C Charging Port: For charging external devices.
- Alarm ON/OFF Switch.
- Alarm Volume Control (Low/Med/High).
- Dimmer Control (for display brightness).
- Time Format Switch (12H/24H).
- DST (Daylight Saving Time) Switch.
- Set Time Button.
- Set Alarm Button.
- Multi-Color Button (for display and night light).
- Battery Compartment (for 2x AAA backup batteries).

Image: Rear view of the alarm clock highlighting the various control buttons and charging ports, including dimmer, alarm volume, time/alarm set, and time format switches.
5. Setup
5.1 Power Connection
- Connect the power cord to the DC IN port on the back of the clock.
- Plug the power adapter into a standard electrical outlet (AC 100-240V).
- The clock display will light up.
5.2 Battery Backup Installation
For battery backup, which saves settings during power outages and can trigger the alarm, install 2 AAA batteries (not included) into the battery compartment on the back of the clock.
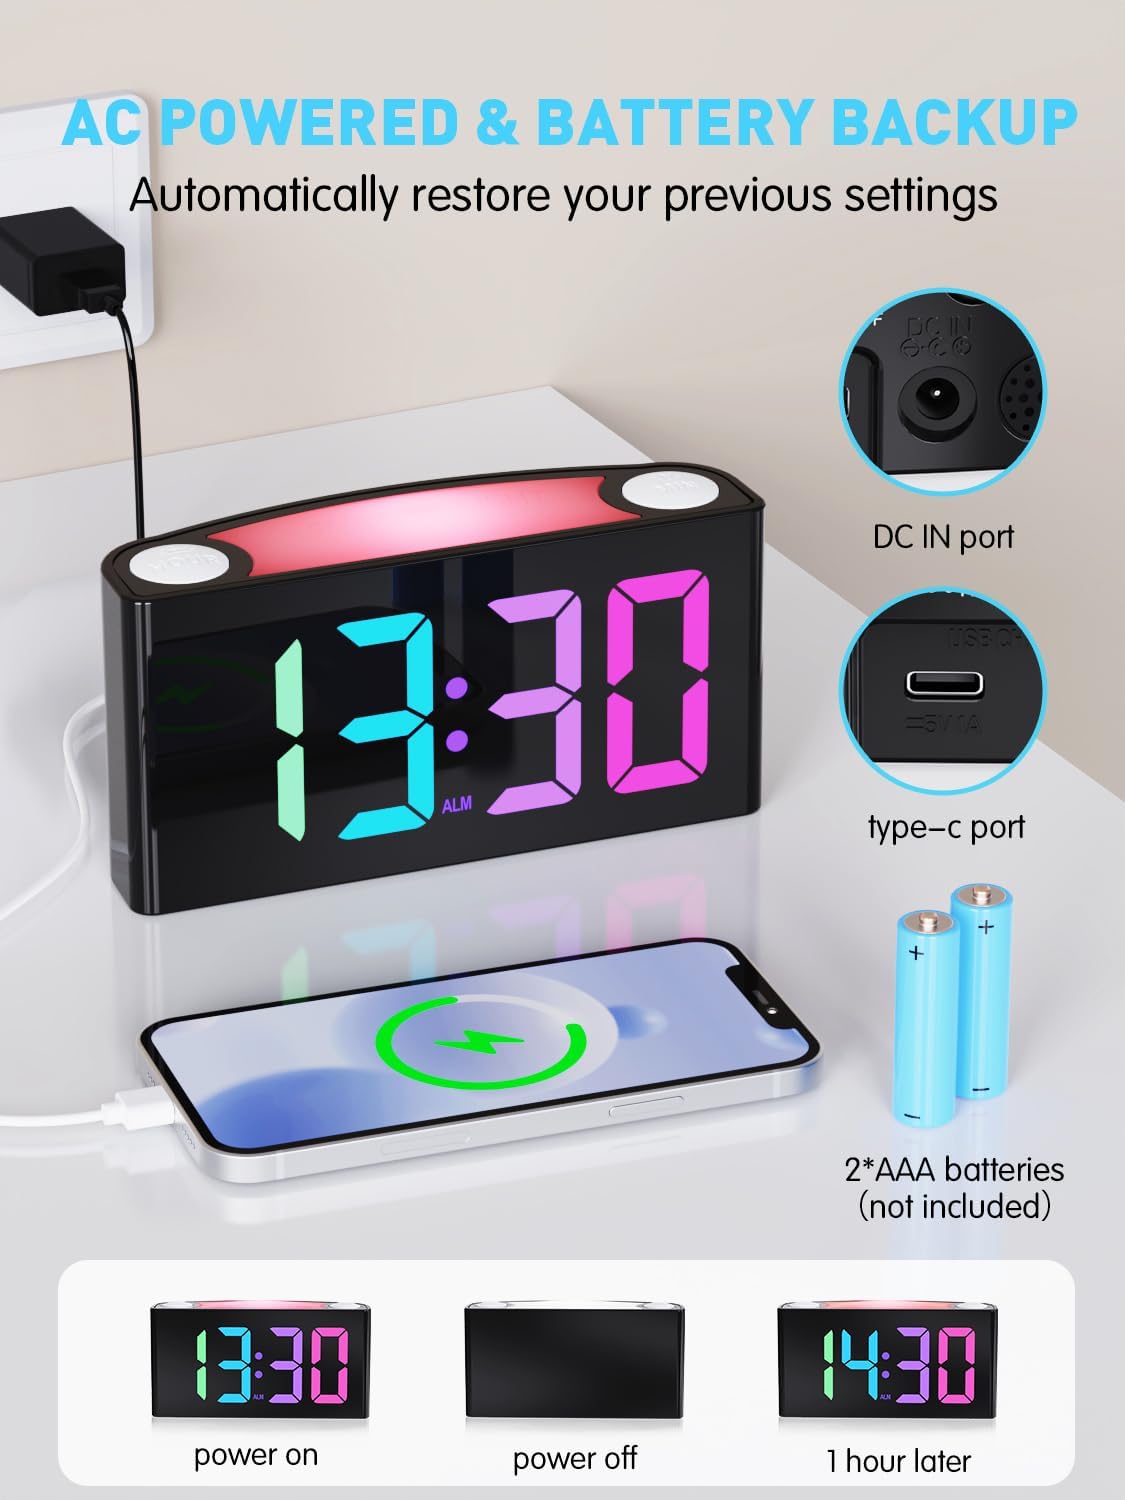
Image: The alarm clock is shown connected to AC power, with an open battery compartment indicating where to insert 2 AAA batteries for backup. The display shows "13:30" (power on), a blank screen (power off), and "14:30" (1 hour later, demonstrating time retention).
Note: The clock's main functions (display, USB charging, alarm) require AC power. Batteries only provide backup for time memory and alarm trigger during power interruptions.
6. Operating Instructions
6.1 Setting the Time
- Press the "SET TIME" button on the rear panel. The display will start flashing.
- Press the "HOUR" button (on top) to adjust the hour.
- Press the "MIN" button (on top) to adjust the minute.
- Press "SET TIME" again to save, or wait 5 seconds for automatic confirmation.
Video: Demonstrates how to set the time on the PPLEE RGB Digital Alarm Clock, including adjusting hours and minutes and confirming the setting.
6.2 Setting the Alarm
- Slide the "ALARM ON/OFF" switch to the "ON" position. The alarm indicator will light up.
- Press the "SET ALARM" button on the rear panel. The alarm time display will start flashing.
- Press the "HOUR" button (on top) to adjust the alarm hour.
- Press the "MIN" button (on top) to adjust the alarm minute.
- Press "SET ALARM" again to save, or wait 5 seconds for automatic confirmation.
To turn off the alarm, slide the "ALARM ON/OFF" switch to the "OFF" position. The alarm indicator will disappear.
6.3 Display Brightness (Dimmer)
The clock features a 7-level dimmer for the time display (0%-100% brightness).
- Use the "DIMMER" button on the rear panel to cycle through brightness levels.

Image: The alarm clock display shows various brightness levels from 0% to 100%, illustrating the 7-level dimmer function.
6.4 Night Light Modes
The clock includes an 8-mode/7-color night light with 3 adjustable brightness settings.
- Press the "SNOOZE/LIGHT" bar on top to turn the night light on/off and cycle through colors/modes.
- To adjust night light brightness, press and hold the "SNOOZE/LIGHT" bar.

Image: A person sleeping next to the alarm clock, which emits a soft yellow night light from its top bar. Below are icons indicating 3-level adjustable brightness for the night light.
6.5 Alarm Volume
Adjust the alarm volume to your preference (Low, Medium, High).
- Use the "ALARM VOLUME" switch on the rear panel to select the desired volume level.

Image: A person reaching for the snooze bar on the alarm clock, which displays "8:30". The image also illustrates the 3-level adjustable alarm volume (90db, 103db, 110db).
6.6 Snooze Function
When the alarm sounds, press the large "SNOOZE/LIGHT" bar on top to activate snooze for 9 extra minutes of sleep.
The alarm will sound again after 9 minutes. To completely turn off the alarm, use the "ALARM ON/OFF" switch.
6.7 12/24 Hour Format and DST
- Use the "TIME FORMAT" switch on the rear panel to toggle between 12-hour and 24-hour display.
- Use the "DST" switch on the rear panel to enable or disable Daylight Saving Time (adjusts time by 1 hour).
6.8 Dual Charging Ports
The clock is equipped with a Type-C output port and a USB output port for charging your devices.

Image: The alarm clock with its display showing "12:00" and two smartphones connected to its USB and Type-C charging ports, indicating active charging.
Simply connect your device's charging cable to the appropriate port on the back of the clock.
7. Maintenance
- Clean the clock with a soft, dry cloth. Do not use abrasive cleaners or solvents.
- Ensure the clock is unplugged before cleaning.
- If not in use for an extended period, remove the backup batteries.
8. Troubleshooting
| Problem | Solution |
|---|---|
| Clock display is blank. | Check if the power adapter is securely plugged into both the clock and the wall outlet. Ensure the outlet has power. |
| Alarm does not sound. | Verify the "ALARM ON/OFF" switch is in the "ON" position. Check the alarm volume setting. Ensure the alarm time is correctly set. |
| Time is incorrect after power outage. | Ensure 2 AAA batteries are installed in the battery compartment for backup. If batteries were not present or depleted, reset the time manually. |
| Devices not charging via USB/Type-C. | Confirm the clock is connected to AC power. Check the charging cable and the device being charged. |
| Night light not working. | Press the "SNOOZE/LIGHT" bar to cycle through modes and turn on the light. Check if the clock is powered. |
9. Specifications
| Model Number | CR1008R |
| Brand | PPLEE |
| Display Type | Digital LED (RGB) |
| Product Dimensions | 6.46"W x 3.39"H |
| Power Source | Corded Electric (AC 100-240V) |
| Battery Backup | 2 x AAA batteries (not included) |
| Charging Ports | 1 x USB, 1 x Type-C |
| Display Brightness | 7-level adjustable dimmer |
| Night Light | 8 modes / 7 colors, 3-level adjustable brightness |
| Alarm Volume | 3-level adjustable (Low, Medium, High) |
| Snooze Duration | 9 minutes |
10. Warranty and Support
For warranty information or technical support, please refer to the contact details provided with your purchase or visit the official PPLEE website. Keep your purchase receipt for warranty claims.
Email: support@pplec.net


