1. Introduction
This manual provides comprehensive instructions for the safe and efficient operation, setup, maintenance, and troubleshooting of your Moonshan 4 Head Thin Liquid Filling Machine, model T400V. Please read this manual thoroughly before operating the machine to ensure proper usage and to prevent damage or injury.

Image 1.1: The Moonshan 4 Head Thin Liquid Filling Machine T400V, shown with four bottles being filled simultaneously.
2. Safety Instructions
Always adhere to the following safety guidelines to ensure safe operation and prevent personal injury or damage to the equipment:
- Ensure the machine is placed on a stable, level surface before operation.
- Do not operate the machine with wet hands or in wet environments.
- Always disconnect power before performing any maintenance, cleaning, or assembly tasks.
- Use only liquids that are water-like, particle-free, and non-corrosive. Refer to the 'Applicable Liquids' section for details.
- Keep children and unauthorized personnel away from the machine during operation.
- Do not attempt to modify the machine or use non-original parts.
- Wear appropriate personal protective equipment (PPE) such as gloves and eye protection when handling liquids.
3. Product Overview
3.1 Key Features
- 4 Independent Filling Channels: Allows simultaneous filling of different liquids or volumes.
- Suitable for Thin Liquids: Optimized for water-like, particle-free, and non-corrosive liquids.
- Quick Connection of Tubes: Easy to connect, disconnect, and clean tubing without disassembly.
- 100 Fl Oz/Min Fast Pump: Each channel features a high-speed pump for efficient filling.
- Simple Panel & Clear Display: Intuitive controls for setting parameters directly.
3.2 Applicable Liquids
The Moonshan T400V is designed for rapid filling of low viscosity liquids. It is suitable for:
- Water-like liquids
- Particle-free liquids
- Non-corrosive liquids
Examples include wine, juice, glass detergent, micellar water, and similar products. It is not suitable for viscous liquids such as lotion, gel, hot sauce, or liquids containing particles like juice with pulp, perfume, essential oil, or olive oil.
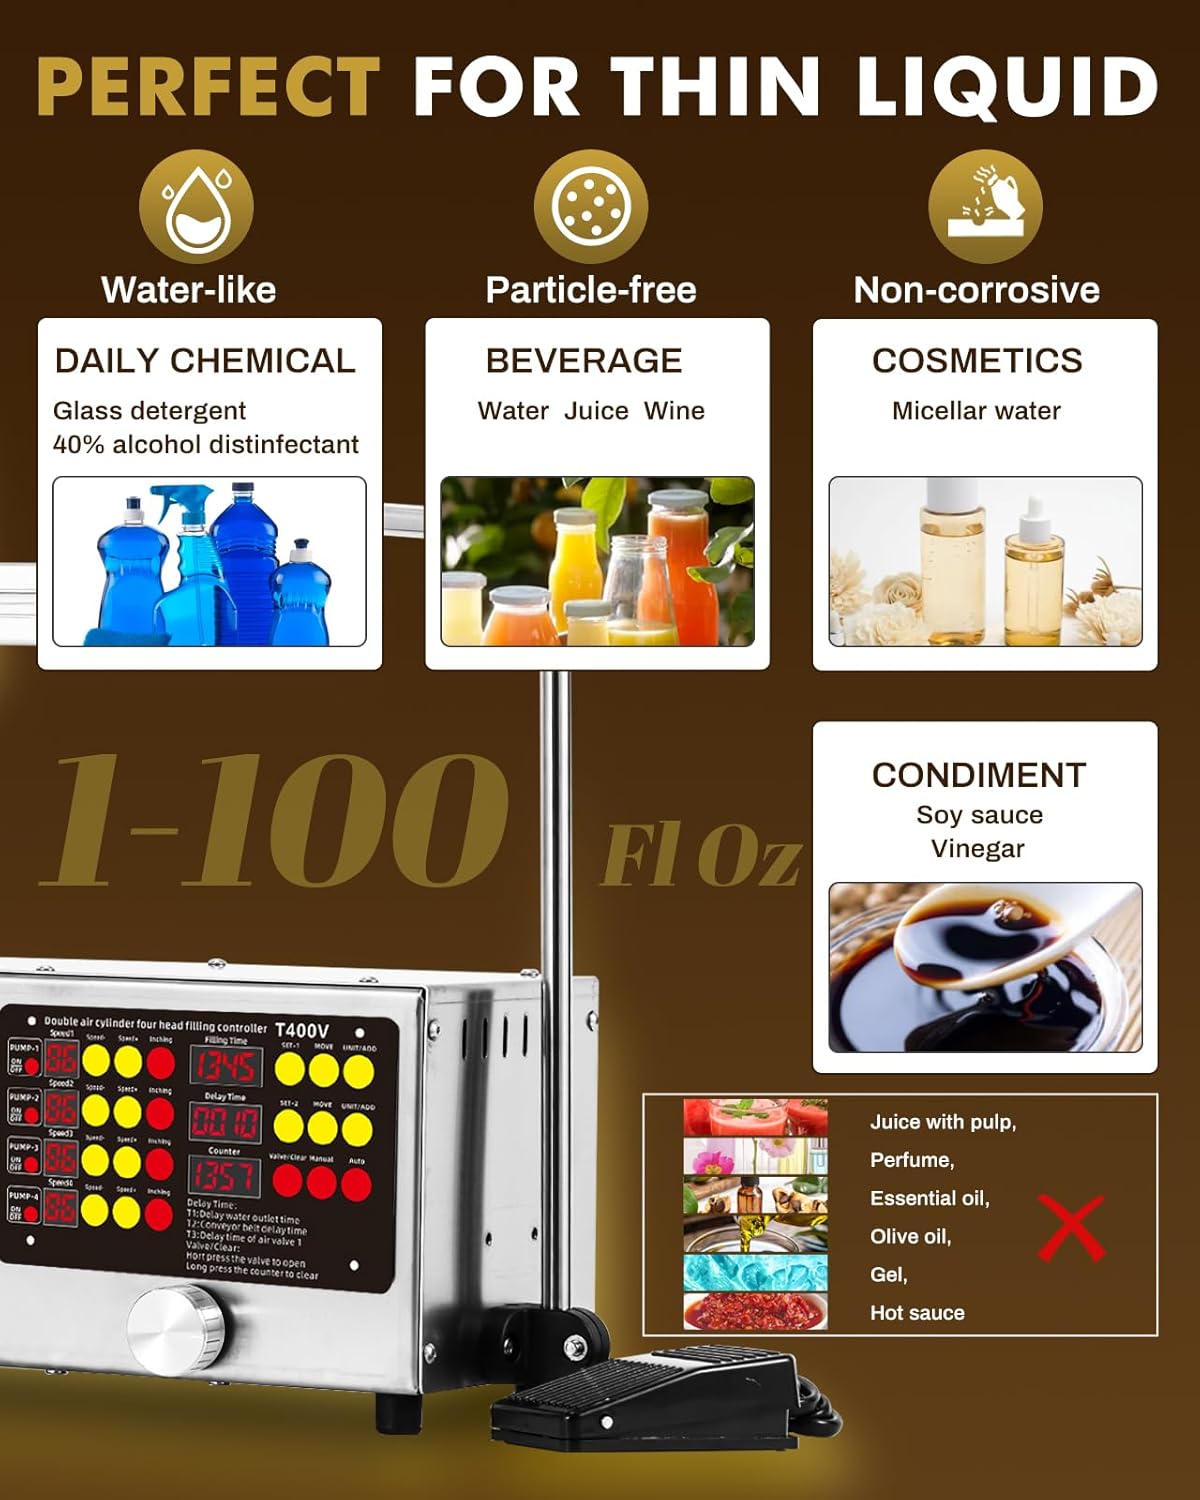
Image 3.1: Visual guide indicating suitable liquids (water-like, particle-free, non-corrosive) and unsuitable liquids (viscous or particle-containing).
3.3 Components
The machine consists of the following main components:
- Main Unit: Houses the control panel and pumps.
- Filling Nozzles (x4): 9mm stainless steel nozzles for liquid dispensing.
- Silicone Tubes: Food-grade, clear, odorless, and chemical-resistant tubes for liquid transfer.
- Mesh Strainers (x4): Located on each inlet tube to prevent foreign matter from entering the pump.
- Control Panel: Digital display and buttons for setting parameters.
- Foot Switch: For manual control of the filling process.

Image 3.2: The four independent filling channels, demonstrating their ability to fill multiple bottles simultaneously.
4. Setup Instructions
4.1 Unpacking
- Carefully remove all components from the packaging.
- Verify that all parts listed in the packing list are present and undamaged.
- Retain packaging materials for future storage or transport.
4.2 Assembly
- Place the main unit on a stable, flat surface.
- Attach the nozzle support bar to the main unit, ensuring it is securely fastened.
- Connect the silicone inlet tubes to the 'Input' ports on the machine. Ensure each tube has its mesh strainer submerged in the liquid source.
- Connect the silicone outlet tubes to the filling nozzles. The quick-connect design allows for easy attachment and removal.
- Position the nozzles above the bottles or containers to be filled. Adjust the height and spacing as needed.

Image 4.1: Illustration of the quick connection mechanism for the tubes, highlighting ease of installation, removal, and cleaning.
4.3 Power Connection
- Ensure the power switch on the machine is in the 'OFF' position.
- Connect the power cord to the machine and then to a grounded electrical outlet.
- Connect the foot switch cable to its designated port on the machine.
5. Operating Instructions
5.1 Control Panel Overview
The control panel allows for precise adjustment of filling parameters for each of the four pumps.

Image 5.1: The machine's control panel, featuring independent speed adjustments for each pump, filling time settings, delay time, and a bottle counter.
- PUMP 1-4 ON/OFF: Individual switches to activate or deactivate each pump.
- Speed +/-: Adjusts the filling speed for each individual pump (0-99).
- Inching: Momentarily activates the pump for quick cleaning or priming.
- Filling Time: Sets the duration for which the liquid is dispensed (e.g., 13.45 seconds).
- Delay Time (T1, T2, T3): Configures delays for water outlet, conveyor belt, and air valve (if applicable).
- Counter: Displays the number of bottles filled. Can be reset.
- MOVE / UNIT/ADD: Buttons for navigating and adjusting settings.
5.2 Setting Filling Parameters
- Turn on the main power switch.
- Set Filling Time: Use the 'MOVE' and 'UNIT/ADD' buttons to adjust the desired filling time on the 'Filling Time' display. This determines the volume dispensed.
- Adjust Pump Speed: For each active pump (PUMP 1-4), use the corresponding 'Speed +' or 'Speed -' buttons to set the desired flow rate. Start with a lower speed and gradually increase.
- Set Delay Time (Optional): If using a conveyor or requiring specific delays, adjust T1, T2, T3 as needed.
- Test Fill: Place an empty container under a nozzle and perform a test fill to verify the volume and speed. Adjust parameters until the desired fill is achieved.
5.3 Filling Process
- Ensure all settings are correctly configured and containers are in place.
- Activate the desired pumps using their individual 'ON/OFF' switches.
- Press the foot switch to initiate the filling cycle. The machine will dispense liquid for the set 'Filling Time'.
- Release the foot switch to stop filling. For continuous operation, some models may have an auto mode.
- The 'Counter' will increment after each successful fill cycle.

Image 5.2: The foot switch, used to trigger the filling process, enhancing operational efficiency.
5.4 Automatic Bottle Counting
The integrated counter automatically tracks the number of bottles filled. This feature helps monitor production output. To reset the counter, long-press the counter button as indicated on the control panel.

Image 5.3: A close-up of the digital counter display, showing the number of filled bottles and instructions for resetting.
5.5 Optional Conveyor System
For enhanced automation, an optional conveyor belt system can be integrated with the filling machine. This allows for continuous bottle movement and filling. The machine's control panel includes a knob for step-less speed adjustment of a matching conveyor belt, effective when connected.

Image 5.4: The 4-head filling machine integrated with an optional conveyor system, demonstrating automated bottle handling.
6. Maintenance
6.1 Cleaning
Regular cleaning is essential for hygiene and to prolong the life of the machine. Always disconnect power before cleaning.
- Tube and Nozzle Cleaning: Disconnect the silicone tubes and nozzles. Rinse them thoroughly with clean water or an appropriate cleaning solution, especially after filling different liquids. The 'Inching' button on the control panel can be used to flush the pumps with cleaning solution.
- Machine Surface: Wipe down the exterior of the machine with a damp cloth. Avoid using abrasive cleaners or submerging the main unit in water.
- Mesh Strainers: Periodically inspect and clean the mesh strainers to ensure they are free of debris.

Image 6.1: The 'Inching' button, which allows for quick, momentary activation of each pump for cleaning or priming purposes.
6.2 Storage
When not in use for extended periods, clean the machine thoroughly, disconnect it from power, and store it in a dry, dust-free environment.
7. Troubleshooting
Refer to the table below for common issues and their potential solutions:
| Problem | Possible Cause | Solution |
|---|---|---|
| Machine does not power on. | Power cord not connected; power outlet fault; main switch off. | Check power connections; test outlet; ensure main switch is ON. |
| Liquid not dispensing or flow is weak. | Inlet tube kinked or blocked; mesh strainer clogged; pump speed too low; liquid too viscous. | Check tubes for kinks; clean mesh strainer; increase pump speed; ensure liquid is suitable. |
| Inconsistent filling volume. | Air bubbles in tubes; pump speed fluctuating; filling time incorrect. | Prime pumps to remove air; ensure stable power supply; re-calibrate filling time. |
| Foot switch not responding. | Foot switch cable loose or damaged. | Check cable connection; replace foot switch if damaged. |
8. Specifications
The following are the technical specifications for the Moonshan 4 Head Thin Liquid Filling Machine T400V:
| Feature | Specification |
|---|---|
| Model | T400V |
| Number of Filling Heads | 4 |
| Applicable Liquid Volume | 1-100 Fl Oz (per channel) |
| Pump Flow Rate (Each) | 100 Fl Oz/Min |
| Suitable Liquids | Water-like, particle-free, non-corrosive low viscosity liquids |
| Nozzle Diameter | 9mm (Stainless Steel) |
| Tube Material | Food Grade Silicone |
| Control | Digital Control Panel, Independent Pump Speed Adjustment, Foot Switch |
| Package Dimensions | 33.8 x 13.4 x 10.3 inches |
| Item Weight | 29.1 pounds |
9. Warranty and Support
For warranty information, technical support, or service inquiries, please refer to the contact details provided at the point of purchase or visit the official Moonshan website. Keep your purchase receipt as proof of purchase for warranty claims.


