1. Introduction
Thank you for choosing the HAvern TTLock App Control Fingerprint Smart Door Lock. This intelligent lock offers multiple unlocking methods including fingerprint, password, IC card, mechanical key, and convenient control via the TTLock mobile application. Designed for various door types, including sliding doors, it provides enhanced security and smart access management for your home or office.
2. Safety Information
- Do not expose the lock to direct sunlight or rain for extended periods unless specified as waterproof.
- Avoid using corrosive liquids or sprays to clean the lock surface.
- Ensure correct battery polarity when inserting batteries. Replace all batteries simultaneously when low.
- Keep mechanical keys in a safe location outside the property.
- Perform regular checks to ensure all components are securely fastened.
3. Package Contents
Please verify that all components are present and in good condition:
- Front Panel Assembly
- Rear Panel Assembly
- Mortise Lock Body
- Mounting Screws and Accessories
- IC Cards (Quantity may vary)
- Mechanical Keys (Quantity may vary)
- User Manual
4. Specifications
| Feature | Specification |
|---|---|
| Material | Aluminum Alloy |
| Color | Black/Silver (Kit3 variant is Silver) |
| Dimensions (Front Panel) | 31mm (W) x 20.7mm (D) x 316mm (H) |
| Unlock Methods | Fingerprint, Password, Card, Key, APP (TTLock) |
| Fingerprint Capacity | 100 |
| Password Capacity | 100 |
| Card Type | 13.56MHz, M1, IC card |
| Working Temperature | -20°C to +60°C |
| Working Humidity | 20% - 90% |
| Applicable Door Thickness | 40-60 mm |
| Emergency Interface | Micro USB |
The lock is suitable for aluminum alloy doors, glass frame doors, wooden doors, sliding doors, revolving doors, and shielded doors.

Image: Front view of the HAvern Smart Lock with key dimensions and keypad layout.
5. Setup and Installation
5.1 Pre-installation Check
- Verify your door thickness is between 40-60 mm.
- Ensure the door frame and existing mortise cutout are compatible with the lock body dimensions.
5.2 Installation Steps
While specific installation steps may vary slightly based on your door type, the general procedure is as follows:
- Prepare the Door: If necessary, drill holes and mortise the door according to the provided template (not included in this manual, refer to packaging).
- Install Mortise Lock Body: Insert the mortise lock body into the prepared cutout on the door edge and secure it with screws.
- Install Front Panel: Connect the front panel to the mortise lock body, ensuring the spindle and cables pass through the door.
- Install Rear Panel: Connect the cables from the front panel to the rear panel. Align the rear panel with the front panel and secure it with mounting screws.
- Insert Batteries: Open the battery cover on the rear panel and insert the required batteries (typically 4x AAA, not included), observing polarity.
- Test Operation: Test the mechanical key, and ensure the handle operates smoothly.
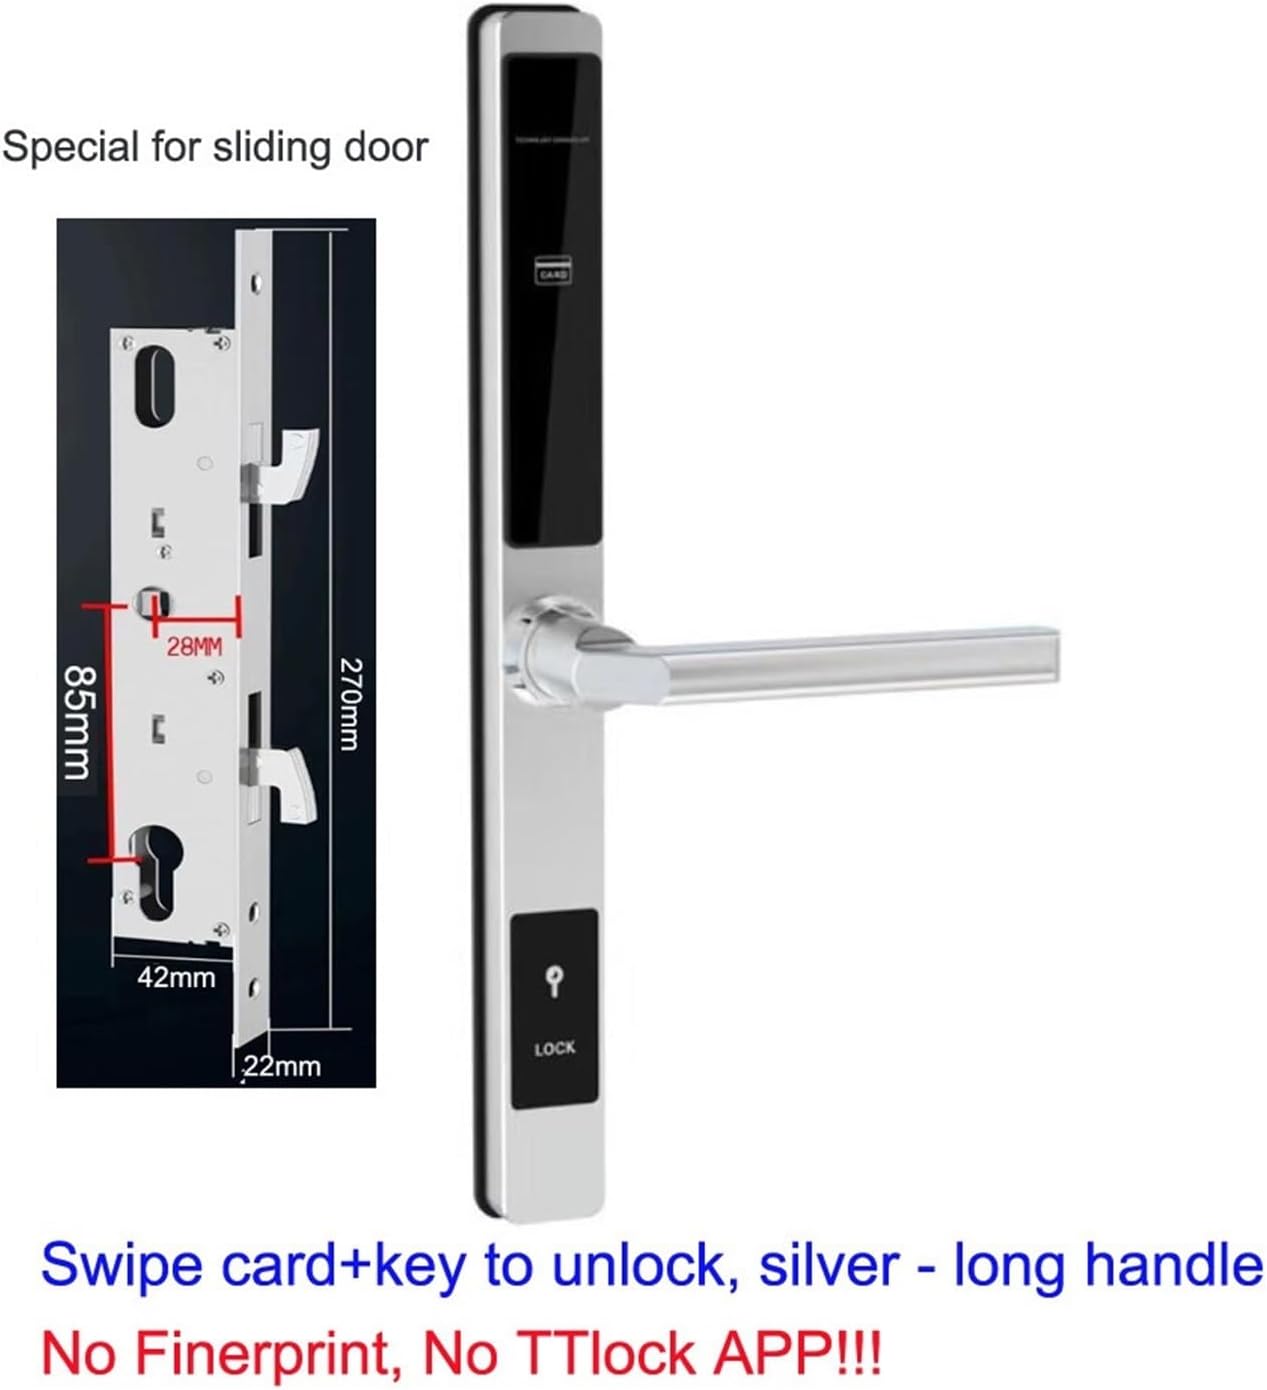
Image: Detailed view of the HAvern Smart Lock's internal mechanism and specific dimensions for sliding door installation.
6. Operating Instructions
6.1 Initial Setup and Administrator Registration
Upon first power-up, the lock will be in factory default mode. You must register an administrator fingerprint, password, or card first.
- Register Administrator: Follow the voice prompts on the lock to register the first fingerprint, password, or IC card. This will be the administrator.
- Download TTLock App: Search for "TTLock" in your smartphone's app store (iOS or Android) and download the application.
- Pair Lock with App:
- Enable Bluetooth on your smartphone.
- Open the TTLock app and create an account.
- Tap "Add Lock" and select "Door Lock".
- The app will scan for nearby locks. Select your HAvern Smart Lock from the list.
- Follow the in-app instructions to complete the pairing process. You may need to touch the lock's keypad or use the administrator credentials.
6.2 Unlocking Methods
- Fingerprint: Place your registered finger on the fingerprint sensor. The lock will unlock if recognized.
- Password: Enter your 6-8 digit password on the keypad, then press '#'. The lock will unlock.
- IC Card: Present your registered IC card to the card reader area on the lock. The lock will unlock.
- Mechanical Key: Insert the mechanical key into the emergency keyhole and turn to unlock.
- TTLock App: Open the TTLock app, select your lock, and tap the unlock icon.
6.3 TTLock App Features
The TTLock app allows you to manage your lock remotely (with a gateway, sold separately) or via Bluetooth when nearby:
- Add/Delete users (fingerprints, passwords, cards).
- Generate time-limited, one-time, or recurring passwords.
- View unlock records and access logs.
- Adjust lock settings (e.g., auto-lock timer, volume).
- Check battery level.

Image: The HAvern Smart Lock shown alongside a smartphone displaying the TTLock application interface, demonstrating app control capabilities.
7. Maintenance
- Battery Replacement: When the low battery warning sounds, replace all batteries promptly. Use high-quality alkaline batteries for optimal performance.
- Cleaning: Wipe the lock surface with a soft, dry cloth. Do not use abrasive cleaners or solvents.
- Fingerprint Sensor: Keep the fingerprint sensor clean and dry for accurate recognition.
- Emergency Power: If batteries completely drain, use the Micro USB port for emergency power to unlock the door and replace batteries.
8. Troubleshooting
| Problem | Possible Cause | Solution |
|---|---|---|
| Lock does not respond | Dead batteries | Replace batteries or use emergency Micro USB power. |
| Fingerprint not recognized | Finger is wet/dirty, sensor is dirty, or fingerprint not registered. | Clean finger and sensor. Re-register fingerprint if necessary. |
| Password not working | Incorrect password, or password expired. | Verify password. Check app for temporary password validity. |
| TTLock App cannot connect | Bluetooth off, lock out of range, or app not paired. | Ensure Bluetooth is on. Move closer to the lock. Re-pair the lock in the app. |
| Lock is jammed | Mechanical obstruction or incorrect installation. | Check for obstructions. Re-check installation alignment. Use mechanical key if possible. |
9. Warranty and Support
For warranty information and technical support, please refer to the documentation provided with your purchase or contact your retailer. Keep your purchase receipt as proof of purchase.


