1. Introduction
Thank you for choosing the Giveet G9 Open Ear Bluetooth 5.3 Headset. This manual provides detailed instructions for setting up, operating, and maintaining your headset to ensure optimal performance and longevity. The G9 headset features an open-ear design for comfort and situational awareness, a detachable DSP noise-cancelling microphone for clear communication, and Bluetooth 5.3 for stable, multi-device connectivity.

Image 1.1: Giveet G9 Open Ear Bluetooth Headset with detachable microphone. The image displays the headset with its main body, ear hooks, and the separate boom microphone.
2. Package Contents
Please check the package for the following items:
- 1 x Giveet G9 Open Ear Headset
- 1 x Removable Mic Boom
- 4 x Removable Soft Rubber Covers (for mic port)
- 1 x USB-C Charging Cable
- 1 x User Manual

Image 2.1: Contents of the Giveet G9 headset package. This image shows the headset, detachable microphone, USB-C cable, spare rubber covers, and the user manual laid out next to the product box.
3. Product Overview
Familiarize yourself with the various components and controls of your Giveet G9 headset.

Image 3.1: Diagram of Giveet G9 headset controls and components. This image highlights the volume up/next song button, volume down/previous song button, removable mic boom, LED indicator, Type-C charging port, built-in mic, and the multi-function button for power, play/pause, answer/hang up, voice assistant, and music/game mode switch.
4. Setup
4.1 Charging the Headset
Before first use, fully charge the headset. Connect the provided USB-C charging cable to the charging port on the headset and a power source (e.g., computer USB port, USB wall adapter). The LED indicator will show charging status.
- Charging time: Approximately 1.5 hours for a full charge.
- Battery life: Up to 12 hours of continuous music playback or talk time.
- Standby time: Up to 200 hours.

Image 4.1: Giveet G9 headset battery life and charging details. This image illustrates the charging time (1.5 hours), working time (12 hours), and standby time (200 hours), with a close-up of the USB-C charging port.
4.2 Wearing the Headset
The G9 headset features an open-ear design with soft silicone ear hooks and a flexible aluminum alloy wire for a secure and comfortable fit. Place the ear hooks over your ears, ensuring the speakers rest comfortably near your ear canals without entering them. The lightweight design (30g) allows for extended wear.

Image 4.2: Man wearing Giveet G9 headset while driving. This image demonstrates the open-ear design and comfortable fit, highlighting its suitability for various activities including driving.
4.3 Attaching the Detachable Microphone
The boom microphone attaches magnetically to the headset. Align the microphone's connector with the port on the headset until it snaps into place. The microphone can be rotated 360 degrees to position it optimally for voice capture.
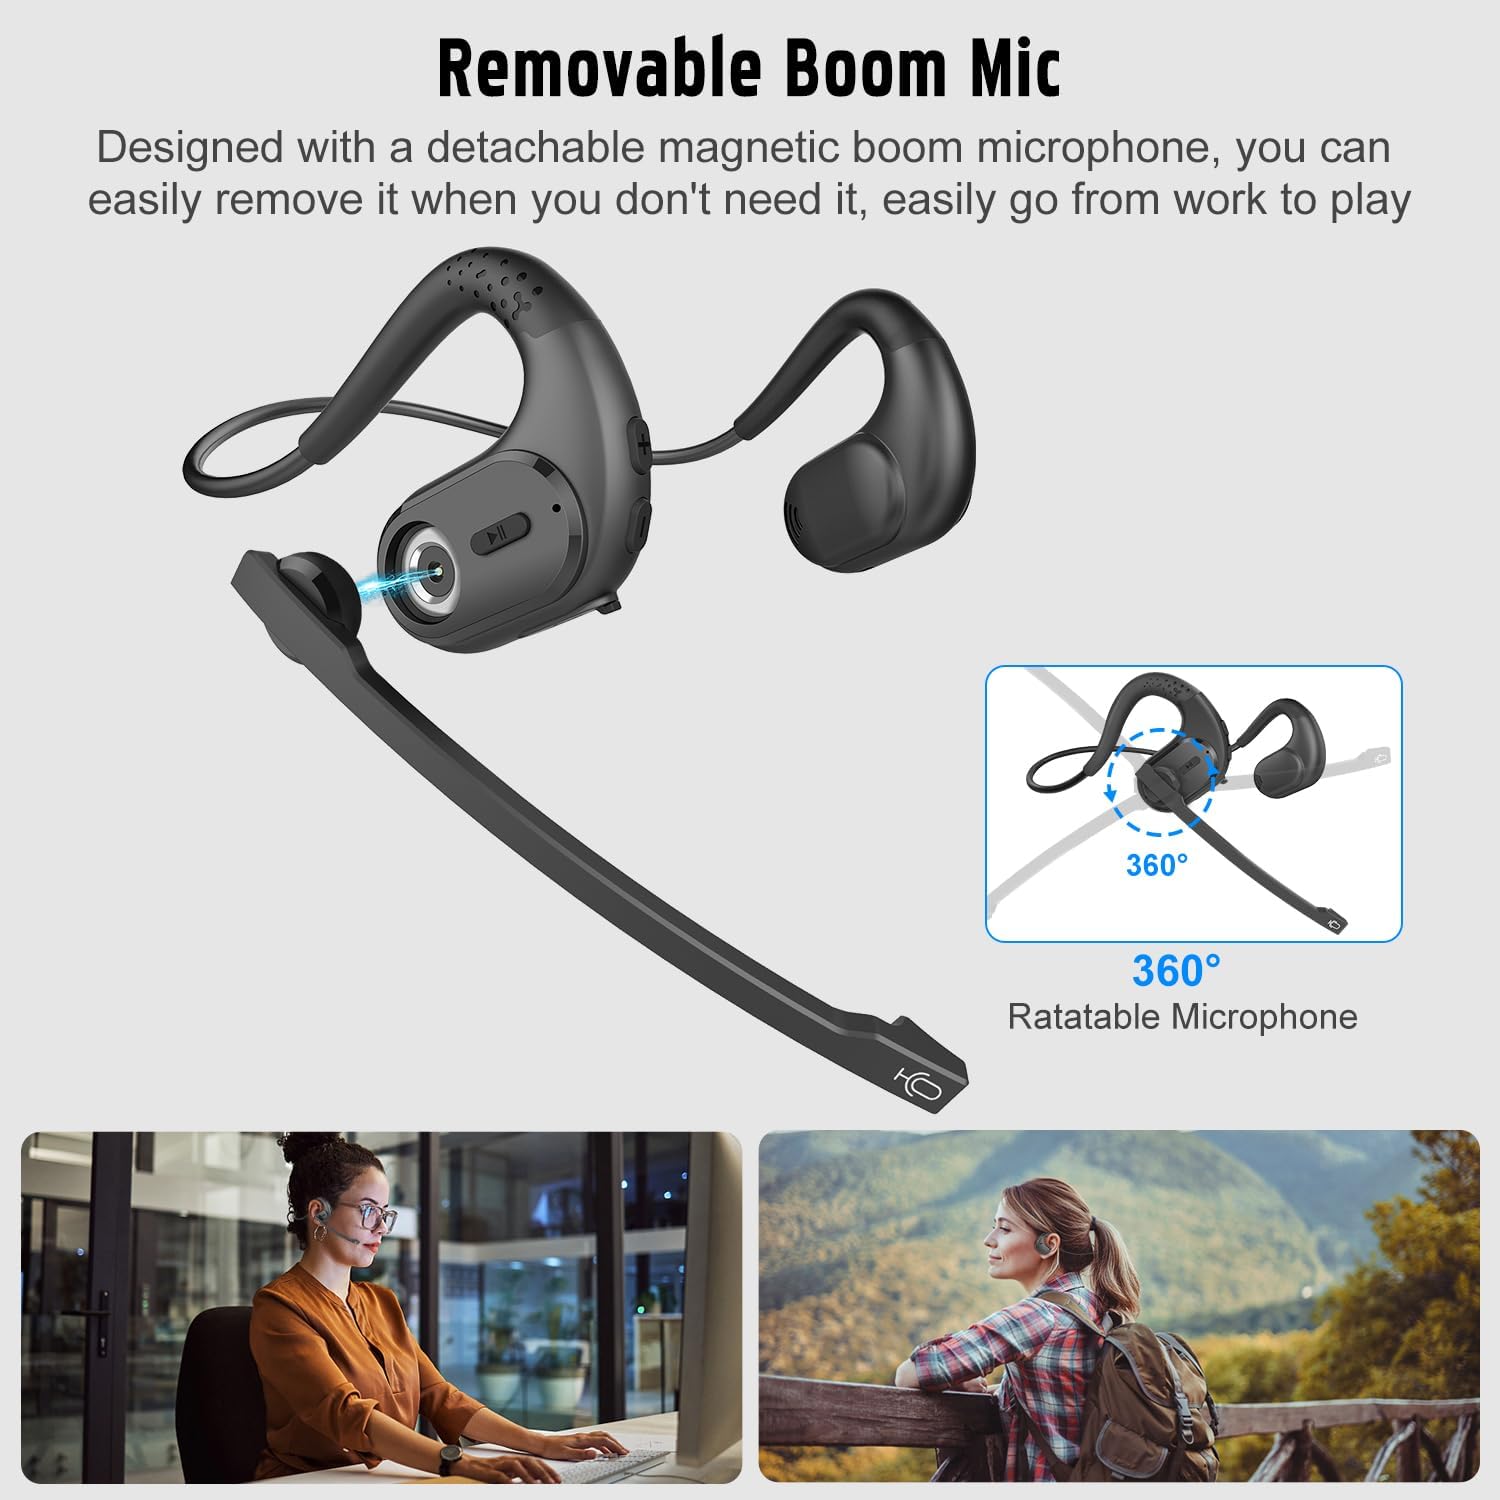
Image 4.3: Diagram showing the detachable and rotatable boom microphone. This image illustrates how the magnetic boom microphone attaches and can be rotated 360 degrees for optimal positioning.
5. Bluetooth Pairing
5.1 Initial Pairing
- Power On: Press and hold the Multi-Function Button (MFB) for 3 seconds until the LED indicator flashes blue and red, indicating pairing mode.
- Activate Bluetooth: On your device (phone, PC, laptop), enable Bluetooth.
- Select Device: In your device's Bluetooth settings, search for and select "Giveet G9".
- Connect: Once connected, the LED indicator will flash blue slowly.
5.2 Multipoint Connection
The G9 headset supports multipoint technology, allowing connection to two devices simultaneously.
- Pair the headset with the first device (e.g., laptop) as described in Section 5.1.
- Disable Bluetooth on the first device. The headset will re-enter pairing mode.
- Pair the headset with the second device (e.g., phone) as described in Section 5.1.
- Re-enable Bluetooth on the first device. The headset should automatically connect to both devices.
You can now seamlessly switch between audio sources from your two connected devices without re-pairing.

Image 5.1: Giveet G9 headset connected to a laptop and a smartphone via Bluetooth. This image visually represents the multipoint connection feature, showing the headset wirelessly linked to two devices.
6. Operating Instructions
6.1 Basic Controls
| Function | Action |
|---|---|
| Power On/Off | Press and hold MFB for 3 seconds |
| Play/Pause Music | Short press MFB |
| Volume Up | Short press '+' button |
| Volume Down | Short press '-' button |
| Next Song | Long press '+' button |
| Previous Song | Long press '-' button |
| Answer/End Call | Short press MFB |
| Reject Call | Long press MFB |
| Activate Voice Assistant | Double press MFB |
| Mute/Unmute Microphone | Press and hold '+' and '-' buttons simultaneously |
| Music/Game Mode Switch | Triple press MFB |
6.2 Microphone Usage
The detachable boom microphone features DSP noise cancellation, effectively filtering out background noise for clear voice transmission during calls. When the boom mic is attached, it will be prioritized over the built-in microphone. You can remove the boom mic when not needed, and the headset will automatically switch to its built-in microphone.

Image 6.1: Woman in office using Giveet G9 headset with DSP noise cancelling microphone. This image illustrates the headset's use in a professional setting, emphasizing the clarity provided by the DSP noise-cancelling microphone.
7. Maintenance
- Cleaning: Wipe the headset with a soft, dry cloth. Do not use abrasive cleaners or immerse in water.
- Storage: Store the headset in a cool, dry place away from direct sunlight and extreme temperatures.
- Battery Care: To preserve battery life, charge the headset regularly, even if not in frequent use. Avoid fully discharging the battery for extended periods.
- Microphone Port: Use the provided rubber covers for the microphone port when the boom mic is detached to protect it from dust and debris.
8. Troubleshooting
| Problem | Possible Solution |
|---|---|
| Headset does not power on | Ensure the headset is fully charged. Press and hold the MFB for 3 seconds. |
| Cannot pair with device | Ensure headset is in pairing mode (LED flashes blue/red). Disable and re-enable Bluetooth on your device. Move headset closer to device. |
| No sound or low volume | Check volume levels on both headset and connected device. Ensure headset is selected as the audio output device. |
| Microphone not working | Ensure the boom mic is securely attached. Check microphone settings on your device. Ensure mic is not muted (refer to Section 6.1). |
| Intermittent connection | Move closer to the connected device. Avoid obstacles between headset and device. Disconnect and re-pair the headset. |
9. Specifications
| Feature | Detail |
|---|---|
| Model Name | G9 Open Ear Headphones with Microphone |
| Brand | Giveet |
| Connectivity | Bluetooth 5.3 |
| Microphone Technology | Stereo, DSP Noise Cancelling (detachable boom mic) |
| Battery Type | Lithium-ion (1 included) |
| Charging Port | USB-C |
| Charging Time | Approx. 1.5 hours |
| Playtime/Talk Time | Up to 12 hours |
| Standby Time | Up to 200 hours |
| Weight | Approx. 30g |
| Form Factor | Open Ear |
| Compatible Devices | Cellphone, PC, Computer, Laptop, Tablet, etc. |
| Special Features | Multipoint Connection, 360° Rotatable Microphone, Lightweight Design |
10. Safety Information
- Do not disassemble or modify the headset.
- Keep the headset away from water, moisture, and extreme temperatures.
- Avoid prolonged listening at high volumes to prevent hearing damage.
- Use caution when operating vehicles or machinery while wearing the headset, as the open-ear design allows ambient sound, but full attention to surroundings is always required.
- Dispose of batteries according to local regulations. Do not expose to fire or high heat.
11. Warranty and Support
Giveet products are designed for reliability and performance. For warranty information, technical support, or customer service inquiries, please refer to the contact details provided on the product packaging or the official Giveet website. Please retain your proof of purchase for warranty claims.


