1. Introduction
This manual provides detailed instructions for the safe and effective operation of your WFLY ET08A 8-channel RC Transmitter and RF206S Receiver. Please read this manual thoroughly before using the product to ensure proper setup, operation, and maintenance. This system is designed for various remote-controlled models including airplanes, helicopters, quadcopters, boats, cars, and tanks.
2. What's in the Box
Upon opening the package, please verify that all components are present and in good condition:
- WFLY ET08A 8-Channel RC Transmitter
- WFLY RF206S Receiver
3. Product Overview
3.1 WFLY ET08A Transmitter
The WFLY ET08A is an 8-channel digital proportional R/C remote control designed for ease of use and versatility. It features a user-friendly interface with both basic and advanced menu options to suit different user needs. The transmitter includes various functions such as Fail-safe setting, Battery Voltage Telemetry, RSSI (Received Signal Strength Indication), Dual/Triple Rates, End Point Adjustment, customizable switches, Reverse Polarity Protection, and Channels Mix Control.

Figure 3.1.1: Front view of the WFLY ET08A 8-Channel RC Transmitter. This image displays the main controls, including the gimbals, switches (SA, SB, SC, SD), and the LCD screen showing operational data.

Figure 3.1.2: Side view of the WFLY ET08A 8-Channel RC Transmitter, showing its ergonomic design and profile.

Figure 3.1.3: Back view of the WFLY ET08A 8-Channel RC Transmitter, showing the battery compartment and product label.
3.2 WFLY RF206S Receiver
The RF206S is a 6-channel receiver designed to work seamlessly with the ET08A transmitter. It supports PWM, PPM, and W.BUS output modes and features external voltage detection ports for telemetry. The receiver is equipped with a 'SET' button for binding and configuration.

Figure 3.2.1: Perspective view of the WFLY RF206S 6-Channel Receiver, showing the antenna connections and channel ports.
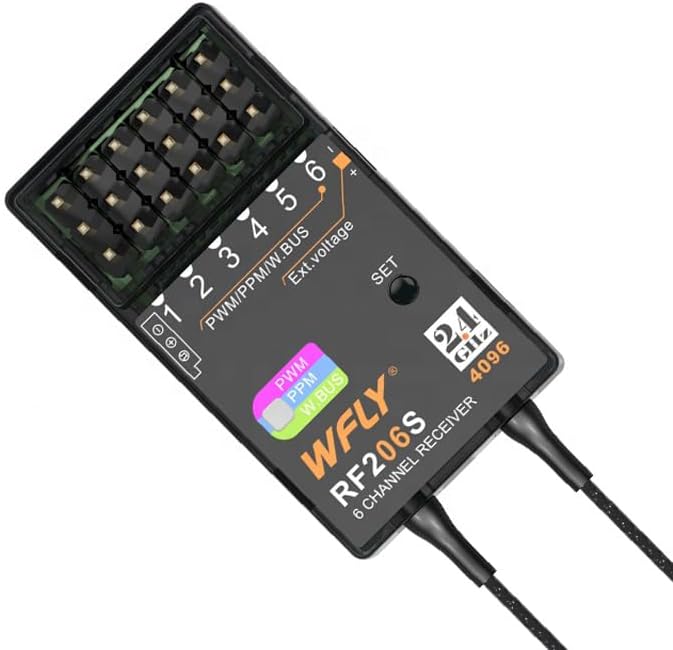
Figure 3.2.2: Top view of the WFLY RF206S 6-Channel Receiver, highlighting the PWM/PPM/W.BUS ports and the 'SET' button.
3.3 Key Features
- 8-channel RC transmitter with RF206S receiver.
- User-friendly interface with basic and advanced menu options.
- Supports Fail-safe Setting, Battery Voltage Telemetry, RSSI.
- Dual/Triple Rates, End Point Adjustment, Switch Customization.
- Reverse Polarity Protection, Multiple Battery Compatibility.
- Channels Mix Control.
- Built-in charging chips and MicroUSB charging port.
- Trainer function support.
- Two-way transmission system for real-time data.

Figure 3.3.1: The ET08A display showing channel outputs and dual rate settings, illustrating the user interface.

Figure 3.3.2: Diagram illustrating the English operating system menu structure of the WFLY ET08A, including Model Menu, System Setting, Linkage Setting, and General Menu options.
4. Setup
4.1 Battery Installation and Charging
The ET08A transmitter requires 1 Lithium Polymer battery (not included). Ensure the battery is correctly oriented before closing the battery compartment. The transmitter features built-in charging chips and a MicroUSB charging port for convenient charging of 1S lithium batteries. Use a compatible charging plug or power bank.

Figure 4.1.1: Diagram showing the built-in charging chips and MicroUSB charging port on the WFLY ET08A transmitter, along with compatible charging accessories.
4.2 Binding the Receiver (RF206S)
To establish communication between the ET08A transmitter and the RF206S receiver, a binding process is required. Follow these general steps:
- Ensure both the transmitter and receiver are powered off.
- Connect a bind plug (if required by your receiver) to the bind port on the RF206S receiver, or press and hold the 'SET' button on the receiver.
- Power on the receiver. The receiver's LED should indicate it is in binding mode (e.g., flashing rapidly).
- While holding the bind button on the transmitter (if applicable) or entering bind mode via the transmitter's menu, power on the ET08A transmitter.
- The transmitter and receiver should bind within a few seconds. The receiver's LED will typically turn solid to indicate a successful bind.
- Power off both devices, then power them on normally to confirm the bind.
Refer to the specific instructions for your model's flight controller or ESC for proper connection of the RF206S receiver.

Figure 4.2.1: Close-up view of the WFLY RF206S receiver, showing the 'SET' button used for binding and configuration.
5. Operating Instructions
5.1 Basic Controls and Navigation
The ET08A transmitter features two main gimbals for primary control (throttle, aileron, elevator, rudder), along with several switches (SA, SB, SC, SD) and rotary knobs for auxiliary functions. The LCD screen and navigation buttons (HOME/MON., EXIT/LOCK, and directional buttons) allow access to the menu system.
5.2 Menu System
The ET08A utilizes an English operating system with a user-friendly interface. Press the 'HOME/MON.' button to access the main menu. Use the directional buttons to navigate and 'HOME/MON.' to select. 'EXIT/LOCK' is used to go back or exit a menu.
Key menu sections include:
- Model Menu: For managing model-specific settings like throttle curve, throttle hold, and throttle cut.
- System Setting: Includes Model Select, Model Type, Trainer function, and Display settings.
- Linkage Setting: For Telemetry, PPM/W.BUS settings, and Receiver Output configuration.
- General Menu: Access Monitor, Function, Servo Reverse, and Dual Rate settings.
5.3 Two-Way Transmission and Telemetry
The ET08A system supports two-way transmission, eliminating the need for a separate telemetry module. The RF206S receiver has built-in receiver voltage and external voltage detection ports. This allows for real-time monitoring of critical data such as battery voltage and RSSI directly on the transmitter's display.

Figure 5.3.1: Diagram illustrating the two-way transmission system, showing how receiver voltage and external voltage are detected and displayed on the ET08A transmitter from the RF206S receiver.
5.4 Fail-Safe Setting
The Fail-safe function is crucial for safety. It allows you to pre-set the positions of all channels in case of signal loss. Consult your model's specific requirements for recommended fail-safe settings (e.g., throttle to idle, control surfaces neutral).
5.5 Model Applications
The ET08A supports a wide variety of models and configurations:
- Airplane: Supports Aileron 1, Aileron 2, Elevon multiple models with built-in mixed control.
- Multi-copter FPV: Supports PPM, S.Bus signal, F/S (Fail-Safe) mode, and status selection.
- Helicopter: Built-in (H-1) (HR3) models.
- DLG (Discus Launch Glider): Supports trimmer function for flight mode changes.
- Car Boat: Supports unidirectional and bidirectional ESC (Electronic Speed Controller).
- Tank: Compatible with 180°/270° servo function and built-in hybrid control for tracked vehicles.

Figure 5.5.1: Visual representation of the diverse model applications supported by the WFLY ET08A, including airplanes, multi-copters, helicopters, DLG, cars, boats, and tanks.

Figure 5.5.2: Additional applications for the WFLY ET08A, such as agriculture plant protection drones, intelligent driverless cars, RC fishing boats, and Schmeiser Robots, alongside user-defined functions and screen lock settings.
6. Maintenance
Proper maintenance ensures the longevity and reliable performance of your WFLY ET08A and RF206S system.
- Cleaning: Use a soft, dry cloth to clean the transmitter and receiver. Avoid using solvents or abrasive cleaners.
- Storage: Store the devices in a cool, dry place away from direct sunlight and extreme temperatures. Remove batteries from the transmitter if storing for extended periods.
- Battery Care: Follow the manufacturer's guidelines for charging and discharging Lithium Polymer batteries. Do not overcharge or over-discharge.
- Inspection: Regularly inspect all cables, connectors, and antennas for any signs of damage or wear.
7. Troubleshooting
This section addresses common issues you might encounter.
7.1 Common Reminders and Warnings
The ET08A transmitter provides various reminders and warnings to ensure safe operation:
- Start Reminder: Alerts you to initial conditions.
- Shutdown Reminder: Guides you through proper power-off sequence.
- RF Off Reminder: Indicates when the radio frequency transmission is off.
- Voltage Reminders: Provides warnings for transmitter voltage, receiver voltage, and external voltage.

Figure 7.1.1: Examples of warning messages displayed on the ET08A screen, such as 'RX IS POWER ON', 'THR POSI', and 'RF IS OFF', which aid in safe operation and real-time control.
7.2 General Troubleshooting Steps
- No Power: Check battery installation and charge level. Ensure the power switch is in the 'ON' position.
- No Signal/No Control: Verify that the transmitter and receiver are properly bound. Check all connections between the receiver and your model's components. Ensure the transmitter's RF is active.
- Erratic Control: Check for interference sources. Ensure all servo connections are secure. Re-bind the receiver if necessary.
- Display Issues: If the screen is blank or unreadable, try restarting the transmitter. Ensure the battery has sufficient charge.
8. Specifications
Technical specifications for the WFLY ET08A Transmitter and RF206S Receiver:
| Feature | Specification |
|---|---|
| Product Dimensions (Transmitter) | 4.72 x 11.81 x 6.69 inches |
| Item Weight (Transmitter) | 1.76 pounds |
| Item Model Number | WFLY ET08A |
| Channels | 8 Channels (Transmitter), 6 Channels (Receiver) |
| Receiver Model | RF206S |
| Battery Requirement (Transmitter) | 1 Lithium Polymer battery (required) |
| Manufacturer | Shezhen WFLY Technology Development Co.,Ltd |
9. Warranty and Support
WFLY products are manufactured to high-quality standards. For warranty information, technical support, or service inquiries, please contact your retailer or visit the official WFLY website. Keep your purchase receipt as proof of purchase for warranty claims.


