1. Introduction
This manual provides essential instructions for the safe and efficient operation of your Irfora Mini Portable LED Projector. Please read this manual thoroughly before using the product and retain it for future reference.
2. Safety Information
- Do not look directly into the projector lens when the lamp is on.
- Ensure proper ventilation around the projector to prevent overheating.
- Use only the power adapter supplied with the projector.
- Keep the projector away from water or other liquids.
- Do not attempt to repair the projector yourself. Contact qualified service personnel.
3. Package Contents
Verify that all items are present in your package:
- 1 x Irfora Mini Portable LED Projector
- 1 x Remote Control
- 1 x AV Cable
- 1 x Power Adapter
- 1 x User Manual (this document)

Image 3.1: The Irfora Mini Portable LED Projector shown with its remote control, AV cable, and power cable.
4. Product Overview
Familiarize yourself with the projector's components and interfaces.

Image 4.1: Top and rear view of the projector, indicating the lens, focus ring, keystone slider, control buttons (Power, Menu, Source, Direction, OK, Escape), power light, audio output, SD port, AV port, USB ports, HD port, PC-VGA port, and air exhaust.
4.1 Top Panel Controls
- Focus Ring: Adjusts image sharpness.
- Horizontal Keystone Slider: Corrects trapezoidal image distortion.
- Direction Buttons: Navigate menus.
- OK Button: Confirms selections.
- Power Button: Turns the projector on/off.
- Menu Button: Accesses the main menu.
- Source Button: Selects input sources.
- Escape Button: Returns to the previous screen or exits a menu.
4.2 Rear Panel Ports
- Audio Output: Connect external speakers or headphones.
- SD Port: Insert SD cards for media playback.
- AV Port: Connect devices using the included AV cable.
- USB Ports: Connect USB drives for media playback or other USB devices.
- HD Port (HDMI): Connect devices with HDMI output (e.g., laptops, gaming consoles).
- PC-VGA Port: Connect computers via VGA cable.
5. Setup
5.1 Placement
Position the projector on a stable, flat surface. Ensure there is adequate space for ventilation. The optimal projection distance ranges from 1.1 to 5 meters, allowing for a screen size of 32 to 176 inches. For the best viewing experience, a projection size of approximately 50 inches is recommended.

Image 5.1: Illustration of various projection distances (1.5m, 2.0m, 2.5m, 2.84m, 3.5m) and their corresponding screen sizes (50", 72", 84", 100", 120").
5.2 Power Connection
- Connect the power adapter to the projector's power input port.
- Plug the power adapter into a suitable electrical outlet.
- The power indicator light on the projector will illuminate.
5.3 Connecting Devices
The projector supports various input sources. Use the appropriate cable to connect your device:
- HDMI: For laptops, gaming consoles (e.g., PS4), Blu-ray players.
- VGA: For desktop computers or older laptops.
- USB: For USB flash drives containing media files.
- AV: For DVD players, older video game consoles, or other devices with AV output.
- TF Card (Micro SD): For memory cards containing media files.
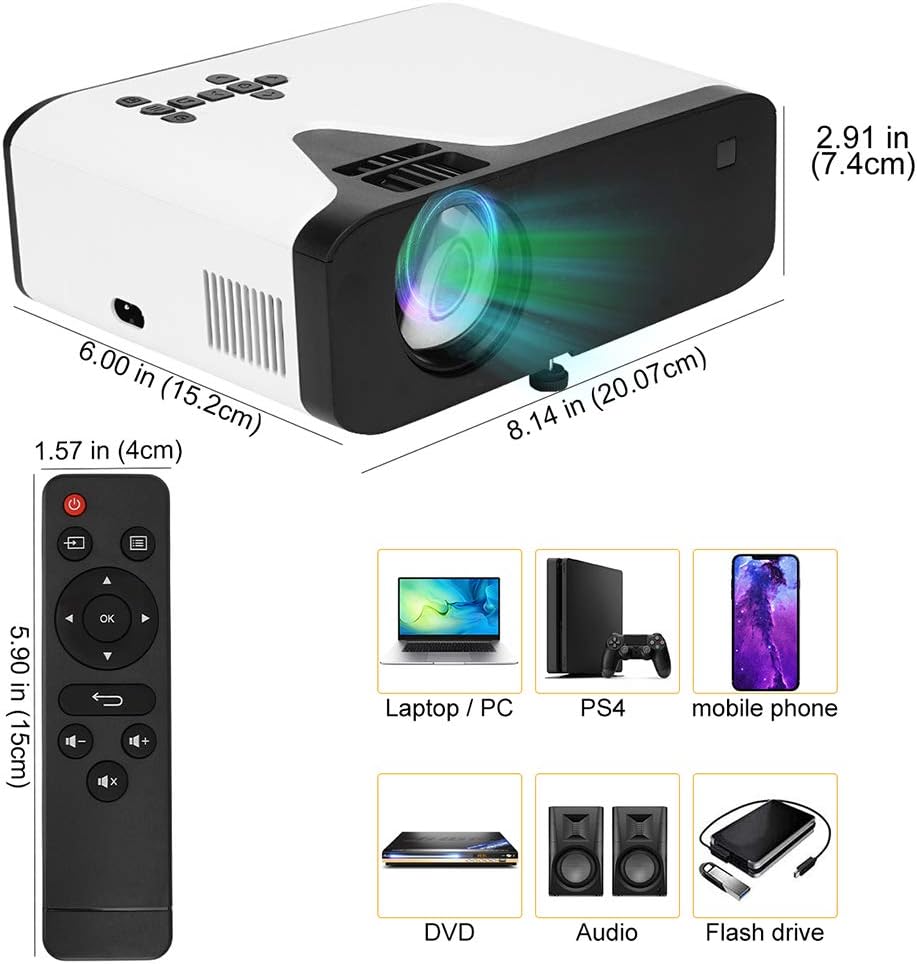
Image 5.2: The projector's dimensions are shown, along with the remote control. Examples of compatible devices include laptops/PCs, PS4, mobile phones, DVD players, external audio systems, and flash drives.
6. Operating Instructions
6.1 Power On/Off
Press the Power Button on the projector or the remote control to turn the unit on or off.
6.2 Focus and Keystone Adjustment
- Focus: Rotate the Focus Ring near the lens until the projected image is clear and sharp.
- Keystone: If the image appears trapezoidal (wider at the top or bottom), use the Horizontal Keystone Slider to correct the distortion. The projector supports a keystone correction of ±15°.

Image 6.1: Detailed view of the projector's side, highlighting the keystone adjustment slider and the focus ring for image clarity.
6.3 Input Source Selection
Press the Source Button on the projector or remote control to cycle through available input sources (HDMI, VGA, USB, AV, TF Card).
6.4 Menu Navigation
Use the Menu Button to access settings. Navigate using the Direction Buttons and confirm selections with the OK Button. Use the Escape Button to exit menus.
6.5 Remote Control Usage
The included remote control allows for convenient operation from a distance. Ensure the remote has a working CR2032 battery (1 x 3.0V 210mAh CR2032) and is pointed towards the projector's IR receiver.
7. Maintenance
7.1 Cleaning
- Lens: Gently wipe the lens with a soft, lint-free cloth specifically designed for optical surfaces. Do not use abrasive cleaners.
- Casing: Wipe the projector's exterior with a soft, dry cloth. For stubborn marks, slightly dampen the cloth with water.
- Ventilation: Regularly check and clean the air vents to ensure proper airflow and prevent dust buildup.
7.2 Storage
When not in use for extended periods, store the projector in a cool, dry place, away from direct sunlight and extreme temperatures. Use the original packaging or a protective case to prevent dust and damage.
8. Troubleshooting
| Problem | Possible Cause | Solution |
|---|---|---|
| No image projected |
|
|
| Blurry image |
|
|
| No sound |
|
|
| Remote control not working |
|
|
9. Specifications
| Feature | Detail |
|---|---|
| Working Voltage | AC100V ~ 240V 50Hz/60Hz |
| Power Consumption | 50 W |
| Brightness | 4500 Lumens |
| Contrast Ratio | 2000:1 |
| Lamp Life | 50,000 hours |
| Aspect Ratio | 4:3 / 16:9 |
| Native Resolution | 720P (supports 1080P) |
| Projection Screen Size | 32-176 inches (best at approx. 50 inches) |
| Projection Distance | 1.1-5 m |
| Audio Formats | MP3, AAC |
| Image Formats | JPG, BMP, PNG |
| Keystone Correction | ±15° |
| Remote Control Battery | 1 * 3.0V 210mAh CR2032 |
| Product Dimensions | 31 x 20 x 12 cm (approx. 12.2 x 7.87 x 4.72 inches) |
10. Warranty and Support
This product comes with a standard manufacturer's warranty. For specific warranty details, please refer to the documentation provided at the time of purchase or contact your retailer. For technical support or service inquiries, please contact Irfora customer service or your authorized dealer.


