1. Safety Information
Please read and understand all instructions before assembling and using this chair. Keep this manual for future reference.
- Ensure all parts are present and undamaged before assembly. Do not use if any parts are missing or broken.
- Assemble the chair on a soft, clean surface to prevent scratches.
- Do not overtighten screws during assembly to avoid damaging components.
- Keep children away from the assembly area and small parts.
- This chair is designed for single-person use. Do not stand on the chair.
- Maximum weight capacity: 300 lbs (136 kg).
- Regularly check all bolts and screws to ensure they remain tight.
2. Parts List
Before you begin assembly, verify that all components are included in your package. Refer to the diagram below for identification.
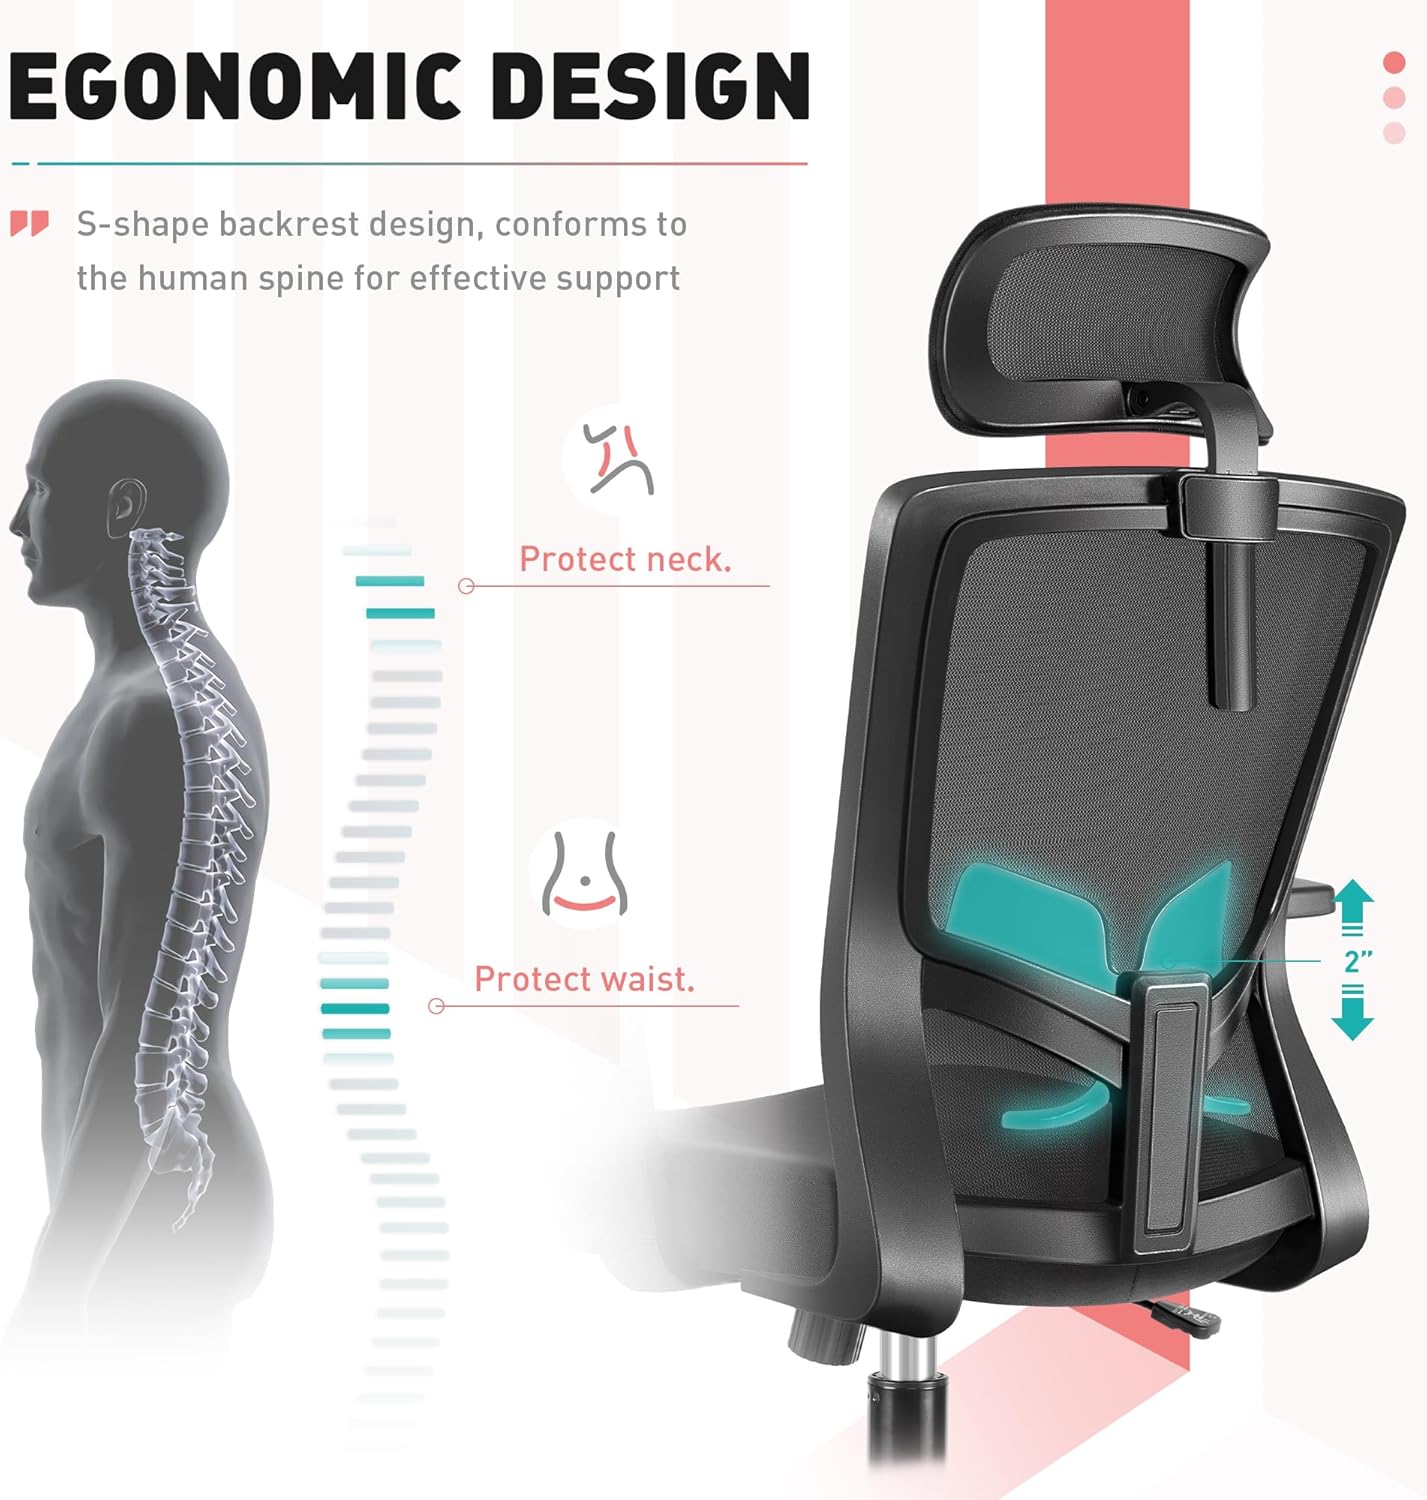
Figure 1: All components of the Brick Attic Ergonomic Desk Chair Model 912 laid out for assembly. This includes the star base, five casters, gas lift, two armrests, seat cushion, chassis, back support with mesh, headrest, various screws, and gaskets.
- A: Back Support (1 pc)
- B: Seat (1 pc)
- C: Armrests (2 pcs)
- D: Chassis (1 pc)
- E: Base (1 pc)
- F: Gas Lift (1 pc)
- G: Casters (5 pcs)
- H: Headrest (1 pc)
- I: Screws (M6x18mm, 4 pcs)
- J: Screws (M6x25mm, 8 pcs)
- K: Screws (M6x35mm, 4 pcs)
- M: Gaskets (4 pcs)
- N: Head Support Cover (1 pc)
- Allen Wrench (1 pc)
3. Assembly Instructions
Follow these steps carefully to assemble your ergonomic desk chair. An assembly video is also provided for visual guidance.
Video 1: Step-by-step assembly guide for the Brick Attic Ergonomic Desk Chair Model 912.
- Step 1: Attach Casters to Base
Insert the 5 casters (G) into the holes at the ends of the star base (E). Press firmly until they click into place.
Image shows casters being inserted into the star-shaped chair base.
- Step 2: Install Gas Lift
Place the gas lift (F) into the central hole of the assembled base (E). Ensure it sits securely.
Image shows the gas lift being placed into the center of the star base.
- Step 3: Attach Armrests to Seat
Align the armrests (C) with the pre-drilled holes on the underside of the seat (B). Secure them using 6 screws (J) (M6x25mm) and the provided Allen wrench. Ensure the "FRONT" label on the seat aligns with the front of the armrests.

Image shows the underside of the seat with armrests being attached using screws.
- Step 4: Install Chassis to Seat
Position the chassis (D) onto the underside of the seat (B), ensuring the front of the chassis aligns with the "FRONT" label on the seat. Secure it with 4 screws (I) (M6x18mm) and the Allen wrench.
Image shows the chassis being screwed into the underside of the seat, aligning with the "FRONT" indicator.
- Step 5: Attach Back Support to Seat
Align the back support (A) with the rear attachment points on the seat (B). Secure it using 4 screws (K) (M6x35mm) and 4 gaskets (M). Use the Allen wrench to tighten.
Image shows the back support being attached to the seat using screws and gaskets.
- Step 6: Install Headrest
Attach the headrest (H) to the top of the back support (A) using 2 screws (J) (M6x25mm). Once secured, snap the head support cover (N) into place to conceal the screws.
Image shows the headrest being attached to the back support, followed by the installation of the head support cover.
- Step 7: Connect Upper and Lower Parts
Carefully align the hole in the chassis (D) with the gas lift (F) on the base. Gently lower the assembled seat and back onto the gas lift until it is securely seated. The installation is now complete.
Image shows the final step of assembly, where the upper chair portion is placed onto the gas lift and base.
4. Product Features and Adjustments
Your Brick Attic Ergonomic Desk Chair is designed with multiple adjustable features to provide optimal comfort and support.
Video 2: Overview of the Brick Attic Ergonomic Desk Chair's features and adjustments.
4.1 Ergonomic Design & Lumbar Support
The chair features an S-shape backrest design that conforms to the natural curve of the human spine, providing effective support for both the neck and waist. The lumbar support is adjustable to suit individual preferences.

Image illustrates the S-shaped backrest and adjustable lumbar support for spinal alignment.
4.2 Adjustable Headrest
The headrest provides comfortable neck and head support. It can be adjusted both vertically (up and down by 3.9 inches) and for its rotation angle (up to 45 degrees) to find your ideal position.
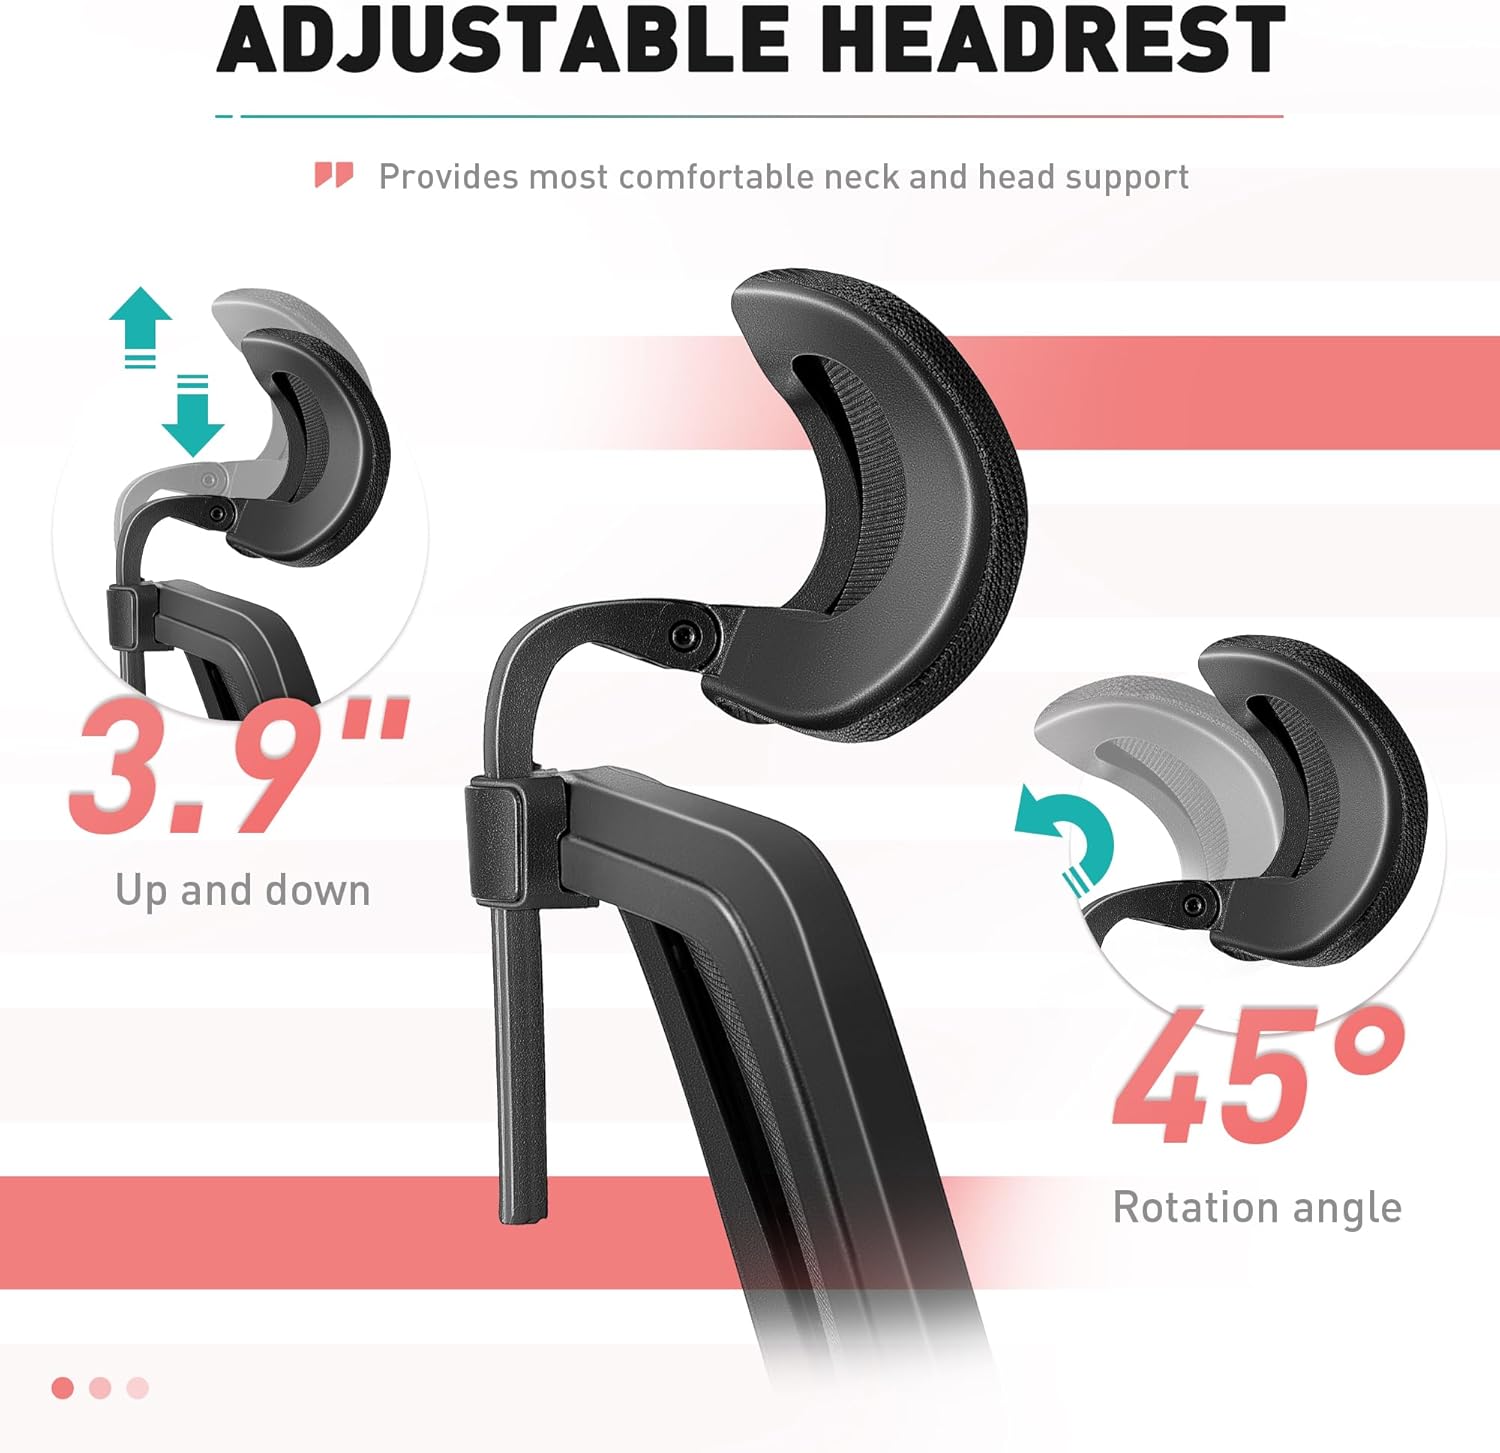
Image demonstrates the headrest's ability to move up/down and tilt for personalized comfort.
4.3 Seat Height Adjustment
Adjust the seat height to your most suitable position. Lift the lever located under the seat to raise or lower the chair. The adjustment range is approximately 3.3 inches to accommodate various user heights.
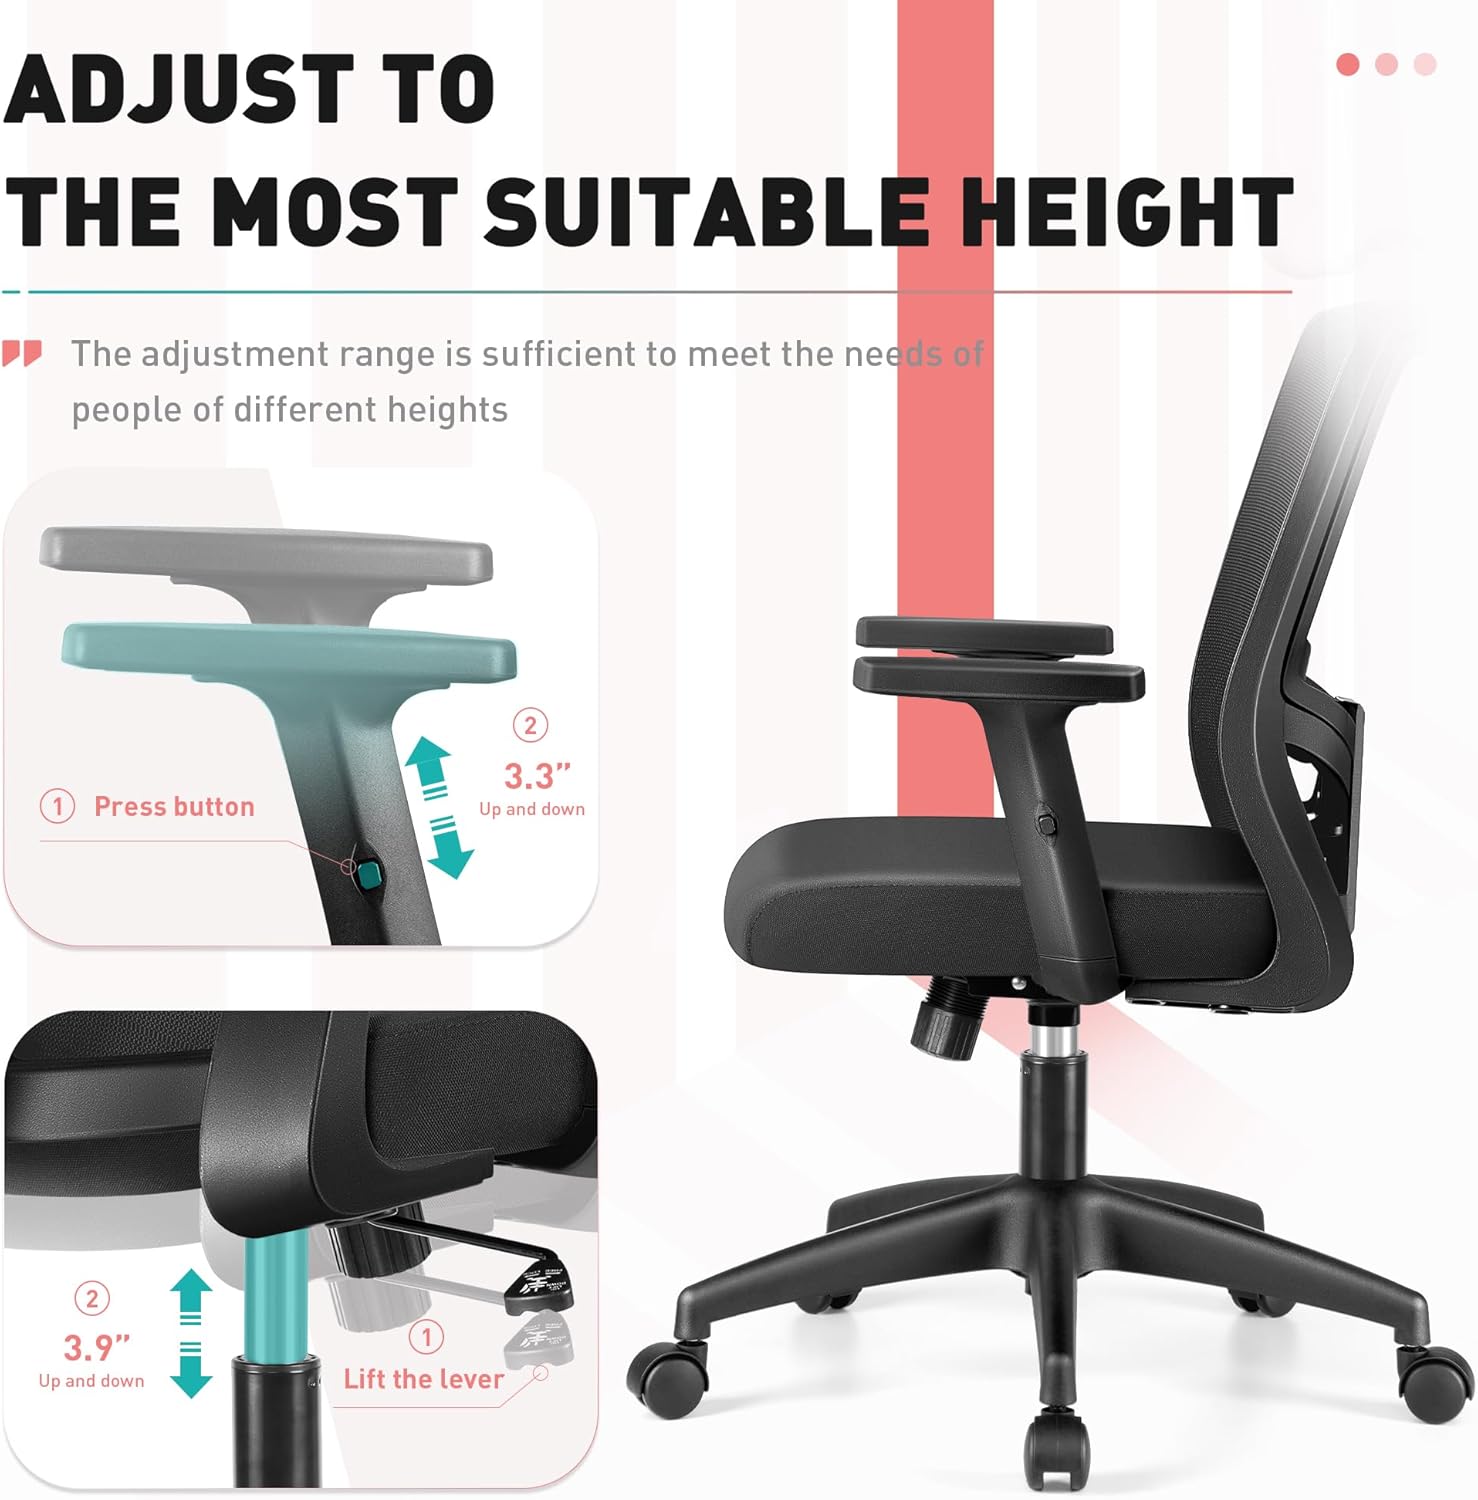
Image shows the lever used to adjust the chair's height, with an arrow indicating the upward and downward movement.
4.4 Rocking Function
The chair features a rocking function that allows you to adjust the tilt of the backrest up to 120 degrees. Use the lever under the seat to engage or disengage the rocking motion, and the tension knob to control the resistance of the recline.

Image displays the chair's rocking capability, showing the tilt angle and the mechanism for adjusting tilt tension.
4.5 Breathable Mesh & Comfortable Seat
The backrest is made of skin-friendly, breathable mesh fabric to keep you cool throughout the day. The seat cushion is constructed with high-density elastic sponge for enhanced comfort during long periods of sitting.

Image highlights the breathable mesh material of the backrest and the high-density elastic sponge of the seat for comfort.
5. Care & Maintenance
- Cleaning: Wipe the chair's frame with a soft, damp cloth. For the mesh and fabric parts, use a mild soap solution and a soft brush, then wipe clean with a damp cloth and allow to air dry. Avoid harsh chemicals.
- Inspection: Periodically check all screws and bolts to ensure they are tight. Retighten if necessary to maintain stability and safety.
- Movement: If the casters become stiff, clean them and apply a small amount of silicone-based lubricant.
- Avoid Direct Sunlight: Prolonged exposure to direct sunlight can cause fading and degradation of materials.
6. Troubleshooting
- Chair Squeaks: Check all screws and bolts for tightness. Apply a small amount of silicone lubricant to moving parts if the squeaking persists.
- Gas Lift Not Functioning: Ensure the height adjustment lever is fully engaged or disengaged. If the issue persists, the gas lift may need replacement.
- Chair Feels Unstable: Verify that all assembly screws are securely tightened and that the casters are fully inserted into the base.
- Difficulty Adjusting Recline: Check the tension knob under the seat. Loosen it to make reclining easier, or tighten it for more resistance.
7. Specifications
- Brand: Brick Attic
- Model: 912
- Color: Black
- Material: Polypropylene, Mesh, High-Density Elastic Sponge
- Product Dimensions: 24.2"D x 12"W x 22"H (61.5cm D x 30.5cm W x 56cm H)
- Weight Capacity: 300 lbs (136 kg)
- Adjustable Headrest: 3.9" (10cm) vertical adjustment, 45° rotation
- Rocking Angle: Up to 120°
Image showing the various dimensions of the chair, including height, width, and depth of different components.
8. Warranty and Support
For warranty information or technical support, please refer to the contact details provided with your purchase or visit the official Brick Attic website. Keep your proof of purchase for any warranty claims.
For additional assistance, you may contact customer service via the Brick Attic Store on Amazon.