1. Introduction
Thank you for choosing the WORKPRO 1500W Rotary Hammer Drill. This heavy-duty tool is designed for demanding tasks such as drilling in concrete, wood, and steel, as well as chiseling applications. This manual provides essential information for the safe and efficient operation, maintenance, and troubleshooting of your rotary hammer drill. Please read it thoroughly before first use and keep it for future reference.

Image 1.1: WORKPRO 1500W Rotary Hammer Drill and included accessories.
2. General Safety Instructions
Always observe basic safety precautions to reduce the risk of fire, electric shock, and personal injury. Failure to follow these instructions may result in serious injury.
- Work Area Safety: Keep the work area clean and well-lit. Cluttered or dark areas invite accidents. Do not operate power tools in explosive atmospheres, such as in the presence of flammable liquids, gases, or dust.
- Electrical Safety: Power tool plugs must match the outlet. Never modify the plug in any way. Avoid body contact with earthed or grounded surfaces. Do not expose power tools to rain or wet conditions.
- Personal Safety: Always wear eye protection. Use hearing protection when operating the tool for extended periods. Wear a dust mask if drilling in dusty conditions. Dress properly; avoid loose clothing or jewelry.
- Tool Use and Care: Do not force the power tool. Use the correct power tool for your application. Disconnect the plug from the power source before making any adjustments, changing accessories, or storing power tools.
- Maintenance: Maintain power tools. Check for misalignment or binding of moving parts, breakage of parts, and any other condition that may affect the power tool’s operation.
3. Product Components and Included Items
Familiarize yourself with the parts of your WORKPRO Rotary Hammer Drill and the accessories provided.

Image 3.1: Key components of the rotary hammer drill, including SDS-PLUS Chuck, Four Functions Switch, Grease Pot, Shock Absorber, On/Off Switch, Cushioned Handle, Variable Speed Control, 360° Rotatable Handle, and Heat Outlet.
Included Accessories:

Image 3.2: The complete set of accessories includes a carrying case, rotary hammer drill, SDS-plus point flat bit (250mm), SDS-plus point chisel bit (250mm), wrench, grease, SDS-plus drill bits (8mm, 10mm, 12mm), and a dust collector.
- 1 x Heavy-duty Rotary Hammer Drill
- 3 x SDS-plus Drill Bits (8 mm, 10 mm, 12 mm)
- 1 x Round Shank Chisel (Φ14 × 250 mm)
- 1 x Flat Chisel (Φ14 × 250 mm)
- 1 x Grease container
- 1 x Carbon Brush set
- 1 x Dust Cover
- 1 x Wrench
- 1 x Carrying Case
4. Setup and Assembly
4.1 Attaching the Auxiliary Handle
The 360° rotatable handle provides better control and comfort. Loosen the handle clamp, position the handle to your desired angle, and tighten the clamp securely.
4.2 Inserting and Removing SDS-plus Bits
The SDS-plus chuck allows for quick and secure bit changes.
- Inserting: Clean the bit shank. Pull back the chuck collar, insert the bit into the chuck until it clicks into place. Release the collar. Pull on the bit to ensure it is securely locked.
- Removing: Pull back the chuck collar and pull the bit out.

Image 4.1: Illustration of the auto-lock SDS-plus chuck for secure bit clamping.
4.3 Attaching the Dust Collector
For cleaner operation and to protect the user, attach the dust collector to the front of the tool when drilling.

Image 4.2: The anti-dust cover protects users and the machine from dust and debris.
5. Operating Instructions
The WORKPRO Rotary Hammer Drill features four operating modes and variable speed control for versatile applications.
5.1 Mode Selection
Use the four-function switch located on the side of the tool to select the desired operating mode:
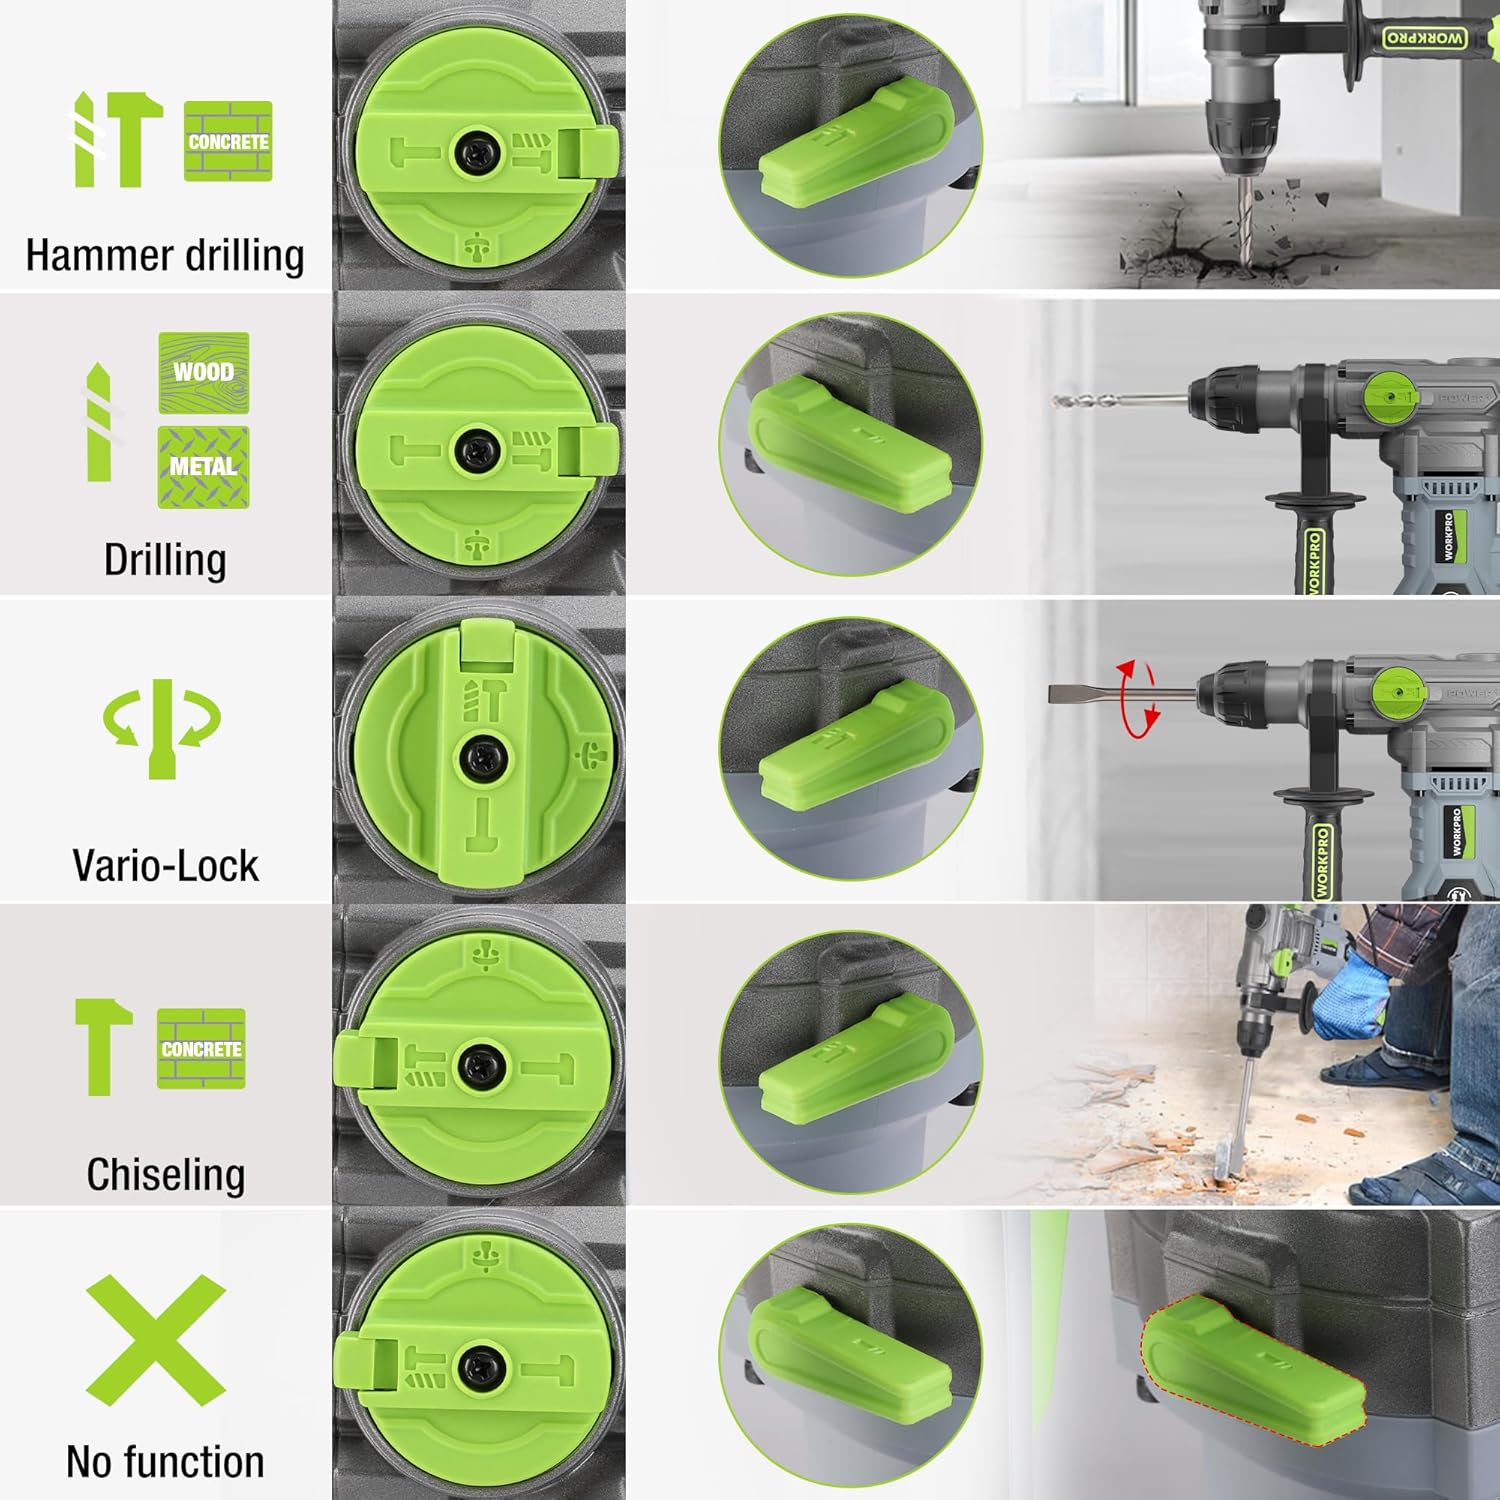
Image 5.1: The four-function switch allows selection between Hammer Drilling, Drilling, Vario-Lock (Chisel Adjust), and Chiseling modes.
- Hammer Drilling: For drilling in concrete and masonry with impact.
- Drilling: For drilling in wood, metal, and plastic without impact.
- Chiseling (Hammer Only): For light chiseling work in concrete and masonry.
- Vario-Lock (Chisel Adjust): Allows you to rotate and lock the chisel in various positions to optimize the working angle.

Image 5.2: Visual representation of the hammer drilling, drilling, hammer, and chisel adjust modes.
5.2 Variable Speed Control
The variable speed control allows you to adjust the rotation speed (0-930 RPM) and impact frequency (0-4300 BPM) to match the material and application.
- Rotate the speed adjustment dial to increase or decrease the speed.
- Start with a lower speed for precise drilling and increase as needed.
5.3 Drilling Capacities
The tool offers excellent drilling performance across various materials:
- Concrete: Up to 32 mm
- Wood: Up to 42 mm
- Steel: Up to 13 mm
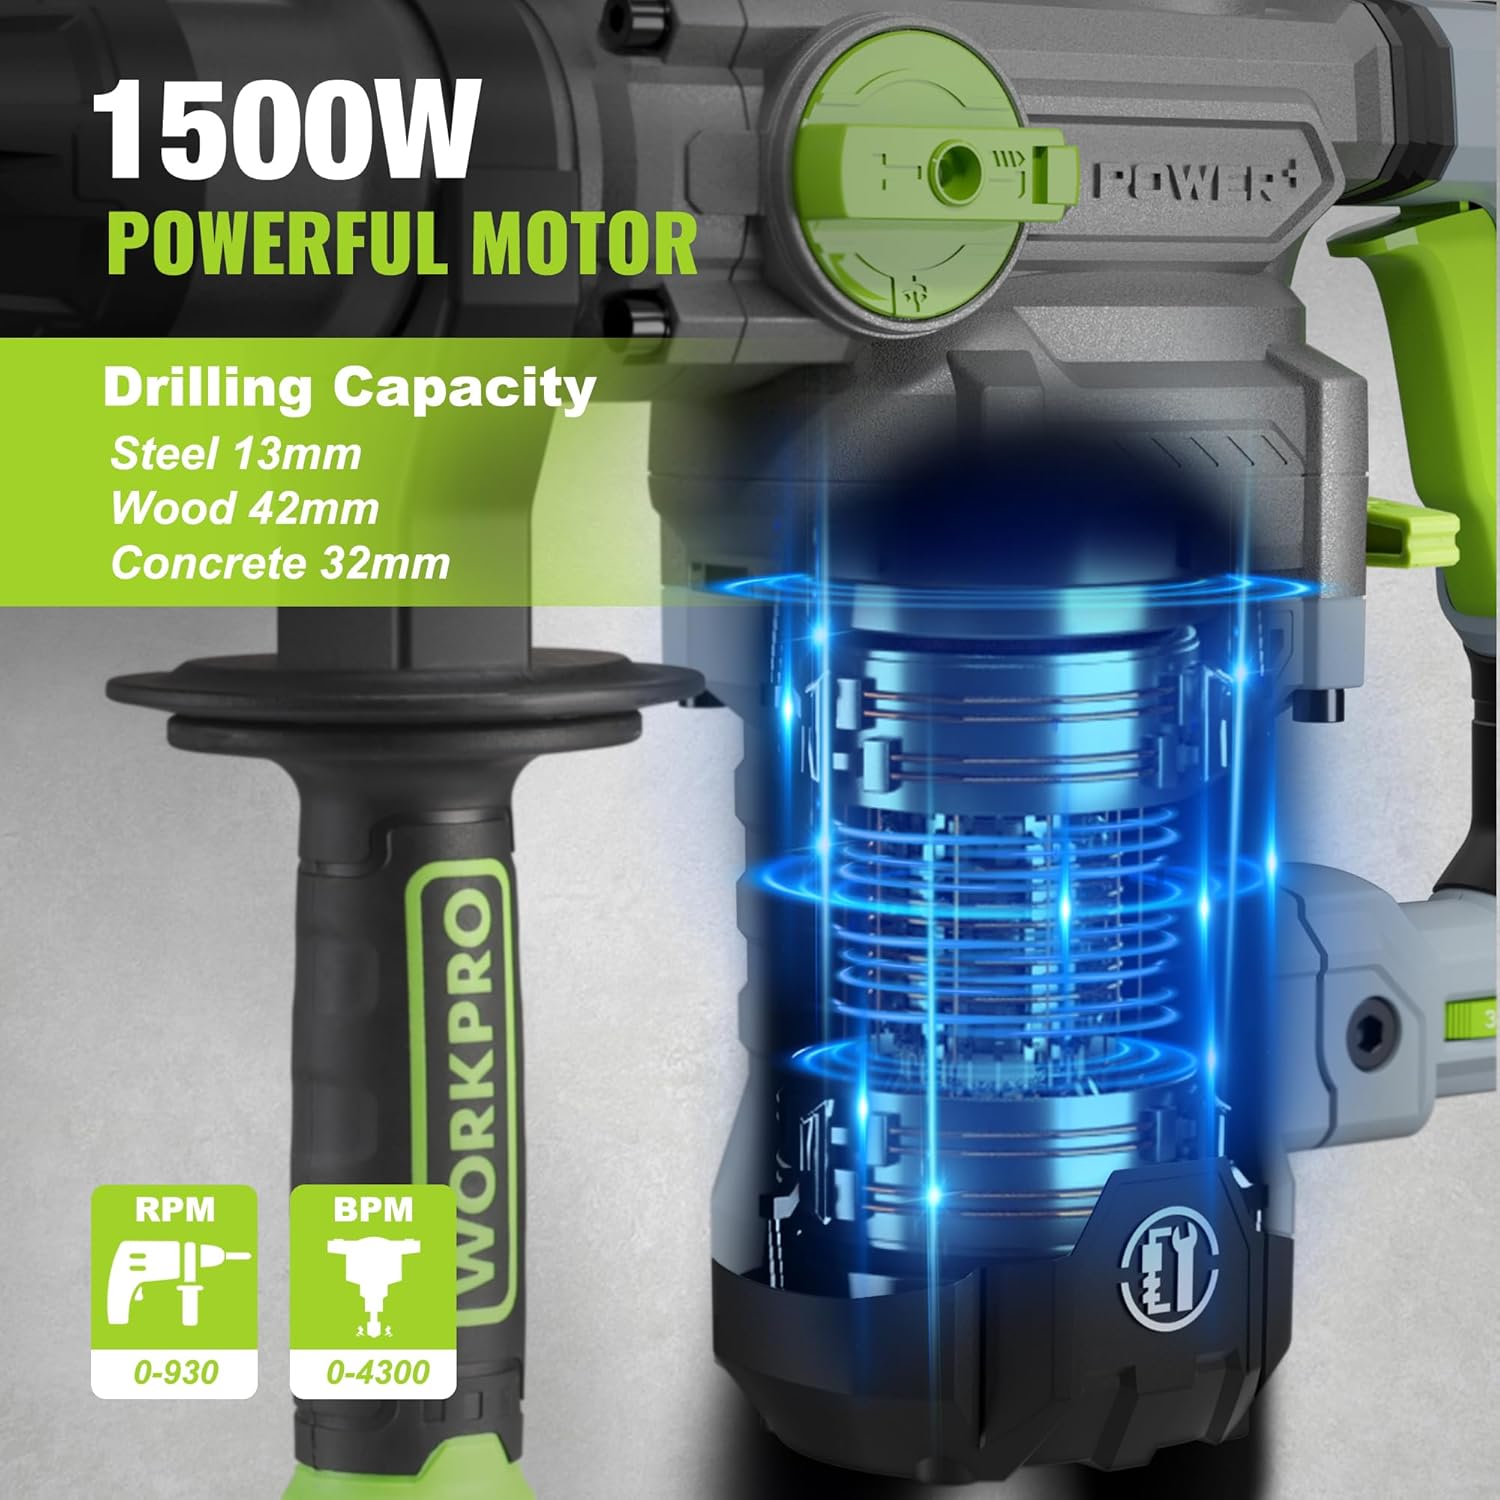
Image 5.3: The 1500W motor provides sufficient power for drilling in steel, wood, and concrete.
5.4 Application Examples

Image 5.4: The tool is suitable for various tasks including chiseling concrete, removing tiles, concrete drilling, and floor breaking.
6. Maintenance
Regular maintenance ensures the longevity and optimal performance of your tool.
6.1 Cleaning
- Always disconnect the tool from the power supply before cleaning.
- Clean the ventilation slots regularly to prevent overheating.
- Wipe the tool housing with a soft, damp cloth. Do not use harsh chemicals or abrasive cleaners.
- The tool features a dust-proof design and anti-dust bottom structure to extend its service life.
6.2 Grease Replenishment
To maintain optimal performance and durability, replenish the grease every 30-40 hours of cumulative use.
- Use the provided wrench to open the grease pot.
- Apply the advanced lubricant (grease) as instructed.
- Securely close the grease pot after replenishment.
Image 6.1: Instructions for grease replenishment using the provided spanner and grease.
6.3 Carbon Brush Replacement
Carbon brushes are wear parts and should be checked periodically. Replace them when they are worn down to their limit to ensure consistent motor performance.
7. Troubleshooting
This section addresses common issues you might encounter. For problems not listed here, contact customer support.
| Problem | Possible Cause | Solution |
|---|---|---|
| Tool does not start | No power supply; Faulty switch; Worn carbon brushes | Check power connection; Test switch; Replace carbon brushes |
| Reduced drilling performance | Dull drill bit; Incorrect mode selected; Insufficient grease | Replace or sharpen drill bit; Select correct mode; Replenish grease |
| Excessive vibration/noise | Loose components; Damaged bit; Internal issue | Check all connections; Replace bit; Contact service center |
| Overheating | Blocked ventilation slots; Prolonged heavy use | Clean ventilation slots; Allow tool to cool down |
8. Technical Specifications
| Feature | Specification |
|---|---|
| Model Number | W125244A |
| Input Voltage | 230-240 V |
| Frequency | 50 Hz |
| Rated Input Power | 1500 W |
| No-load Speed | 0-930 rpm ±10% |
| Impact Frequency | 0-4300 bpm ±10% |
| Single Impact Force | 5.5 J |
| Drilling Capacity (Concrete) | 32 mm |
| Drilling Capacity (Wood) | 42 mm |
| Drilling Capacity (Steel) | 13 mm |
| Chuck Type | SDS-plus |
| Product Dimensions (L x W x H) | 38.6 x 10.4 x 26.4 cm |
| Weight | 8.34 kg |
| Power Source | Corded Electric |
| Number of Gears | 6 (Variable Speed) |
9. Warranty and Support Information
For warranty details, product support, or service inquiries, please refer to the warranty card included with your purchase or contact WORKPRO customer service directly. Keep your proof of purchase for any warranty claims.