1. Introduction
This manual provides instructions for the safe and efficient operation of your Scotch Thermal Laminator TL1302X. Please read this manual thoroughly before using the device and retain it for future reference. The Scotch TL1302X is designed to protect documents, photos, and other paper items up to 13 inches wide using thermal laminating pouches.

Image 1: Scotch Thermal Laminator TL1302X. This image shows the white laminator unit with its power and temperature setting buttons, and the input and output slots.
2. Safety Information
- Electrical Safety: This machine is suitable for use only with a grounded 120V outlet. Do not use the laminator with a voltage or outlet converter.
- Heat: The laminator uses heat. Avoid touching the laminating area during operation to prevent burns. Allow the machine to cool before storing.
- Ventilation: Ensure adequate ventilation around the laminator during use.
- Children: Keep the laminator out of reach of children. Adult supervision is required if children are present during operation.
- Liquid Contact: Do not expose the laminator to water or other liquids.
- Maintenance: Do not attempt to open or repair the laminator yourself. Refer all servicing to qualified personnel.
- Auto Shutoff: The device features an auto shutoff function after one hour of inactivity to conserve energy.
3. Product Features
- Wide Input: Accommodates items up to 13 inches wide.
- Dual Temperature Settings: Two heated rollers support both 3-mil and 5-mil laminating pouches.
- Fast Warm-up: Ready to use in approximately one minute.
- Quick Lamination: Laminates at a rate of 18 inches per minute.
- Quality Results: Designed to produce bubble- and wrinkle-free laminated documents.
- Energy Saving: Automatic shutoff after one hour of inactivity.
- Pouch Release Lever: For clearing misfed pouches.

Image 2: Key features of the Scotch Thermal Laminator, highlighting its quick warm-up time, wide input, and professional results.
4. Setup
- Unpack: Carefully remove the laminator from its packaging.
- Placement: Place the laminator on a stable, flat surface with adequate space around it for proper ventilation and for documents to pass through.
- Power Connection: Plug the power cord into a grounded 120V electrical outlet.
5. Operating Instructions
5.1 Preparing the Laminator
- Power On: Press the Power button. The Power indicator light will illuminate.
- Select Pouch Thickness: Choose the appropriate setting for your laminating pouch:
- 3 mil: For standard documents and everyday use.
- 5 mil: For thicker, more rigid, and durable results.
- Warm-up: Wait for the laminator to warm up. This typically takes about one minute. The "Ready" indicator light will illuminate when the machine is ready for use.

Image 3: Step 1 - Prepare the laminator by turning it on and selecting the 3 mil or 5 mil setting.
5.2 Laminating a Document
- Place Document: Open a laminating pouch and carefully place your document inside, centering it as much as possible. Ensure the document does not exceed the pouch's edges.
- Insert Pouch: With the sealed edge of the pouch first, gently insert the pouch into the laminator's input slot. The laminator will automatically feed the pouch through.
- Seal: Allow the laminator to complete the process. The laminated document will exit the output slot.
- Cool and Trim: Once the laminated item exits, allow it to cool on a flat surface. If necessary, trim any excess pouch material around the edges.
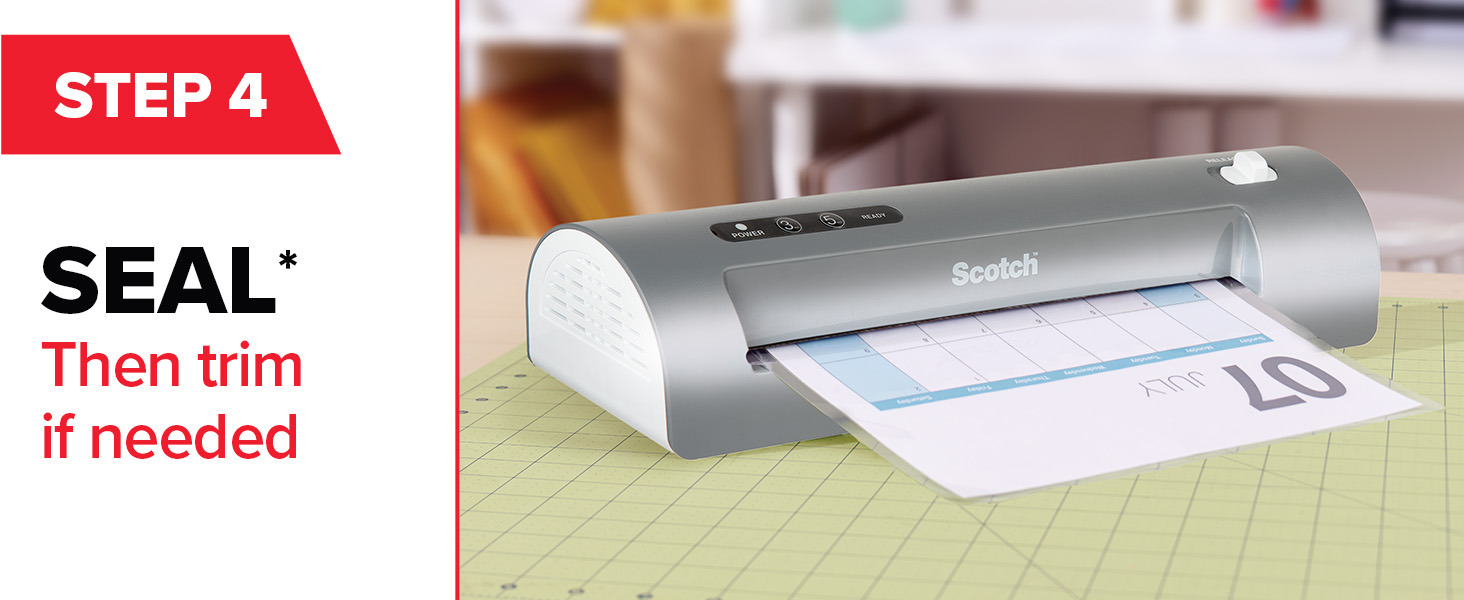
Image 4: Step 2 - Place the item to be laminated inside the pouch.

Image 5: Step 3 - Insert the sealed end of the pouch into the laminator.
Image 6: Step 4 - The laminator seals the document. Trim if needed after cooling.
6. Maintenance
- Cleaning: Ensure the laminator is unplugged and completely cool before cleaning. Wipe the exterior with a soft, dry cloth. Do not use abrasive cleaners or solvents.
- Storage: Store the laminator in a cool, dry place when not in use.
- Pouch Release Lever: Use the pouch release lever if a pouch becomes jammed or misfed. This mechanism allows you to gently pull the pouch out.
7. Troubleshooting
| Problem | Possible Cause | Solution |
|---|---|---|
| Laminator does not turn on. | Not plugged in; power outlet not active; power button not pressed. | Ensure the power cord is securely plugged into a grounded 120V outlet. Check the outlet with another device. Press the Power button. |
| Pouch is jammed or misfed. | Pouch inserted incorrectly; document too thick; rollers dirty. | Immediately use the Pouch Release Lever to gently pull the pouch out. Ensure the sealed edge is inserted first. Do not force the pouch. Clean rollers if necessary (when cool and unplugged). |
| Laminated document has bubbles or wrinkles. | Incorrect temperature setting; pouch not flat; document too thick. | Ensure the correct temperature setting (3 mil or 5 mil) is selected for your pouch. Ensure the document is flat and centered within the pouch. Avoid laminating overly thick items. |
| Laminator is not heating up. | Incorrect temperature setting; internal malfunction. | Verify the 3 mil or 5 mil setting is selected. If the "Ready" light does not illuminate after the warm-up period, contact customer support. |
8. Specifications
- Model: TL1302X
- Brand: Scotch
- Input Width: 13 inches (maximum)
- Pouch Thickness: Compatible with 3 mil and 5 mil thermal laminating pouches
- Warm-up Time: Approximately 1 minute
- Laminating Speed: 18 inches per minute
- Power: 120V (grounded outlet required)
- Dimensions: Approximately 20.08 x 5.91 x 5.32 inches
- Weight: Approximately 4.09 pounds
- Manufacturer: 3M
9. Warranty and Support
The Scotch Thermal Laminator TL1302X comes with a 1-year limited warranty. For warranty claims, technical support, or further assistance, please refer to the contact information provided with your product packaging or visit the official Scotch Brand website.
For optimal results, it is recommended to use Scotch Brand Thermal Laminating Pouches with this device.

Image 7: The Scotch Thermal Laminator TL1302X shown with compatible Scotch Thermal Laminating Pouches.


