1. Introduction
This manual provides detailed instructions for the installation, operation, and maintenance of your FELLOSTAR Android 12 Car Radio Stereo Head Unit. Please read this manual thoroughly before installation and use to ensure proper function and to maximize your experience. This unit is designed specifically for BMW 3 Series E90, E91, E92, E93 models manufactured between 2005 and 2012.
2. Product Overview
The FELLOSTAR Android 12 Car Radio Stereo Head Unit is an advanced in-car entertainment and navigation system. It features a high-resolution IPS capacitive touch screen, integrated Apple CarPlay and Android Auto (wired/wireless), Bluetooth 5.0, and GPS navigation capabilities.

Figure 2.1: Front view of the FELLOSTAR Android 12 Car Radio Stereo Head Unit, highlighting its 4-Core 2+32GB configuration, IPS display, and support for Car-Play and Android Auto.
Key Features:
- Operating System: Android 12
- Processor: 4-Core
- Memory/Storage: 2GB RAM + 32GB ROM
- Display: IPS Capacitive Touch Screen, 1280x720 resolution
- Connectivity: Bluetooth 5.0, Wi-Fi, GPS
- Smartphone Integration: Built-in Wireless Apple CarPlay and Android Auto
- Audio: DSP (Digital Signal Processor), FM/AM Radio, Stereo Audio Output
- Additional Functions: Split Screen, Hands-free Phone Call, Tethering Internet, Support for 2K video
3. Installation
The FELLOSTAR head unit is designed for a plug-and-play installation in compatible BMW 3 Series models (E90, E91, E92, E93 from 2005-2012). A well-connected harness is included to simplify the process. While designed for ease of installation, professional installation is recommended to ensure correct wiring and optimal performance, preventing potential damage to the vehicle's electrical system or the head unit.
Installation Steps (General Guide):
- Preparation: Ensure the vehicle's ignition is off and the battery is disconnected before starting any electrical work.
- Remove Original Unit: Carefully remove the existing car radio or display unit from the dashboard. Refer to your vehicle's service manual for specific instructions on trim panel and component removal.
- Connect Harness: Connect the provided wiring harness to the vehicle's existing wiring. Ensure all connections are secure.
- Connect Head Unit: Attach the harness and any other necessary cables (GPS antenna, USB, etc.) to the FELLOSTAR head unit.
- Test Functionality: Before fully reassembling the dashboard, reconnect the battery and power on the unit to test basic functions (power, audio, touch screen, radio).
- Secure Unit: Mount the new head unit securely into the dashboard opening.
- Reassemble: Reinstall all removed trim panels and components.
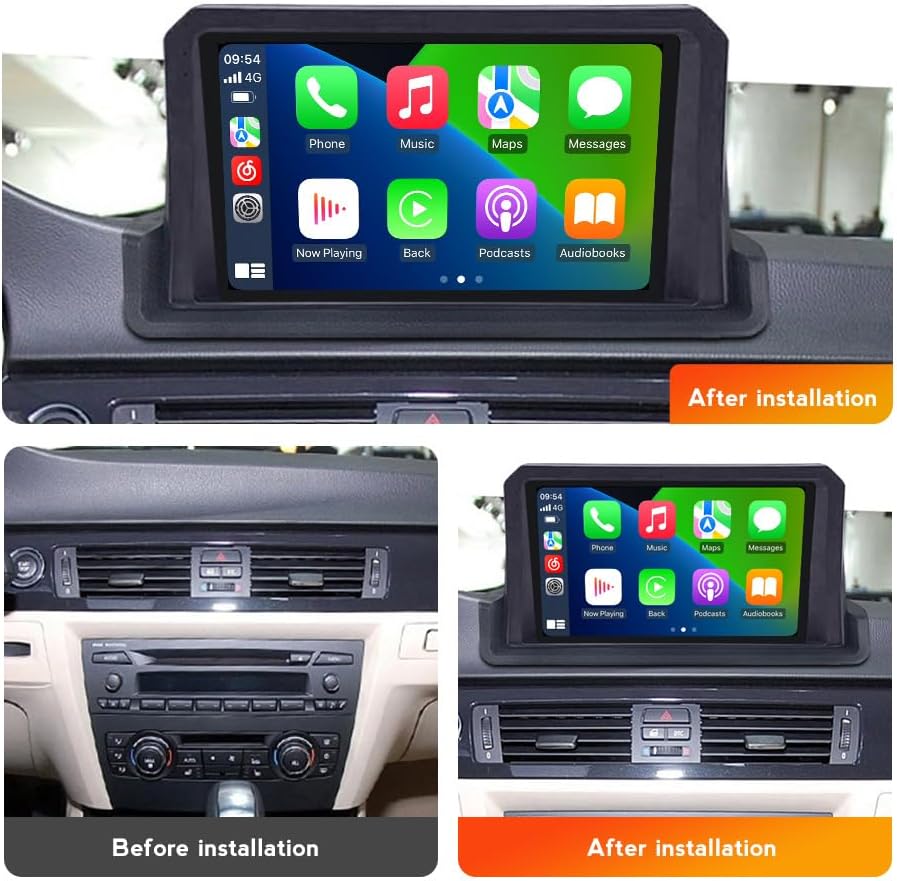
Figure 3.1: Visual comparison showing the vehicle's dashboard before and after the FELLOSTAR head unit installation.
4. Initial Setup
After successful installation and powering on the unit for the first time, you may need to perform some initial setup steps.
- Language Selection: Follow the on-screen prompts to select your preferred language.
- Time and Date: Set the correct time zone, date, and time. This can often be synchronized automatically via GPS or network connection.
- Wi-Fi Connection: Connect to an available Wi-Fi network for internet access, which is necessary for online maps, app downloads, and system updates. Go to Settings > Network & Internet > Wi-Fi.
- Bluetooth Pairing: Pair your mobile phone for hands-free calling and audio streaming. Go to Settings > Connected devices > Pair new device.
- GPS Calibration: Ensure the GPS antenna is properly positioned for optimal signal reception. The system should automatically detect your location.
5. Operating Instructions
This section covers the basic operation of your FELLOSTAR head unit.
5.1. Touch Screen Navigation
The unit features an IPS capacitive touch screen. Navigate through menus and applications by tapping, swiping, and pinching gestures similar to a smartphone or tablet.
5.2. Apple CarPlay / Android Auto
The head unit supports both wireless Apple CarPlay and Android Auto, allowing seamless integration of your smartphone's features.
- Wireless Connection: Ensure Bluetooth is enabled on your phone and the head unit. Pair your phone. Once paired, open the CarPlay or Android Auto application on the head unit. Follow on-screen prompts to establish the wireless connection.
- Functions: Access navigation, make phone calls, send and receive messages, and listen to music directly from your phone's interface displayed on the head unit. Voice commands (Siri for CarPlay, Google Assistant for Android Auto) are supported via the built-in microphone.
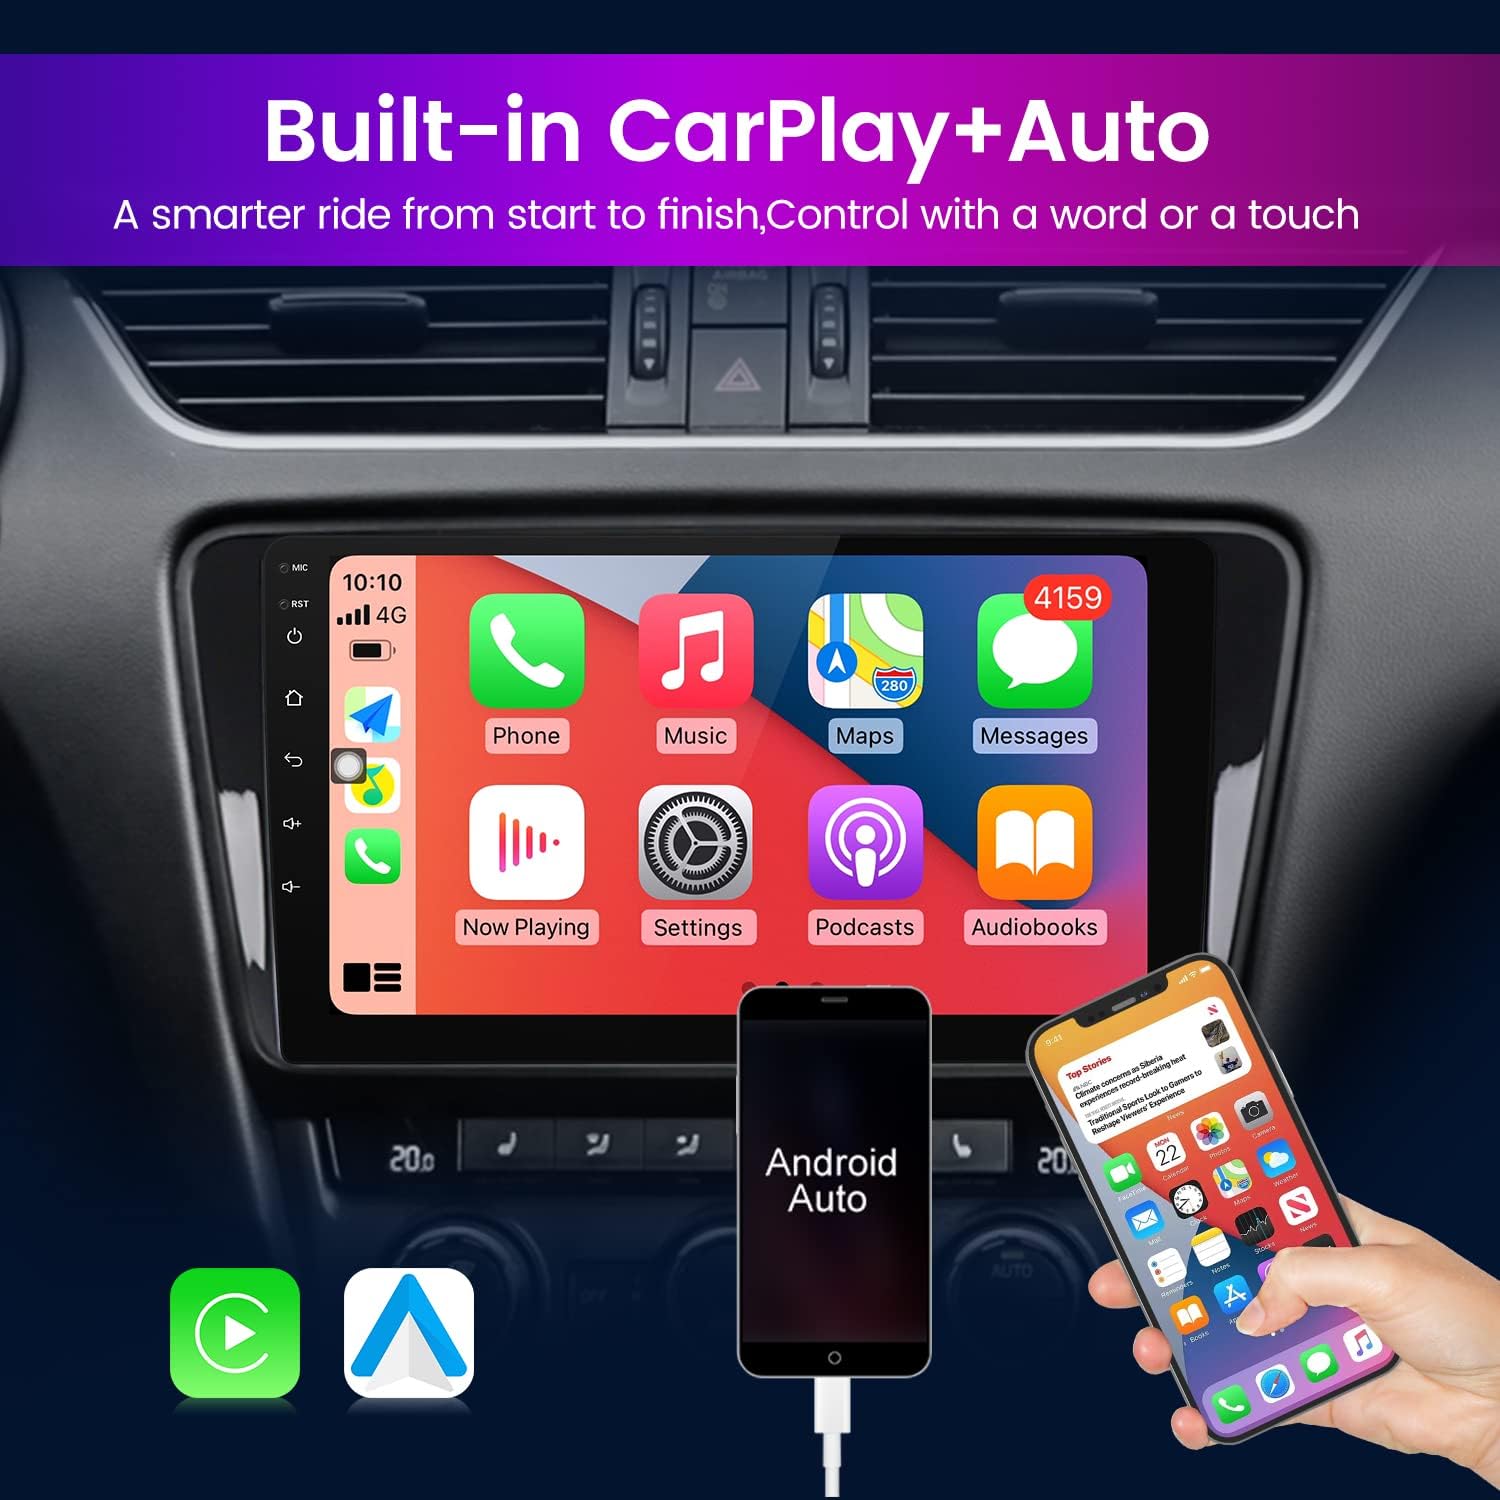
Figure 5.1: The head unit displaying the Apple CarPlay interface, showing various applications like Phone, Music, Maps, and Messages.
5.3. GPS Navigation
The unit includes a built-in GPS module. With an internet connection, you can use online mapping applications such as Google Maps, Sygic, or Waze. The system supports 3D maps for enhanced navigation.
- Using Navigation: Open your preferred navigation app from the main menu. Enter your destination, and the system will provide turn-by-turn directions.
- Map Updates: Ensure your navigation apps are updated regularly via the Google Play Store (requires internet connection) for the latest map data.
5.4. Bluetooth Functions
Bluetooth 5.0 provides stable and fast connections for various functions.
- Hands-free Calling: Once your phone is paired, you can make and receive calls directly from the head unit's interface. The built-in microphone ensures clear communication.
- Audio Streaming: Stream music and other audio from your paired phone to the car's speakers.
- Tethering Internet: Use your phone's mobile data connection to provide internet access to the head unit via Bluetooth tethering.
5.5. Split Screen Function
The split screen feature allows you to run two applications simultaneously on the display, enhancing multitasking and convenience.
- Activating Split Screen: While an application is open, press and hold the recent apps button (usually a square icon) or swipe up from the bottom and hold, then drag an app to one side of the screen. Select another app to fill the other half.
- Example Usage: Run navigation on one side and music playback or radio on the other.

Figure 5.2: The head unit demonstrating the split screen function, with a navigation map on one side and a phone dial pad on the other.
6. Maintenance
Proper maintenance ensures the longevity and optimal performance of your head unit.
- Screen Cleaning: Use a soft, lint-free cloth specifically designed for electronics screens. Do not use abrasive cleaners or solvents. Gently wipe the screen to remove dust and fingerprints.
- Software Updates: Periodically check for system software updates via the unit's settings menu (requires internet connection). Keeping the software updated ensures the latest features, bug fixes, and security enhancements.
- Environmental Care: Avoid exposing the unit to extreme temperatures, direct sunlight for prolonged periods, or excessive moisture.
- Cable Connections: Periodically check that all cables connected to the unit are secure and free from damage.
7. Troubleshooting
This section addresses common issues you might encounter and their potential solutions.
- No Power:
- Check all power connections and fuses.
- Ensure the vehicle's battery is properly connected and charged.
- No Sound:
- Verify volume settings on the head unit and any connected devices.
- Check speaker connections.
- Ensure the correct audio source is selected.
- GPS Signal Lost/Inaccurate:
- Ensure the GPS antenna is properly installed and has a clear view of the sky.
- Check for any obstructions that might block the signal.
- Verify that location services are enabled in the unit's settings.
- Bluetooth Connectivity Issues:
- Ensure Bluetooth is enabled on both the head unit and your mobile device.
- Delete previous pairings on both devices and attempt to re-pair.
- Restart both the head unit and your mobile device.
- Touch Screen Unresponsive:
- Perform a soft reset of the unit (refer to the device's specific reset procedure, often a small reset button or holding the power button).
- Ensure the screen is clean and free from debris.
If you encounter issues not listed here or if the suggested solutions do not resolve the problem, please contact FELLOSTAR customer support.
8. Specifications
Below are the technical specifications for the FELLOSTAR Android 12 Car Radio Stereo Head Unit (4-Core 2+32GB model).
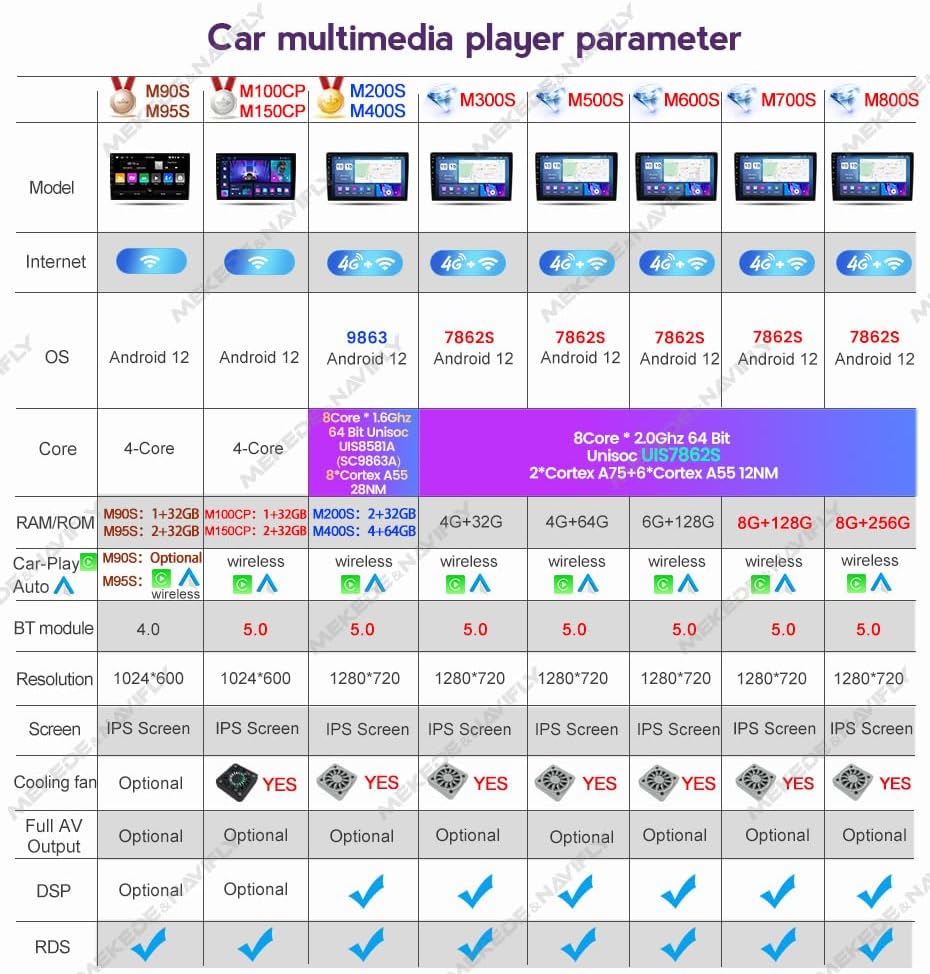
Figure 8.1: Detailed parameter table for FELLOSTAR car multimedia players, including the M150CP (4-Core 2+32GB) model.
| Feature | Specification |
|---|---|
| Model | 4-Core 2+32GB (M150CP) |
| Operating System | Android 12 |
| Processor | 4-Core |
| RAM | 2GB |
| Internal Storage | 32GB |
| Display Resolution | 1280 x 720 (IPS) |
| Bluetooth Version | 5.0 |
| Connectivity Technology | Bluetooth, Wi-Fi |
| Special Features | Built-in Wireless Apple CarPlay, Android Auto, DSP, Touchscreen, Microphone, Split Screen, GPS Navigation |
| Audio Output Mode | Stereo |
| Mounting Type | Dashboard Mount |
| Included Components | Well-connected harness |
9. Warranty and Support
FELLOSTAR is committed to providing excellent customer service.
- Technical Support: We offer 24/7 after-sales technical support to assist with installation and operation questions.
- Contact Us: If you have any questions regarding installation, product functionality, or require assistance, please contact us via message. We aim to respond with a solution within 24 hours.


