1. Important Safety Information
Warning: Keep hands and other body parts away from rotating parts. Always use gloves and protective eyewear. Do not operate in adverse weather conditions or on slippery surfaces. Store the snow blower in a cool, dry place, out of reach of children and pets.
2. Product Overview and Features
The COSTWAY Electric Snow Blower QF32263IT is designed for efficient snow removal from various outdoor surfaces. It combines powerful performance with user-friendly features for a convenient experience.
- Efficient Snow Removal: This electric snow blower offers a snow removal width of 50 cm and a snow removal depth of 25 cm, allowing for quick and easy clearing of paths and driveways.
- Adjustable Snow Chute: The snow discharge chute can rotate 180° left and right. Its vertical angle is adjustable from 15° to 60°, enabling precise control over snow throwing direction and height. Adjustments are made via a knob and crank.
- Comfortable Handle and LED Lights: Equipped with a comfortable foam grip handle for ease of use and reduced hand fatigue. Powerful LED lights are integrated to facilitate snow removal operations even in low-light conditions or after dark.
- Powerful Motor: Features a high-efficiency 15 A motor with a rated voltage of 220 V-240 V, delivering 2300 W of power. This allows the snow blower to throw snow up to 9 meters, making it suitable for steps, gardens, courtyards, and walkways.
- Simple Assembly and Safe Operation: The unit arrives partially assembled. Final assembly involves connecting and securing the handle with a simple knob rotation. Dual safety switches are included to minimize the risk of accidental activation.

Figure 2.1: Person operating a blue electric snow blower to clear snow from a driveway. The snow is being efficiently thrown away from the path.

Figure 2.2: Detailed view showcasing the snow blower's key components: two bright LED headlights, robust wheels, a durable auger blade, an ergonomic foam-covered handle, and a convenient cable support.
3. Setup
The COSTWAY Electric Snow Blower is designed for quick and easy setup. Follow these steps to prepare your snow blower for use:
- Unpack the Unit: Carefully remove all components from the packaging. Ensure all parts listed in the packing list are present.
- Assemble the Handle: The snow blower arrives with the handle partially disassembled. Align the handle sections and rotate the connecting knobs to securely fix the two sections together.
- Attach the Crank Handle: Securely attach the crank handle for chute adjustment to its designated position.
- Power Connection: Ensure the power cord is properly connected and secured to the cable support to prevent accidental disconnection during operation.
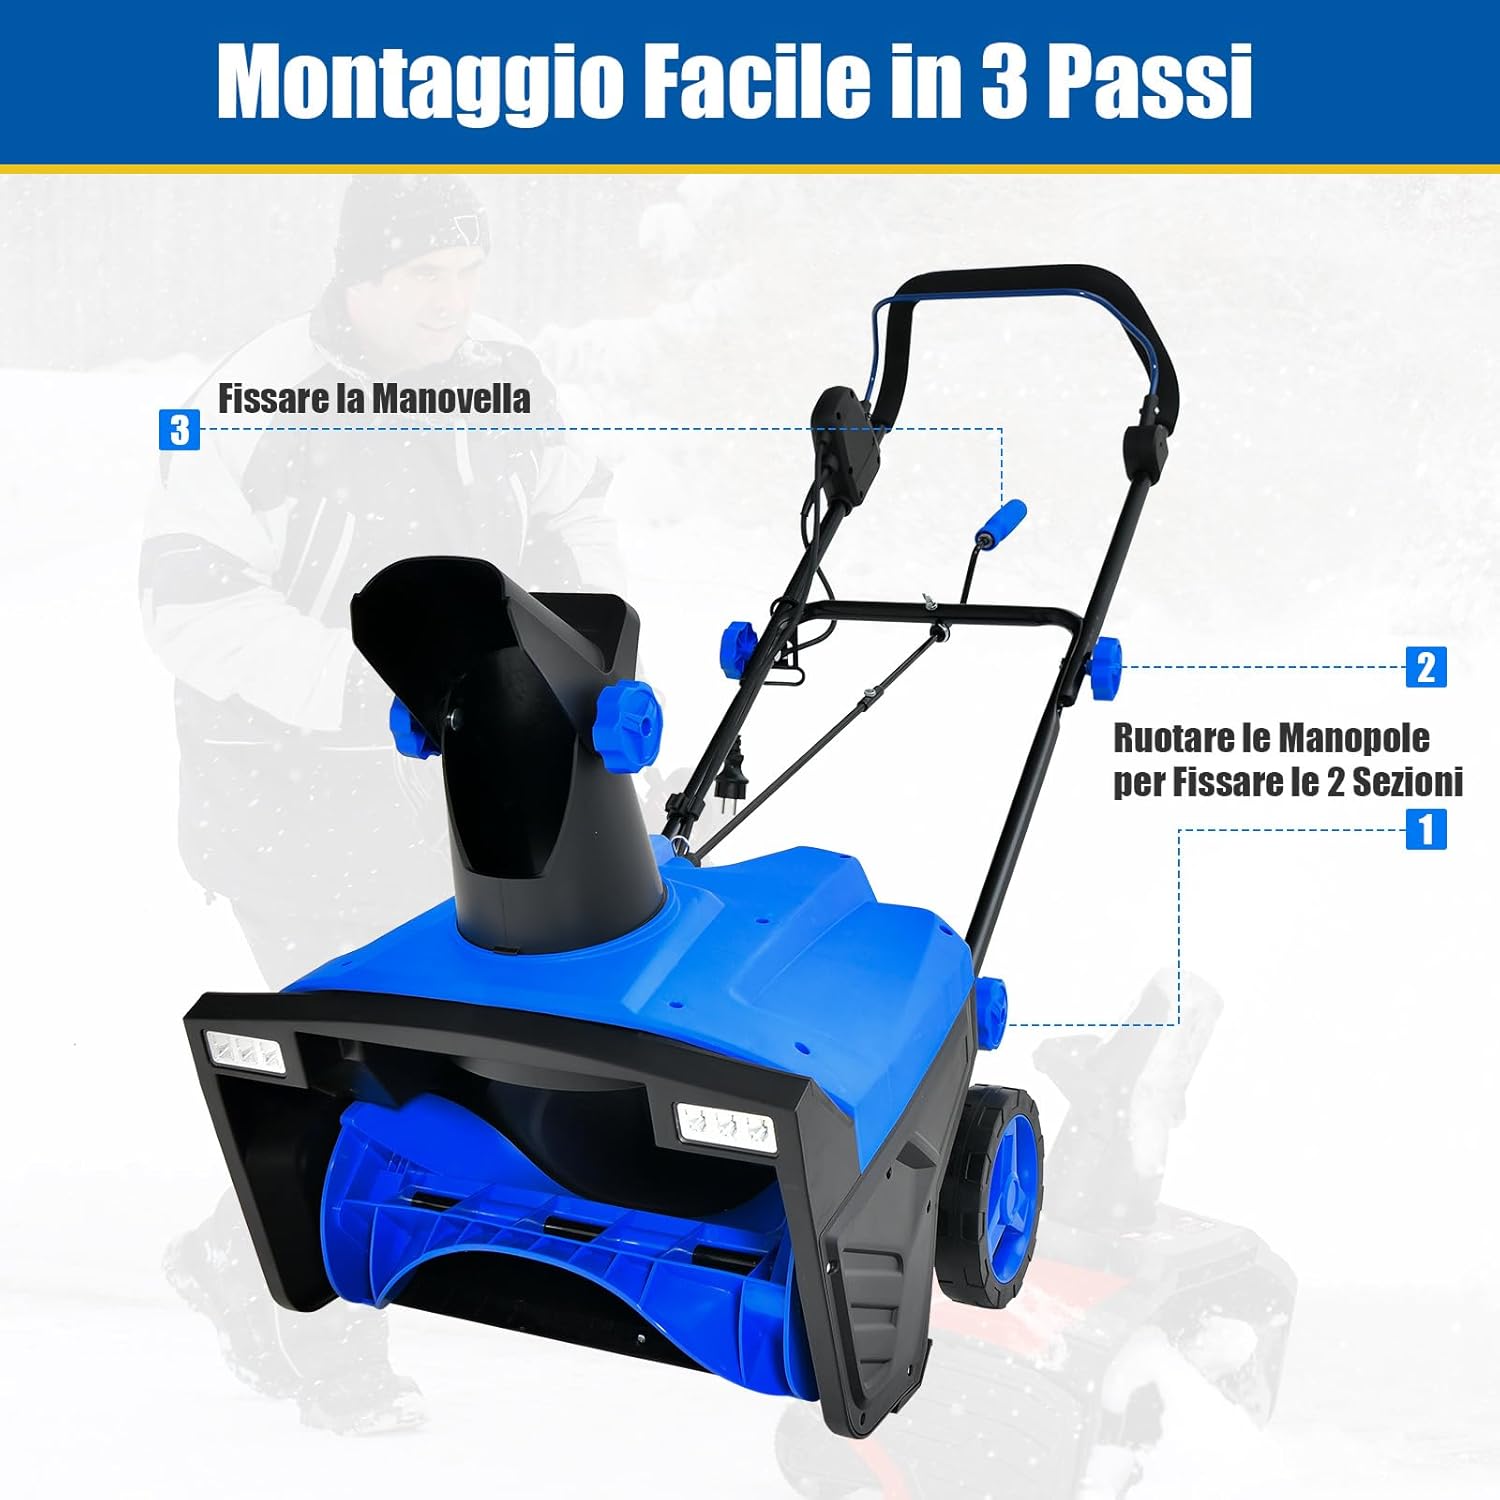
Figure 3.1: This image provides a three-step guide for easy assembly: first, rotate the knobs to secure the two main sections, then fix the crank handle.
4. Operating Instructions
Before operating, ensure you have read and understood all safety warnings. Always wear appropriate personal protective equipment, including safety glasses and gloves.
4.1 Starting the Snow Blower
The snow blower features dual safety switches for secure activation:
- Press the Safety Button: Locate the safety button on the handle and press it.
- Pull the Bail Lever: While holding the safety button, pull the bail lever towards the handle to engage the motor. Release the safety button once the motor is running.

Figure 4.1: This image details the simple two-step starting procedure: first, press the safety button, then pull the bail lever to engage the motor.
4.2 Adjusting the Snow Chute
To control the direction and height of the thrown snow:
- Direction Adjustment: Use the crank handle to rotate the snow chute up to 180° left or right, directing the snow away from cleared areas.
- Height Adjustment: Adjust the knob on the chute to change its vertical angle between 15° and 60°, which controls how high the snow is thrown.

Figure 4.2: This diagram highlights the adjustable features of the snow blower's discharge chute, showing its 180-degree horizontal rotation and 15-60 degree vertical angle adjustment for precise snow direction.
4.3 Clearing Snow
Push the snow blower forward at a steady pace, allowing the auger to clear the snow. Overloading the machine can reduce efficiency and potentially cause damage. For deep snow, it may be necessary to make multiple passes.
5. Maintenance
Regular maintenance ensures optimal performance and extends the lifespan of your snow blower. Always unplug the unit before performing any maintenance.
- Clean After Each Use: Remove any snow, ice, or debris from the auger, chute, and housing. Use a non-abrasive cloth.
- Inspect Auger Blades: Periodically check the auger blades for wear or damage. Replace worn blades to maintain efficient snow clearing.
- Check Power Cord: Inspect the power cord for any cuts, fraying, or damage. Replace immediately if damaged.
- Lubrication: Refer to the detailed manual for specific lubrication points and recommended lubricants, if applicable.
- Storage: Store the snow blower in a clean, dry place when not in use. Ensure it is protected from moisture and extreme temperatures.
6. Troubleshooting
If you encounter issues with your snow blower, refer to the following common troubleshooting tips:
| Problem | Possible Cause | Solution |
|---|---|---|
| Snow blower does not start | Power cord not connected; Safety button/bail lever not engaged; Circuit breaker tripped | Check power connection; Ensure both safety button and bail lever are pressed correctly; Reset circuit breaker |
| Reduced snow throwing distance | Chute clogged; Auger blades worn; Wet, heavy snow | Clear chute (with unit unplugged); Inspect/replace auger blades; Work at a slower pace for heavy snow |
| Excessive vibration | Loose components; Damaged auger | Check all fasteners; Inspect auger for damage and replace if necessary |
If the problem persists after attempting these solutions, please contact COSTWAY customer support.
7. Specifications
Detailed technical specifications for the COSTWAY Electric Snow Blower QF32263IT:
| Specification | Value |
|---|---|
| Brand | COSTWAY |
| Model Number | QF32263IT |
| Product Dimensions (L x W x H) | 118 x 51 x 96 cm |
| Item Weight | 13.5 kg |
| Power Source Type | Corded Electric |
| Motor Type | Electric |
| Rated Voltage | 220-240 V |
| Rated Current | 15 A |
| Motor Power | 2300 W |
| Clearing Width | 50 cm |
| Ideal Snow Depth | 25 cm |
| Snow Throwing Distance (Max) | 9 meters |
| Chute Rotation | 180° |
| Chute Angle Adjustment | 15°-60° |
| Color | Blue |

Figure 7.1: A visual representation of the snow blower's overall dimensions, indicating its length (118cm), width (51cm), and height (96cm).
8. Warranty and Support
For warranty information, please refer to the warranty card included with your product or visit the official COSTWAY website. For technical support, replacement parts, or any other inquiries, please contact COSTWAY customer service directly. Contact details can typically be found on the product packaging or the manufacturer's website.


