
1. Introduction
This manual provides essential information for the installation, operation, and maintenance of your HUIOP Surpass Hobby Rocket V3 540 13.5T Sensored Brushless SPEC Motor. This motor is designed for 1/10 scale RC racing cars and trucks, offering high performance and reliability. Please read this manual thoroughly before use to ensure proper function and longevity of your motor.

Image 1.1: Overview of the HUIOP Surpass Hobby Rocket V3 540 13.5T Sensored Brushless SPEC Motor.
2. Features
- 540 13.5T 3200KV: Optimized for 1/10 RC car applications.
- Compatibility: Works with any sensored or sensorless Electronic Speed Controller (ESC).
- Dual Sensor Port: Provides convenient wiring options for sensor cables.
- CNC Machined Billet T6 Aluminum Heatsink Can: Ensures efficient heat dissipation for consistent performance.
- High Purity Copper Windings: Maximizes electrical conductivity for optimal power transfer.
- High Power Solder Tabs: Designed for secure and efficient power connections.
- Removable/Replaceable Rotor: Allows for maintenance and customization.
- Precision Engineered: Designed for maximum energy conversion efficiency.
- Adjustable Timing: Enables fine-tuning of motor performance.
- IFMAR, ROAR Compliance: Meets international racing standards.
3. Package Contents
Upon opening the package, please verify that all the following items are included:
- 1 x HUIOP Surpass Hobby Rocket V3 540 13.5T Sensored Brushless Motor
- 1 x Sensored Connected Cable
- 1 x User Manual (this document)

Image 3.1: Contents of the product package, showing the motor, sensor cable, and manual.
4. Specifications
| Specification | Value |
|---|---|
| Brand Name | HUIOP |
| Size | 540 |
| Design | Sensor |
| Rotor Poles | 2 |
| Turns | 13.5T |
| Watts | 190W |
| Support Battery | 1-3s LiPo |
| Max Amps | 49A |
| KV (RPM/Volt) | 3200KV |
| Diameter | 36mm |
| Length | 54mm |
| Shaft Length | 14.5mm |
| Shaft Diameter | 3.175mm |
| Rotor | 12.5 * 7.2mm |
| Type | SPEC |
| Mounting Hole | M3 |
| Weight | 159g |
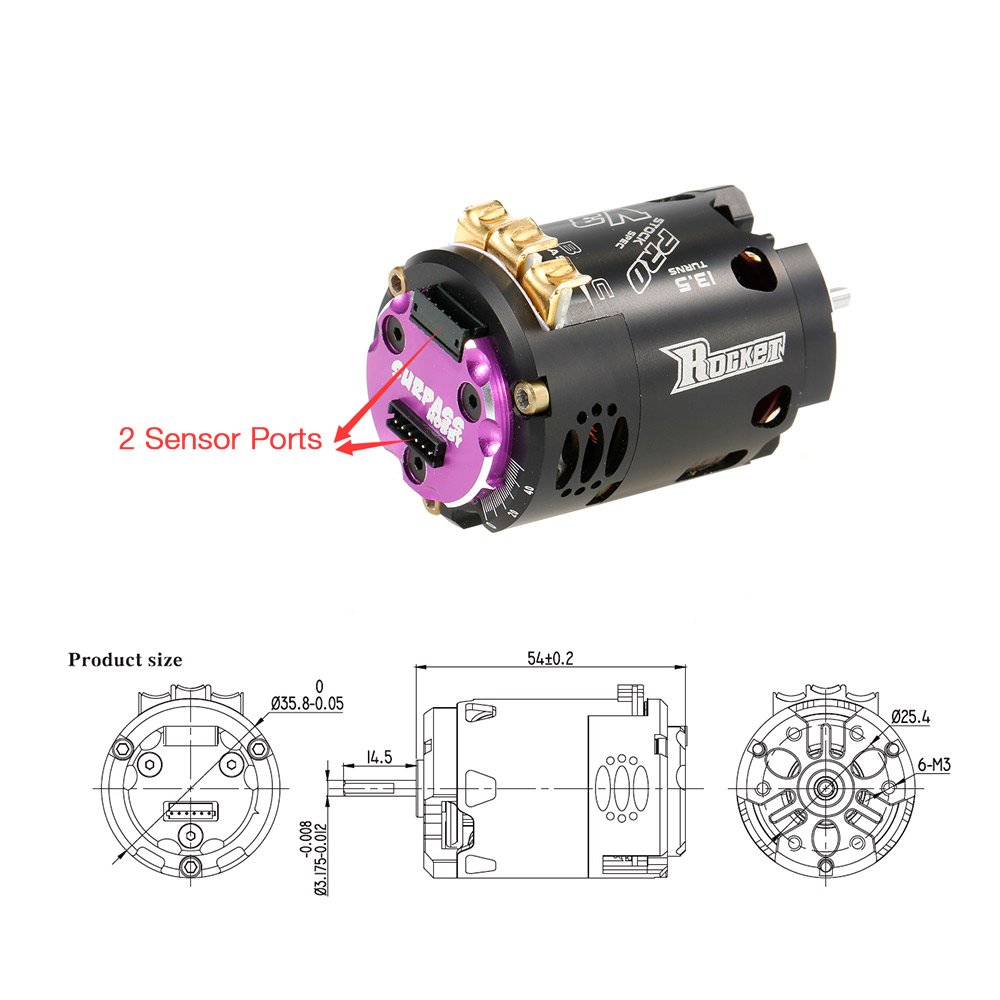
Image 4.1: Detailed view of the motor, highlighting the dual sensor ports and providing dimensional drawings.
5. Setup and Installation
Proper installation is crucial for the performance and safety of your RC vehicle. Follow these general guidelines:
- Mounting the Motor: Securely mount the motor to your vehicle's motor mount using appropriate M3 screws. Ensure the pinion gear aligns correctly with the spur gear.
- Connecting to ESC: Connect the three motor phase wires (typically labeled A, B, C or U, V, W) to the corresponding output terminals on your sensored/sensorless ESC. Ensure connections are firm and insulated.
- Sensor Cable Connection: Connect the provided sensored cable from one of the motor's dual sensor ports to the sensor port on your ESC. Ensure the cable is not pinched and has enough slack.
- Adjusting Timing: The motor features adjustable timing. Refer to your ESC manual for specific instructions on how to set motor timing. Generally, advancing timing increases RPM but also increases motor temperature. Start with a neutral timing setting and adjust incrementally.
- Initial Testing: Before full operation, perform a bench test to ensure the motor spins freely and in the correct direction. If the direction is incorrect, reverse any two of the three motor phase wires or adjust the setting in your ESC.

Image 5.1: View of the motor's adjustable timing marks on the end cap.
6. Operating Instructions
Once installed, operate your motor in conjunction with a compatible ESC and battery. Always observe the following:
- Battery Compatibility: Use LiPo batteries within the recommended 1-3s range. Exceeding this voltage can damage the motor and ESC.
- Temperature Monitoring: Regularly monitor the motor's temperature during operation. Excessive heat can lead to permanent damage. If the motor becomes too hot to touch (typically above 80°C / 176°F), allow it to cool down and investigate potential causes such as incorrect gearing, excessive load, or improper timing.
- Gearing: Select appropriate gearing for your vehicle and track conditions. Incorrect gearing can cause overheating or reduced performance.
- ESC Settings: Configure your ESC settings (e.g., drag brake, punch, throttle curve) according to your driving style and vehicle requirements. Refer to your ESC manual for detailed instructions.
7. Maintenance
Regular maintenance will extend the life and performance of your motor:
- Cleaning: Keep the motor clean and free from dirt, dust, and debris. Use compressed air or a soft brush to remove foreign particles.
- Bearing Inspection: Periodically check the motor bearings for smooth operation. Worn bearings can cause increased friction and noise. Replace bearings if they feel rough or gritty.
- Rotor Inspection: Inspect the rotor for any signs of damage or imbalance. The rotor is removable/replaceable if necessary.
- Wiring: Ensure all wiring connections (phase wires, sensor cable) are secure and free from damage. Repair or replace any frayed or broken wires immediately.
- Storage: Store the motor in a clean, dry environment away from extreme temperatures and humidity.
8. Troubleshooting
If you encounter issues with your motor, refer to the following common problems and solutions:
- Motor Not Spinning:
- Check all wiring connections between the motor, ESC, and battery.
- Ensure the battery is charged and connected correctly.
- Verify ESC is powered on and properly calibrated with your radio.
- Inspect sensor cable for damage and ensure it's fully seated.
- Motor Runs Hot:
- Check gearing; it may be too aggressive. Try a smaller pinion or larger spur gear.
- Reduce motor timing if it's set too high.
- Ensure there is no binding in the drivetrain or wheels.
- Verify the motor is not overloaded (e.g., driving on very high-traction surfaces or heavy vehicles).
- Loss of Power/Intermittent Operation:
- Check battery voltage and condition.
- Inspect solder joints on motor and ESC for cold joints or breaks.
- Ensure sensor cable is not damaged or loose.
- Check for debris inside the motor affecting rotor movement.
- Unusual Noise:
- Inspect pinion and spur gear mesh for proper clearance.
- Check motor bearings for wear or damage.
- Ensure no foreign objects are inside the motor.
9. Warranty and Support
For warranty information and technical support, please contact the retailer where you purchased this product or the manufacturer directly. Keep your proof of purchase for any warranty claims. Specific warranty terms and conditions may vary.