
1. Product Overview
The Otcboimo Smart WiFi Wireless Relay Switch Module (Model TYWB4CH-D1) is a 4-channel smart relay designed for remote control of home appliances. It supports both AC/DC 7-32V and USB 5V power input, offering flexible integration into various setups. This module features dry contact/passive output, meaning it does not supply voltage to the connected appliance directly; an external power source is required for the appliance. It is compatible with Tuya/Smart Life applications, Amazon Alexa, and Google Home for voice and remote control.
The module supports three working modes: Self-locking, Interlocking, and Inching, catering to diverse automation needs. It also includes a timing function for scheduled operations and RF433MHz control capability.

Image 1.1: Otcboimo 4-Channel Smart WiFi Relay Module showing input (Micro USB 5V or DC/AC 7-32V) and output terminals (NC, COM, NO), along with the reset switch and manual control buttons (K1, K2, K3, K4).
2. Safety Information
- Power Disconnection: Always disconnect power to the circuit before installing, wiring, or performing any maintenance on the module.
- Voltage Compatibility: Ensure the input voltage (USB 5V or AC/DC 7-32V) matches the module's specifications. Do not exceed the maximum current rating of 10A per channel or 16A total.
- Dry Contact Output: Remember that the output is dry contact (passive). Connected appliances require their own power supply.
- Professional Installation: If you are unsure about wiring or electrical connections, consult a qualified electrician.
- Environmental Conditions: Operate the module within the specified working temperature range of -20°C to 70°C. Avoid exposure to moisture or extreme temperatures.
3. Setup and Installation
3.1 Power Supply
The module can be powered via two methods:
- USB 5V: Connect a standard Micro USB 5V power adapter to the USB port.
- AC/DC 7-32V: Connect a 7-32V AC or DC power source to the screw terminal input labeled "7-32V".
3.2 App Installation and Pairing
- Download the Tuya Smart or Smart Life app from your mobile device's app store (available for iOS and Android).
- Register or log in to your account.
- Ensure your mobile device is connected to a 2.4GHz Wi-Fi network. The module is not compatible with 5.0GHz networks.
- Power on the relay module.
- In the app, tap the "+" icon to add a device.
- Follow the in-app instructions to put the device into pairing mode. This usually involves pressing and holding the "Reset Switch" or "PF pairing button" on the module until the Wi-Fi indicator light blinks rapidly.
- Select the device type (e.g., "Switch" or "Relay") and confirm the blinking indicator.
- Enter your Wi-Fi network password and proceed with the pairing process.
- Once successfully added, you can rename the device and individual channels within the app.
4. Operating Modes and Control
4.1 Self-Locking Mode
In Self-locking mode, each relay acts as an independent switch. Pressing the button (physical or in-app) turns the relay ON, and pressing it again turns it OFF. This mode is suitable for controlling individual lights or appliances.

Image 4.1: Wiring diagram illustrating Self-Locking Mode. Input can be USB 5V or DC/AC 7-32V. The output circuit is shown controlling four light bulbs, with each relay acting independently. The circuit within the relay supports AC 0-250V 10A / DC 0-30V 10A.
4.2 Interlocking Mode
In Interlocking mode, only one relay can be ON at a time. When one relay is activated, any previously active relay in the group will automatically turn OFF. This mode is ideal for applications where only one state should be active, such as controlling a motor's forward/reverse direction.
Setting Interlocking Mode via App:
- Open the Tuya/Smart Life app and navigate to your device.
- Tap on the "Setting" icon (usually a gear icon) at the bottom of the screen.
- Select "Interlock set" from the options.
- Tap "Add" to create a new interlock group.
- Select the switches (relays) you want to include in the interlock group (e.g., Switch 1, Switch 2, Switch 3, Switch 4).
- Tap "Save" to apply the settings.
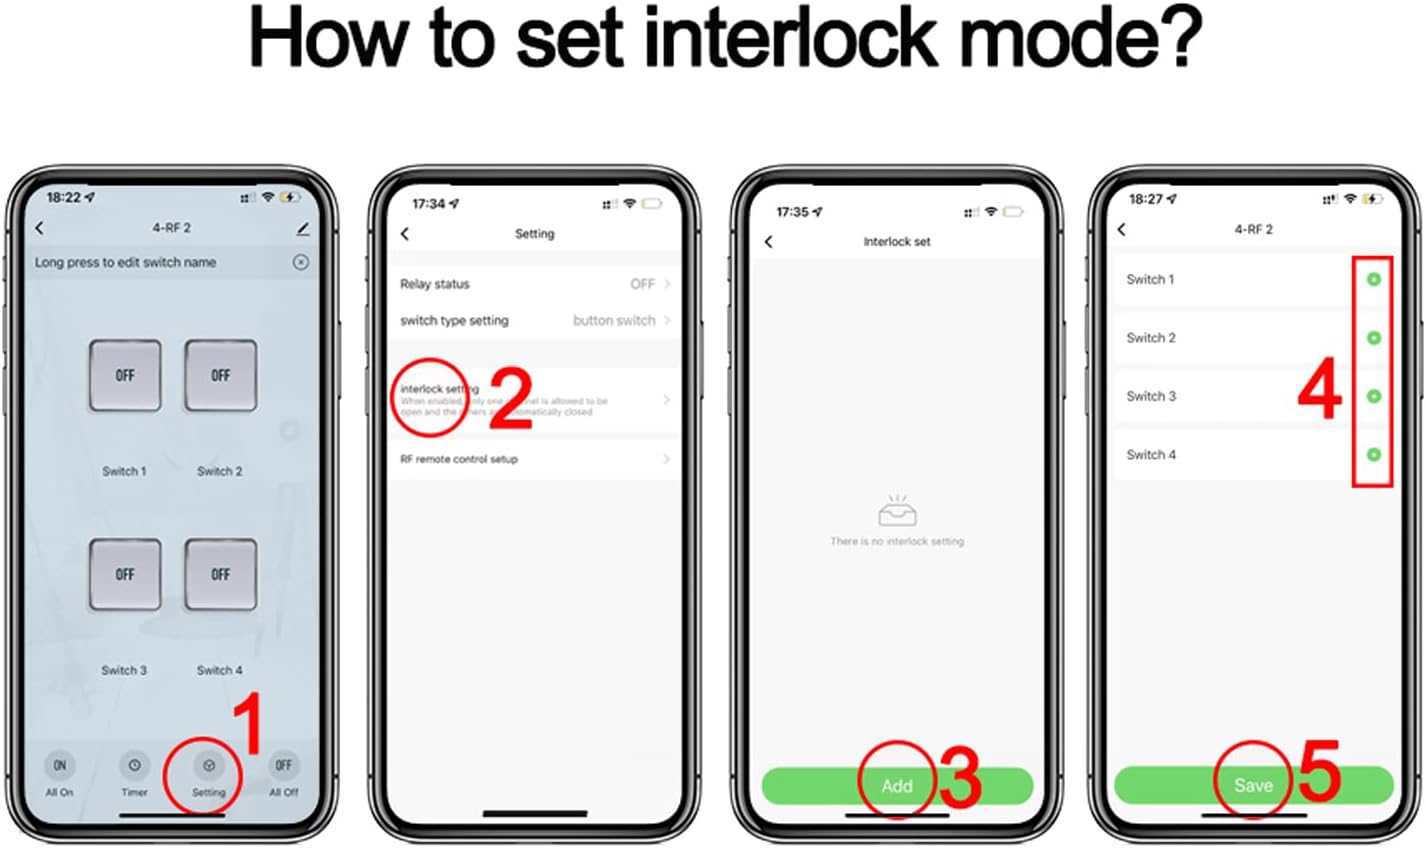
Image 4.2: Step-by-step guide within the Smart Life app to configure Interlocking Mode. This involves navigating to settings, selecting 'Interlock set', adding switches to the group, and saving the configuration.

Image 4.3: Wiring diagram for Interlock Mode. The left diagram shows controlling an AC motor with 85-250V input. The right diagram shows controlling a DC motor with 7-32V input. Note: Only one motor can run at a time in this configuration.
4.3 Inching Mode (Momentary)
In Inching mode, the relay turns ON for a set duration (e.g., 0.5 to 3600 seconds) and then automatically turns OFF. This is useful for momentary actions like opening a gate, triggering a garage door, or pulsing a signal.
Setting Inching Mode via App:
- Open the Tuya/Smart Life app and navigate to your device.
- Tap on the "Timer" icon at the bottom of the screen.
- Select the specific switch (relay) you want to configure.
- Tap on the "Inching" tab (often represented by a clock icon).
- Enable the inching function and set the desired duration (e.g., 03 seconds).

Image 4.4: Step-by-step guide within the Smart Life app to configure Inching Mode. This involves accessing the timer settings, selecting a switch, enabling inching, and setting the duration.

Image 4.5: Application diagram for Inching Mode, showing the relay module connected to a remote control receiver (JY-KA4) and controlling devices such as an exit button, a rolling shutter, and a computer. This illustrates its use for momentary actions.
4.4 Remote Control Options
- App Remote Control: Control connected appliances from anywhere using the Tuya Smart or Smart Life app on your smartphone, provided the module has an internet connection (2.4GHz Wi-Fi).
- RF433 Control: The module supports RF433MHz frequency, allowing control via a compatible RF433MHz remote controller (sold separately).
- Voice Control: Integrate with Amazon Alexa or Google Assistant to control appliances using voice commands.

Image 4.6: Diagram demonstrating simple voice control. A user speaks a command to an Alexa device, which communicates with the smart relay module to control a connected light.
4.5 Advanced Features
- Timing Function: Set schedules, timers, and countdowns within the app to automatically turn appliances ON/OFF at specified times. Each channel can have its own schedule.
- Share Control: Share control of the module with family members through the Tuya/Smart Life app, allowing multiple users to manage connected devices.
- Group Control: Create groups of smart devices within the app to control multiple devices simultaneously with a single command.
- Scene Linkage: Create smart scenes to automate actions based on various conditions such as departure/home mode, temperature, humidity, or other smart device statuses.
5. Wiring Diagrams
The Otcboimo Smart WiFi Wireless Relay Switch Module provides dry contact outputs. This means the relay acts as a switch that opens or closes a circuit, but it does not provide power to the connected device. You must supply power to the appliance separately.
Refer to the specific mode diagrams (Self-Locking, Interlocking, Inching) in Section 4 for detailed wiring examples. Always ensure power is disconnected before making any wiring changes.
6. Maintenance
- Cleaning: Use a soft, dry cloth to clean the module. Do not use liquid cleaners or aerosols.
- Firmware Updates: Periodically check the Tuya/Smart Life app for available firmware updates to ensure optimal performance and security.
- Environmental Protection: Keep the module away from water, excessive heat, and direct sunlight.
7. Troubleshooting
- Module Not Powering On: Verify the power supply connection (USB 5V or AC/DC 7-32V) and ensure the power source is active.
- Unable to Pair with App:
- Ensure your phone is connected to a 2.4GHz Wi-Fi network.
- Confirm the module's Wi-Fi indicator is blinking rapidly (pairing mode). If not, press and hold the reset button.
- Check Wi-Fi signal strength. The module should be within close proximity to your router.
- Restart your router and try pairing again.
- Appliance Not Responding:
- Check the wiring connections to the appliance and ensure they are secure.
- Verify that the appliance has its own power supply and is functioning correctly.
- Confirm the relay is switching ON/OFF in the app.
- Voice Control Not Working:
- Ensure the module is successfully linked to your Alexa or Google Home account via the Tuya/Smart Life app.
- Check the device name in Alexa/Google Home; it should match the name set in the Tuya/Smart Life app.
- Verify your voice assistant device has an active internet connection.
8. Specifications
| Parameter | Value |
|---|---|
| Model | TYWB4CH-D1 |
| Input Voltage | DC/AC 7-32V or USB 5V |
| Max. Current (per gang) | 10A |
| Max. Load (total) | 3500W / 16A / 4 gangs |
| Wireless Connectivity | WiFi 2.4GHz (IEEE802.11 b/g/n) + Bluetooth |
| Working Temperature | -20°C to 70°C |
| Dimensions (L x W x H) | 81 x 76 x 28 mm |
| Contact Type | Normally Closed (NC) |
| Control Method | Remote (App), Voice (Alexa, Google Home) |
| Material | Plastic |
| International Protection Rating | IP30 |

Image 8.1: Detailed product parameters including input voltage (DC/AC 7-32V, USB 5V), max current (10A/gang), max load (16A/4gang), wireless type (WiFi 2.4GHz), working temperature (-20°C to 70°C), and dimensions (81*76*28mm).
9. Warranty and Support
For warranty information and technical support, please refer to the documentation provided with your purchase or contact the manufacturer directly through their official website or customer service channels. Keep your purchase receipt for warranty claims.