
1. Important Safety Information
Please read and understand all safety instructions before using this product. Keep this manual for future reference.
- Power Source: Operate the unit only from the power sources indicated on the marking label.
- Ventilation: Ensure proper ventilation. Do not block any ventilation openings.
- Water and Moisture: Do not expose the unit to rain, moisture, dripping, or splashing. Do not place objects filled with liquids on the unit.
- Heat: Keep the unit away from heat sources such as radiators, heat registers, stoves, or other apparatus (including amplifiers) that produce heat.
- Cleaning: Unplug the unit from the wall outlet before cleaning. Use a soft, dry cloth only.
- Servicing: Do not attempt to service this product yourself. Refer all servicing to qualified service personnel.
2. Product Overview
The Emerson EPB-3003 is a versatile portable audio system designed for various listening experiences. It features a top-loading CD player, a cassette player/recorder, and an AM/FM radio. The unit can be powered by AC or batteries, offering flexibility for both indoor and outdoor use.

Figure 2.1: Front view of the Emerson EPB-3003 Portable CD Player Boombox, showing the dual speakers, control panel, and carrying handle.
Key Features:
- Top-loading CD Player (CD, CD-R, CD-RW compatible)
- Cassette Player and Tape Recorder
- Digital AM/FM Stereo Radio with PLL technology
- 3.5mm AUX Input for external devices
- Headphone Jack
- Dual Speakers for clear stereo sound
- AC/DC and Battery Operated for portability
Controls and Components:
Refer to the diagram below for an overview of the unit's controls and components.

Figure 2.2: Diagram illustrating the main controls and components of the boombox, including the display, function buttons, volume, and tuning controls.
- FUNCTION Button: Selects between CD, Radio, Tape, and AUX modes.
- SCAN/PLAY/PAUSE Button: Initiates scan in radio mode, plays/pauses CD or cassette.
- STOP Button: Stops playback.
- SKIP/SEARCH Buttons (◀◀ / ▶▶): Skips tracks on CD, searches on cassette, tunes radio stations.
- MEM.- / MEM.+ Buttons: Stores and recalls radio presets.
- TUN. (Tune) Buttons (+/-): Fine-tunes radio frequency.
- VOL. (Volume) Buttons (+/-): Adjusts audio volume.
- PROG./P-MODE Button: Programs CD tracks, selects playback mode.
- Display: Shows current mode, track number, frequency, etc.
- CD Compartment: For loading compact discs.
- Cassette Compartment: For loading audio cassettes.
- Telescopic Antenna: For FM radio reception.
- AUX Input Jack: Connects external audio devices.
- Headphone Jack: For private listening.
- AC Power Input: Connects to the AC power adapter.
- Battery Compartment: For DC power using batteries.
3. Setup
3.1 Powering the Unit
The boombox can be powered by either AC power or batteries.
AC Power Operation:
- Ensure the unit is turned off.
- Connect the supplied AC power adapter cord to the AC power input jack on the back of the unit.
- Plug the other end of the AC power adapter into a standard wall outlet (120V AC, 60Hz).
Battery Operation:
For portable use, the unit requires 6 x 'C' size batteries (not included).
- Ensure the unit is turned off and disconnected from AC power.
- Open the battery compartment cover located on the bottom of the unit.
- Insert 6 'C' size batteries, observing the correct polarity (+ and -) as indicated inside the compartment.
- Close the battery compartment cover securely.
Note: Remove batteries if the unit will not be used for an extended period to prevent leakage and damage.
3.2 Antenna Setup
For optimal FM radio reception, fully extend the telescopic antenna. For AM reception, the unit has a built-in antenna, so no adjustment is typically needed. If AM reception is poor, try repositioning the unit.
4. Operating Instructions
4.1 General Operation
- Press the POWER button to turn the unit on.
- Press the FUNCTION button repeatedly to select the desired mode: CD, RADIO, TAPE, or AUX.
- Adjust the volume using the VOL. +/- buttons.
- Press the POWER button again to turn the unit off.
4.2 CD Player Operation

Figure 4.1: Loading a compact disc into the top-loading CD compartment.
- Press the FUNCTION button to select CD mode. The display will show "CD" or "OP" (Open).
- Open the CD compartment cover.
- Place a CD with the label side facing up onto the center spindle.
- Close the CD compartment cover. The unit will read the disc, and the total number of tracks will appear on the display.
- Press the PLAY/PAUSE button (▶/██) to start playback. The current track number will be displayed.
- To pause playback, press the PLAY/PAUSE button (▶/██). Press again to resume.
- To stop playback, press the STOP button (■).
- To skip to the next track, press the SKIP/SEARCH button (▶▶).
- To go back to the beginning of the current track or previous tracks, press the SKIP/SEARCH button (◀◀).
- To fast forward or rewind within a track, press and hold the SKIP/SEARCH buttons (▶▶ or ◀◀).
Programmed Playback:
- In STOP mode, press the PROG./P-MODE button. The display will show "P01".
- Use the SKIP/SEARCH buttons (◀◀ / ▶▶) to select the desired track.
- Press PROG./P-MODE again to confirm the track. Repeat for up to 20 tracks.
- Press PLAY/PAUSE to start programmed playback.
4.3 Cassette Player/Recorder Operation
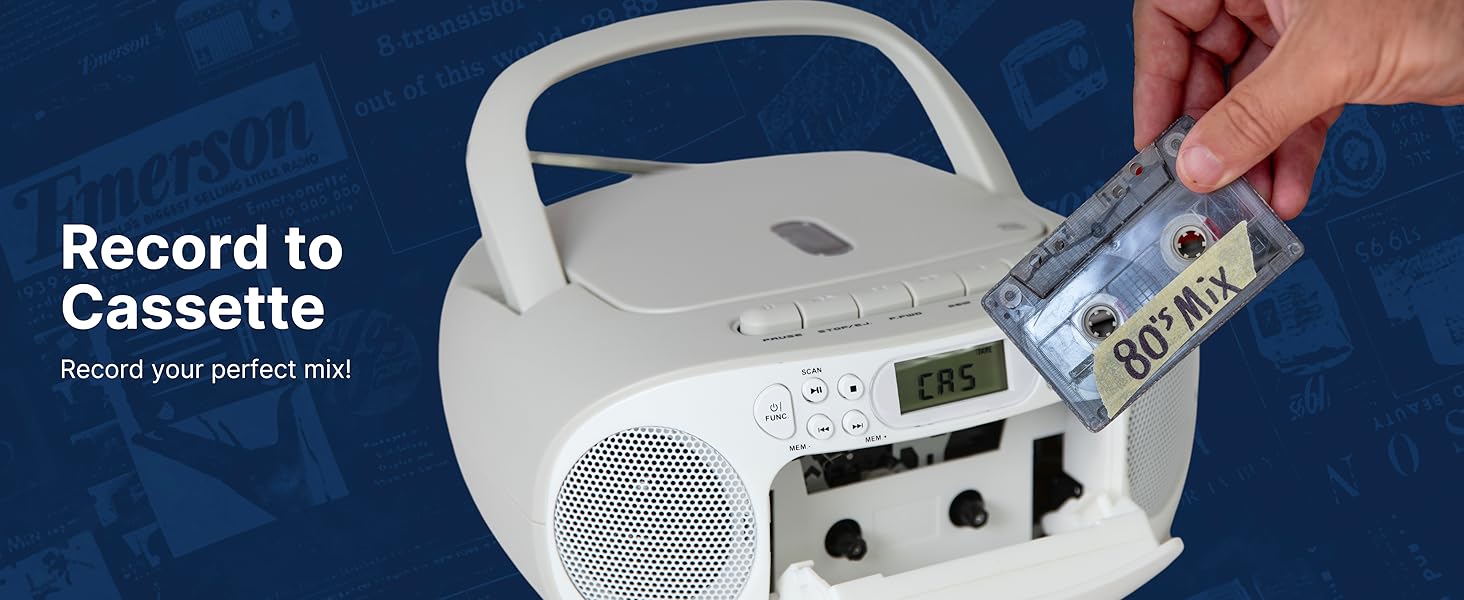
Figure 4.2: Inserting a cassette tape into the front-loading compartment.
- Press the FUNCTION button to select TAPE mode.
- Open the cassette compartment door.
- Insert a cassette tape with the open edge facing upwards.
- Close the cassette compartment door.
- Press the PLAY button (▶) on the cassette control panel to start playback.
- To stop playback, press the STOP/EJECT button (■).
- To fast forward, press the FAST FORWARD button (▶▶).
- To rewind, press the REWIND button (◀◀).
- To pause playback, press the PAUSE button (██). Press again to resume.
Recording to Cassette:

Figure 4.3: Preparing to record to a cassette tape.
You can record from the radio or the AUX input.
- Insert a blank cassette tape into the cassette compartment.
- Select the desired source (RADIO or AUX) using the FUNCTION button.
- Start playing the audio you wish to record (tune to a radio station or start playback from the AUX device).
- Press the RECORD button (●) on the cassette control panel. The PLAY button (▶) will also engage. Recording will begin.
- To stop recording, press the STOP/EJECT button (■).
4.4 AM/FM Radio Operation

Figure 4.4: The boombox tuned to an AM/FM radio station.
- Press the FUNCTION button to select RADIO mode.
- Extend the telescopic antenna for FM reception.
- Press the SCAN button to automatically scan and store available stations.
- Alternatively, use the TUN. +/- buttons to manually tune to a desired frequency.
- To recall stored stations, use the MEM.- / MEM.+ buttons.
4.5 AUX Input
The AUX input allows you to connect external audio devices (e.g., smartphones, MP3 players) to play through the boombox speakers.
- Press the FUNCTION button to select AUX mode.
- Connect one end of a 3.5mm audio cable (not included) to the AUX input jack on the boombox.
- Connect the other end of the audio cable to the headphone jack or audio output of your external device.
- Start playback on your external device.
- Adjust the volume on both the boombox and your external device for optimal sound.
4.6 Headphone Jack
For private listening, plug standard 3.5mm headphones (not included) into the headphone jack. The speakers will automatically mute.
5. Maintenance
5.1 Cleaning the Unit
- Unplug the unit from the power source before cleaning.
- Use a soft, dry cloth to wipe the exterior surfaces.
- Do not use abrasive cleaners, waxes, or solvents as they may damage the finish.
5.2 CD Player Care
- Handle CDs by their edges to avoid fingerprints and scratches.
- Clean CDs with a soft, lint-free cloth, wiping from the center outwards.
- Do not use solvents or abrasive cleaners on CDs.
5.3 Cassette Player Care
- Keep the cassette compartment clean. Dust and debris can affect playback quality.
- Periodically clean the tape heads and pinch rollers with a cotton swab lightly dampened with isopropyl alcohol.
- Avoid exposing tapes to direct sunlight or extreme temperatures.
6. Troubleshooting
If you experience issues with your boombox, refer to the following table for common problems and solutions.
| Problem | Possible Cause | Solution |
|---|---|---|
| No power | AC adapter not connected; Batteries depleted or incorrectly inserted. | Check AC connection; Replace batteries or ensure correct polarity. |
| No sound | Volume too low; Headphones connected; Incorrect function mode. | Increase volume; Disconnect headphones; Select correct mode (CD, Radio, Tape, AUX). |
| CD not playing | CD inserted incorrectly; CD dirty or scratched; Disc not compatible. | Insert CD label-side up; Clean or replace CD; Ensure CD-R/RW compatibility. |
| Cassette not playing/recording | Cassette inserted incorrectly; Tape heads dirty; Tape damaged. | Insert cassette correctly; Clean tape heads; Try a different tape. |
| Poor radio reception | Antenna not extended; Unit location. | Fully extend FM antenna; Reposition the unit for better AM reception. |
| AUX input not working | Cable not connected; Incorrect function mode; External device volume low. | Check 3.5mm cable connection; Select AUX mode; Increase volume on external device. |
7. Specifications

Figure 7.1: Product dimensions of the Emerson EPB-3003.
- Model: EPB-3003
- Power Source: AC 120V ~ 60Hz or 6 x 'C' size batteries (DC 9V)
- Radio Frequency: FM: 88-108 MHz, AM: 530-1710 kHz
- CD Compatibility: CD, CD-R, CD-RW
- Connectivity: 3.5mm AUX Input, 3.5mm Headphone Jack
- Speakers: Dual Stereo Speakers
- Product Dimensions (L x W x H): 9.1 x 8.5 x 4.5 inches (23.1 x 21.6 x 11.4 cm)
- Item Weight: 2.86 pounds (1.3 kg)
- Manufacturer: Naxa Electronics, Inc.
8. Warranty and Support
This product is covered by a limited manufacturer's warranty. For specific warranty details, please refer to the warranty card included with your purchase or contact Emerson customer support.
Customer Support:
For technical assistance, troubleshooting, or warranty inquiries, please contact Emerson customer support through their official website or the contact information provided in your product packaging.
Please have your model number (EPB-3003) and purchase date available when contacting support.


