1. Product Overview
The Bewinner H310 LGA 1151 Motherboard is a Micro ATX mainboard designed to support 8th and 9th generation Intel Core processors. It features DDR4 memory support, multiple storage interfaces including SATA 6Gb/s and M.2, and integrated graphics output options. This manual provides essential information for installation, operation, and maintenance.

Figure 1: Bewinner H310 LGA 1151 Motherboard, top-down view.
Key Features:
- Wide CPU Compatibility: Supports 8th and 9th generation Intel Core CPUs (LGA1151 socket).
- Dual-Channel DDR4 Memory: Supports up to 32GB across 2 DIMM slots, with effective frequencies including 2133 MHz.
- Stable Power Delivery: Features a three-phase power supply with solid-state capacitors and 24+8 pin power connectors for reliable operation.
- High-Speed H310 Chipset: Provides stable and efficient performance for various computing tasks.
- Integrated Graphics Support: Equipped with an integrated graphics processor and multiple display outputs (DVI, HDMI, VGA) for multi-monitor setups.
2. Package Contents
Verify that all items are present in the package:
- 1 x Bewinner H310 LGA 1151 Motherboard
- User Manual (this document)
Note: Additional accessories such as SATA cables or I/O shields may be included depending on the specific retail package.
3. Key Components and Connectors
Familiarize yourself with the layout and various connectors on the motherboard.

Figure 2: Overview of key areas including CPU socket, DIMM slots, chipset, and SATA ports.
Rear I/O Panel:
The rear I/O panel provides external connectivity for peripherals and displays.

Figure 3: Rear I/O panel showing PS/2, VGA, DVI, HDMI, USB 2.0, USB 3.0, LAN, and Audio ports.
Onboard Connectors:
Internal connectors for power, storage, and front panel components.

Figure 4: Labeled diagram of onboard connectors including 24-pin ATX power, SATA 6Gb/s, NVMe M.2, PCIe slots, USB headers, and front panel headers.
4. Setup Guide
Follow these general steps to install your motherboard into a computer system. Always ensure power is disconnected before handling components.
4.1. Preparation
- Safety First: Disconnect the power supply from the wall outlet. Wear an anti-static wrist strap or frequently touch a grounded metal object to discharge static electricity.
- Gather Components: Ensure you have your CPU, CPU cooler, RAM modules, storage devices, power supply, and PC case ready.
4.2. Motherboard Installation
- Install CPU: Open the CPU socket lever, align the CPU with the socket (match the golden triangle or notches), gently place the CPU into the socket, and close the lever to secure it.
- Install CPU Cooler: Apply thermal paste (if not pre-applied) and install the CPU cooler according to its instructions.
- Install RAM: Open the clips on the DDR4 DIMM slots. Align the RAM modules with the slots (notch on the module matches the slot key), and press down firmly on both ends until the clips snap into place. For dual-channel operation, refer to your CPU cooler's manual for recommended slot population.
- Mount Motherboard: Install the I/O shield into your PC case. Carefully place the motherboard into the case, aligning the screw holes with the standoffs. Secure the motherboard with screws.
- Install M.2 SSD (Optional): If using an M.2 SSD, insert it into the M.2 slot and secure it with the provided screw.
- Connect Power: Connect the 24-pin ATX power connector and the 8-pin CPU power connector from your power supply to the motherboard.
- Connect Storage: Connect SATA data cables from your storage drives (HDDs/SSDs) to the SATA 6Gb/s ports on the motherboard. Connect SATA power cables from your power supply to the drives.
- Connect Front Panel: Connect the front panel headers (power button, reset button, USB ports, audio jacks, LED indicators) to the corresponding pins on the motherboard. Refer to the motherboard's silkscreen labels for correct orientation.
- Install Expansion Cards (Optional): If using a dedicated graphics card or other PCIe expansion cards, insert them into the appropriate PCIe slots and secure them.
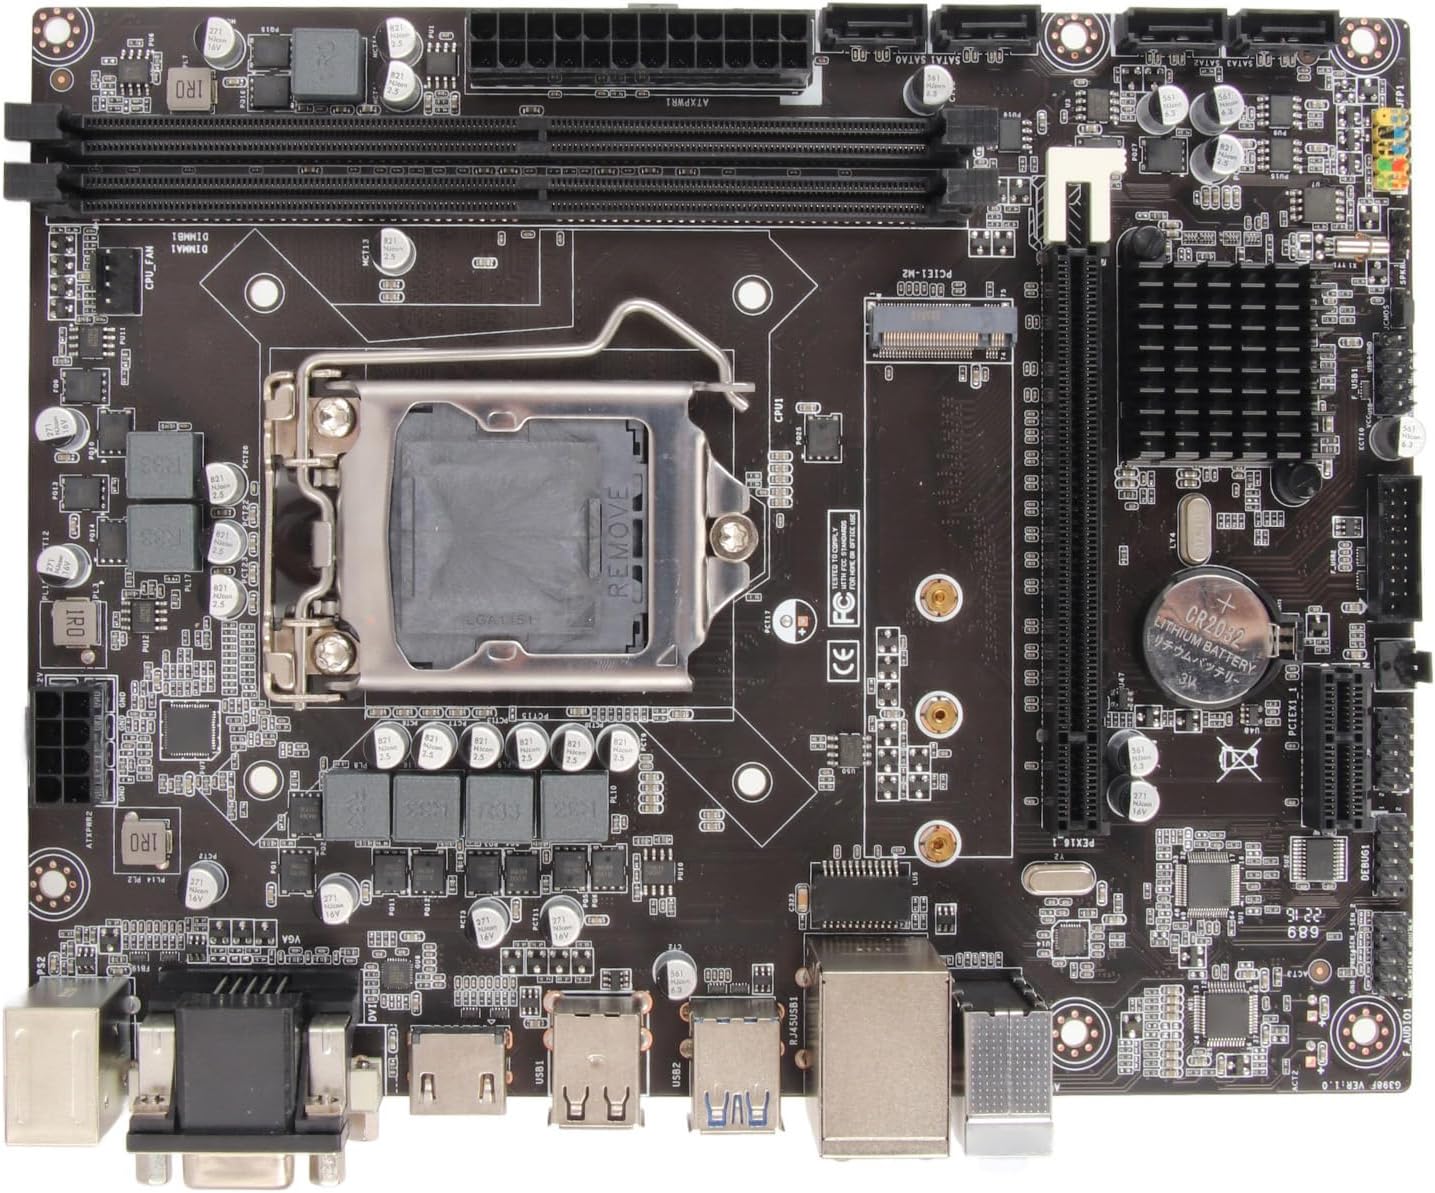
Figure 5: Top-down view of the motherboard, useful for identifying component locations during installation.
5. Operating Instructions
Once all components are installed and connected, you can proceed with system operation.
5.1. First Boot
- Connect Peripherals: Connect your monitor, keyboard, and mouse to the rear I/O ports.
- Power On: Connect the power supply to the wall outlet and flip the power switch on the PSU. Press the power button on your PC case.
- BIOS/UEFI Access: During startup, repeatedly press the designated key (usually DEL or F2) to enter the BIOS/UEFI setup utility.
5.2. BIOS/UEFI Configuration
The BIOS/UEFI interface allows you to configure system settings, boot order, and monitor hardware status.
- Boot Order: Set the boot priority to your operating system installation media (USB drive or DVD-ROM) to install Windows or other OS.
- System Time/Date: Adjust the system clock if necessary.
- Fan Control: Configure fan speeds for optimal cooling and noise levels.
- Save and Exit: After making changes, save your settings and exit the BIOS/UEFI. The system will restart.
5.3. Operating System Installation
Follow the on-screen prompts to install your preferred operating system. After installation, install all necessary drivers for the motherboard chipset, integrated graphics, audio, and LAN from the manufacturer's website or included media.
6. Maintenance
Proper maintenance ensures the longevity and stable performance of your motherboard.
- Keep Clean: Regularly clean dust from inside your PC case using compressed air. Dust accumulation can lead to overheating.
- BIOS/UEFI Updates: Check the manufacturer's website for BIOS/UEFI updates. Updates can improve compatibility, stability, and performance. Follow update instructions carefully.
- Driver Updates: Keep your motherboard drivers (chipset, audio, LAN, graphics) updated to ensure optimal performance and compatibility with new software.
- Environmental Conditions: Operate the motherboard in a well-ventilated area, away from direct sunlight, excessive heat, and moisture.
7. Troubleshooting
If you encounter issues, refer to the following troubleshooting tips:
- No Power:
- Ensure the power supply is connected to the wall and switched on.
- Verify that the 24-pin ATX and 8-pin CPU power connectors are securely seated on the motherboard.
- Check front panel power switch connection to the motherboard.
- No Display:
- Ensure the monitor is connected to the correct display output (VGA, DVI, or HDMI) on the motherboard or dedicated graphics card.
- Reseat RAM modules. Try booting with only one RAM module.
- Check if the CPU is properly installed.
- System Instability/Crashes:
- Check CPU and GPU temperatures. Ensure adequate cooling.
- Verify RAM compatibility and stability. Run memory diagnostic tools.
- Ensure all drivers are up to date.
- Peripheral Not Detected:
- Try connecting the peripheral to a different USB port.
- Install or update drivers for the peripheral.
- Check BIOS/UEFI settings for USB port enablement.
- Operating System Issues:
- Ensure the operating system is installed on a bootable drive.
- Check boot order in BIOS/UEFI.
- Perform a clean installation of the operating system if issues persist.
8. Technical Specifications
Detailed specifications for the Bewinner H310 LGA 1151 Motherboard.

Figure 6: Motherboard dimensions: approximately 21.5 cm (8.5 inches) by 17 cm (6.7 inches).
| Feature | Specification |
|---|---|
| Brand | Bewinner |
| Model Name | H310 (Model Number: Bewinnerw4dsgtaq2y) |
| CPU Socket | LGA 1151 |
| Compatible Processors | 8th and 9th Generation Intel Core (e.g., i3-8100, i5-8400, i7-8700, i3-9100, i5-9400, i7-9700) |
| Chipset Type | Intel H310 |
| RAM Technology | DDR4 |
| Memory Slots | 2 x DIMM (Dual Channel) |
| Max RAM Capacity | Up to 32GB |
| Memory Clock Speed | 2133 MHz (Supports 1066, 1333, 1600 MHz) |
| Graphics | Integrated Graphics Processor |
| Audio Codec | Realtek ALC662 6-channel |
| LAN Controller | Realtek 100M/1000M |
| Expansion Slots | 1 x PCI Express X16, 1 x PCI Express X1 |
| SATA Ports | 4 x SATA 6Gb/s |
| M.2 Slot | 1 x NVME M.2 |
| USB Ports (Rear) | 4 x USB 2.0/1.1, 2 x USB 3.0 |
| Display Outputs | 1 x VGA, 1 x DVI, 1 x HDMI compatible |
| Other Rear I/O | 1 x PS/2 port, 1 x RJ45 LAN port, 1 x Audio connector |
| Form Factor | Micro ATX (17 x 21.5 cm / 6.7 x 8.5 inches) |
| CMOS Battery | CR2032 (integrated) |
| Compatible Devices | PC, Laptop (as a component) |
| Origin | China |
9. Warranty and Support
For warranty information and technical support, please refer to the retailer or the official Bewinner website. Keep your proof of purchase for any warranty claims.
- Product Support: Visit the Bewinner support page for FAQs, driver downloads, and contact information.
- Warranty Claims: Contact your point of purchase or Bewinner customer service with your product model number (Bewinnerw4dsgtaq2y) and purchase details.


