
YCDUS 75w Red_LCD
Weld Lux 75W Digital Soldering Station User Manual
Model: 75w Red_LCD
Brand: YCDUS
1. Introduction
Thank you for choosing the Weld Lux 75W Digital Soldering Station. This professional-grade soldering station is designed for precision thermal control, offering a wide temperature range, fast heating, and user-friendly features. This manual provides essential information for the safe and effective operation, maintenance, and troubleshooting of your new soldering station.

Figure 1.1: Weld Lux 75W Digital Soldering Station and accessories.
2. Package Contents
Please verify that all items listed below are included in your package. If any items are missing or damaged, please contact customer support.
- Weld Lux Soldering Station
- Soldering Iron Handle
- Soldering Iron Stand with Cleaning Sponge
- 3x Anti-static Safety Tweezers
- Vacuum Suction Pen (Desoldering Pump)
- 6x Soldering Iron Tips (various shapes: I, B, 2C, 3C, 1.6D, K)
- Lead-free Solder Wire Reel (35g)
- Solder Wire Dispenser

Figure 2.1: Included accessories for the soldering station.
3. Product Features
The Weld Lux 75W Digital Soldering Station is equipped with advanced features to enhance your soldering experience:
- Fast Heating: High-power ceramic heating core ensures rapid temperature attainment.
- Precision Thermal Control: Flexible temperature range from 392°F to 896°F (180°C to 480°C) with real-time monitoring and correction for accuracy.
- Digital LCD Display: A large 3.5-inch LCD clearly displays temperature readings and function indicators.
- Temperature Unit Conversion: Easily switch between Fahrenheit (°F) and Celsius (°C).
- Automatic Sleep Mode: The workstation enters sleep mode after a set duration of inactivity to reduce tip wear and save energy.
- Temperature Pre-storage: Stores your last used temperature setting for quick recall upon restart.
- USB Power Output: Integrated 5V/1A USB port for charging small electronic devices.
- PID Temperature Stabilization: Advanced PID algorithm ensures stable and consistent temperature output.
- Short Circuit Protection: Built-in safety mechanisms to protect the unit and user.

Figure 3.1: LCD Display Features.

Figure 3.2: Key Features of the Soldering Station.
4. Setup Instructions
Follow these steps to set up your Weld Lux Soldering Station:
- Unpack Components: Carefully remove all items from the packaging and inspect them for any damage.
- Place the Station: Position the soldering station on a stable, heat-resistant, and well-ventilated surface. Ensure there is enough space around the unit for proper airflow.
- Assemble Soldering Iron Stand: Place the metal iron bracket into the designated slot on the soldering iron stand. Insert the cleaning sponge into its tray on the stand. You may dampen the sponge slightly with distilled water before use.
- Connect Soldering Iron: Connect the soldering iron handle connector cable to the corresponding port on the front of the soldering station. Ensure a secure connection.
- Connect Power: Plug the power cord into the back of the soldering station and then into a standard electrical outlet.
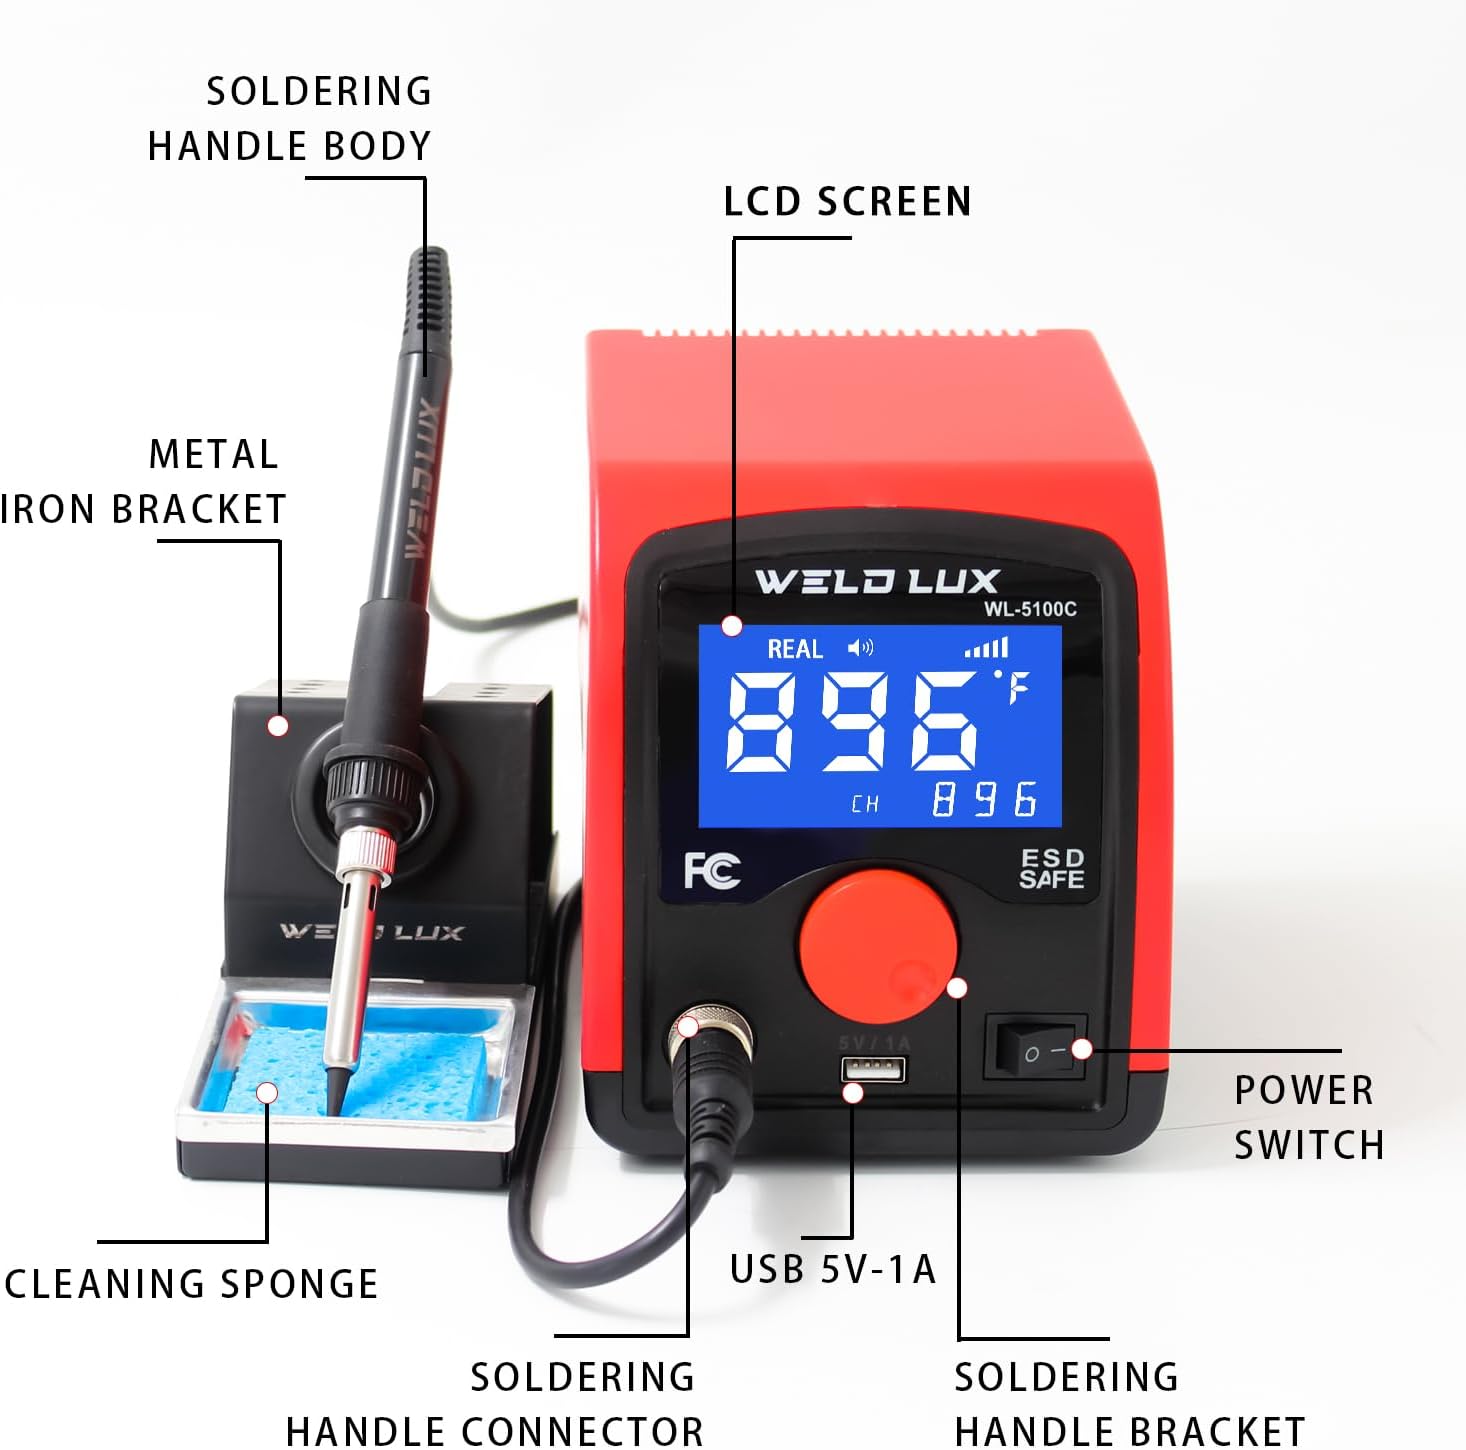
Figure 4.1: Soldering Station Components Diagram.
5. Operating Instructions
5.1 Power On/Off
Press the power switch located on the front panel to turn the soldering station ON or OFF. The LCD will illuminate upon power-on.
5.2 Temperature Adjustment
Rotate the large red knob on the front panel clockwise to increase the temperature and counter-clockwise to decrease it. The set temperature will be displayed on the LCD. The station will quickly heat up to the desired temperature.
5.3 Fahrenheit/Celsius Conversion
To switch between Fahrenheit (°F) and Celsius (°C), refer to the instructions in the display features section (Figure 3.1). Typically, this involves a short press or combination of button presses on the control panel.
5.4 Using Pre-stored Temperatures
The station automatically stores the last used temperature. Upon next power-on, it will recall this setting, eliminating the need for manual readjustment.
5.5 Automatic Sleep Mode
If the soldering iron is not used for a set duration (factory default or user-configurable), the station will enter sleep mode, reducing the tip temperature to a lower, safer level. This prolongs the life of the soldering tip and heating element. Waking the station typically involves picking up the iron or pressing a button.
5.6 Basic Soldering Tips
- Tinning the Tip: Before first use and periodically during operation, apply a small amount of solder to the heated tip. This protects the tip and improves heat transfer.
- Cleaning the Tip: Regularly wipe the hot tip on the damp cleaning sponge to remove excess solder and oxidation.
- Proper Soldering Technique: Apply the hot, tinned tip to both the component lead and the PCB pad simultaneously. Feed solder onto the joint, not directly onto the iron tip. Remove the iron once the solder flows smoothly.
6. Maintenance
Regular maintenance ensures optimal performance and longevity of your soldering station:
- Tip Cleaning: Always clean the soldering tip before and after use. Use the damp sponge to wipe off excess solder and oxidation. For stubborn oxidation, use a tip cleaner or brass wool.
- Tip Replacement: If a tip becomes excessively worn or damaged, replace it with a new one. Ensure the station is off and the iron has cooled before changing tips.
- Sponge Maintenance: Keep the cleaning sponge damp but not soaking wet. Replace the sponge when it becomes heavily soiled or worn.
- General Cleaning: Keep the soldering station and iron handle clean and free of dust and debris. Use a soft, dry cloth. Do not use abrasive cleaners or solvents.
- Storage: When not in use, store the soldering iron in its stand. Disconnect the power cord if storing for an extended period.
7. Troubleshooting
If you encounter issues with your soldering station, refer to the following common problems and solutions:
| Problem | Possible Cause | Solution |
|---|---|---|
| Station does not power on. | No power supply; Power switch off; Loose connection. | Check power cord connection; Ensure power switch is ON; Try a different outlet. |
| Soldering iron not heating or heating slowly. | Incorrect temperature setting; Loose iron connection; Damaged heating element/tip. | Verify temperature setting; Re-seat iron connector; Replace soldering tip; Contact support if issue persists. |
| Temperature display is inaccurate or fluctuating. | Sensor issue; Tip not properly seated; Calibration needed. | Ensure tip is fully inserted; Refer to manual for calibration steps (if available); Contact support. |
| Solder does not melt easily. | Temperature too low; Tip is oxidized or dirty; Incorrect solder type. | Increase temperature; Clean and re-tin the tip; Ensure using appropriate solder for the temperature. |
| Station enters sleep mode too quickly/not at all. | Sleep mode settings. | Consult the manual for adjusting sleep mode duration settings. |
If the problem persists after attempting these solutions, please contact Weld Lux customer support for further assistance.
8. Specifications
| Specification | Detail |
|---|---|
| Model Number | 75w Red_LCD |
| Wattage | 75 watts |
| Temperature Range | 392°F to 896°F (180°C to 480°C) |
| Temperature Stability | ±5°F (±3°C) |
| Display Type | LCD |
| Power Source | AC |
| USB Output | 5V/1A |
| Item Weight | 5.39 pounds (2.45 kg) |
| Package Dimensions | 10.43 x 8.46 x 7.48 inches |
| Manufacturer | YCDUS |
| UPC | 680306174614 |
9. Warranty and Support
The Weld Lux 75W Digital Soldering Station comes with a 12-month warranty from the date of purchase. This warranty covers defects in materials and workmanship under normal use.
The warranty does not cover damage caused by misuse, accident, unauthorized modification, or improper maintenance. Please retain your proof of purchase for warranty claims.
For technical support, warranty claims, or any questions regarding your product, please contact Weld Lux customer service via the contact information provided on your purchase platform or the official Weld Lux website.
Ask a question about this manual
Ask about setup, troubleshooting, compatibility, parts, safety, or missing instructions. Manuals+ will review the question and use this page’s manual context to help answer it.