Introduction
This manual provides essential information for the safe installation, operation, and maintenance of your WOODBRIDGE 60-inch Alcove Acrylic Rectangular Whirlpool Heated Jetted Tub, model BS6030R. Please read all instructions carefully before installation and use to ensure proper function and longevity of your product.
Safety Information
Always follow basic safety precautions when using electrical appliances, especially those involving water. Failure to do so may result in electric shock, fire, or injury.
- Ensure all electrical connections are performed by a qualified electrician and comply with local codes.
- Do not operate the tub if the water level is not above the jets.
- Avoid using abrasive cleaners or tools that could damage the acrylic surface.
- Keep children away from the tub unless supervised by an adult.
- Do not use extension cords with this product.
- Consult a physician before use if you have health concerns, are pregnant, or have a heart condition.
Package Contents
Verify that all components are present and undamaged upon receipt.
- WOODBRIDGE 60" Alcove Whirlpool Heated Jetted Tub (Model BS6030R)
- Solid brass pop-up drain with stainless steel overflow (Chrome finish)
- Installation Manual
Specifications
| Brand | WOODBRIDGE |
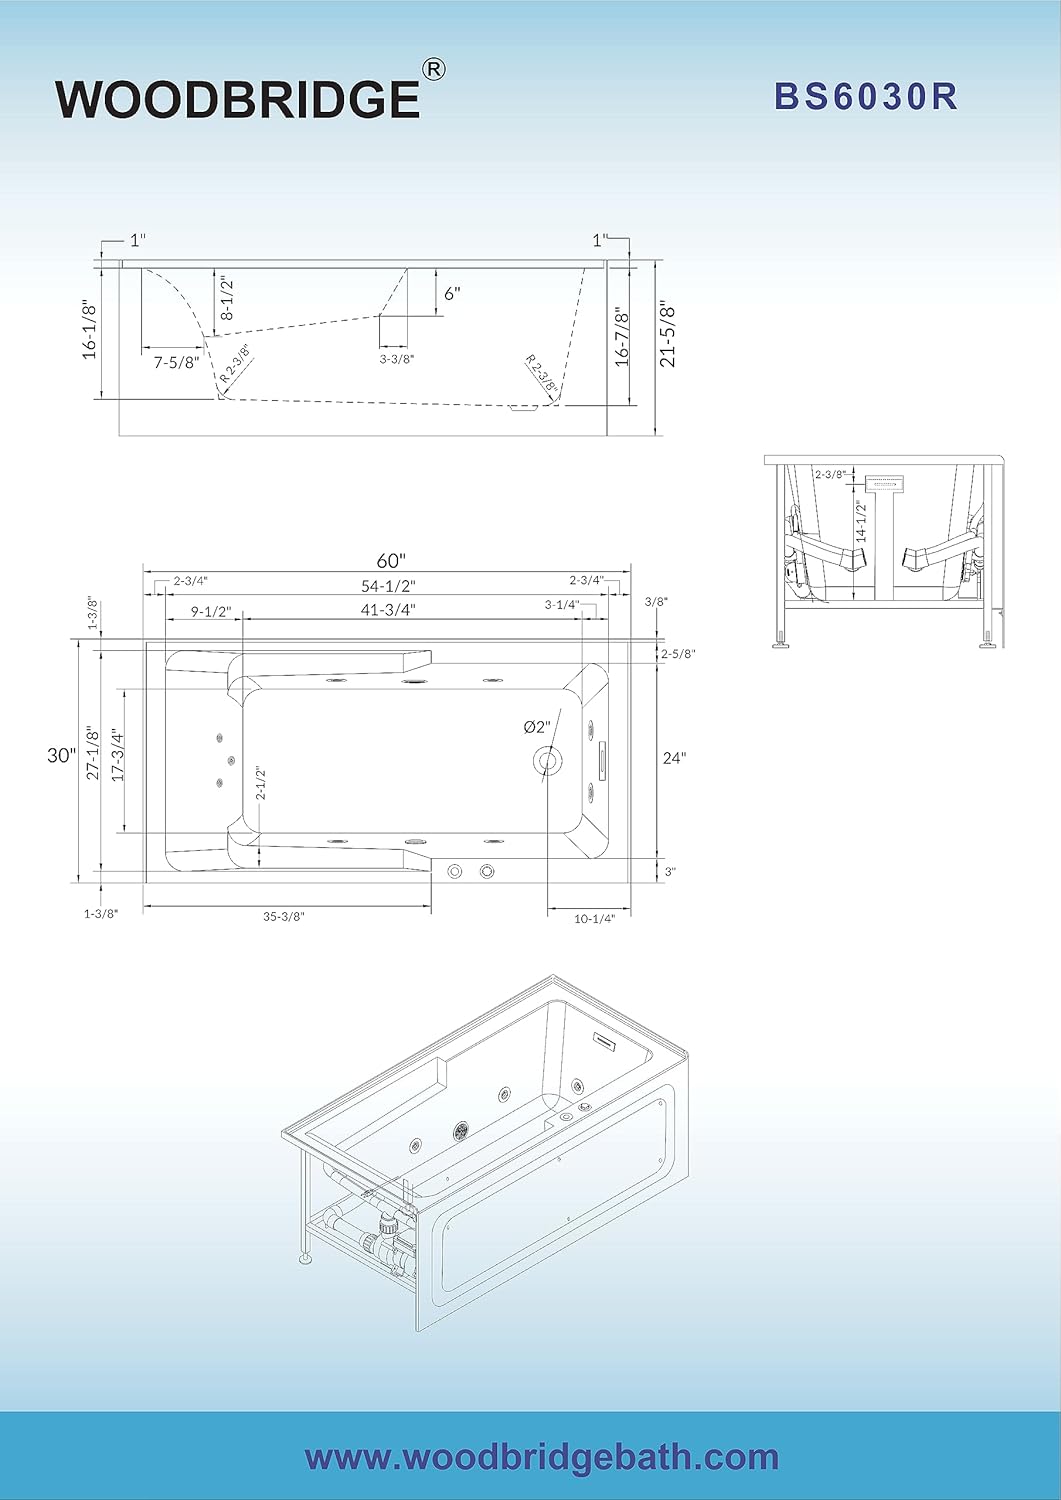
| Model Number | BS6030R |
| External Dimensions | 60" L x 30" W x 21-5/8" H |
| Internal Dimensions | 54-1/2" L x 24" W x 16-1/8" D1 x 16-7/8" D2 |
| Seating Area | 41-3/4" L x 17-3/4" W |
| Soaking Depth | 14 1/2" |
| Material | Acrylic |
| Installation Type | Alcove |
| Drain Finish | Chrome |
| Item Weight | 160.1 pounds |
Setup and Installation
Proper installation is crucial for the performance and safety of your jetted tub. It is recommended that installation be performed by a licensed professional.
- Preparation: Ensure the installation area is level and has adequate structural support for the tub's weight when filled with water and occupied. Verify plumbing and electrical connections are accessible and meet local codes.
- Positioning: Carefully place the tub into the alcove. The integral three-sided tiling flange is designed to prevent water damage to the wall and simplifies installation.
- Plumbing Connections: Connect the drain and overflow assembly. Ensure all connections are watertight.
- Electrical Connections: A qualified electrician must connect the tub's electrical system to a dedicated circuit as per local electrical codes.
- Access Panel: The bathtub skirt features a removable access panel. This panel allows access to all internal equipment for any necessary maintenance or service, eliminating the need for a separate access panel in your wall.
- Water Test: Before sealing the installation, fill the tub with water and operate the jets to check for leaks and proper function.
Important Note: Due to the design and threshold size of WOODBRIDGE alcove tubs, this model will not accommodate the usage of bathtub shower doors, including those from WOODBRIDGE. This tub is designed for use with a shower rod and curtain only.

Operating Instructions
Familiarize yourself with the controls for an optimal bathing experience.
- Filling the Tub: Ensure the drain is closed. Fill the tub with water to a level above the highest jets before activating the whirlpool system.
- Activating Whirlpool Jets: Press the designated button to activate the whirlpool system. The tub features 3 small jets in the foot zone and 6 jets in the body zone.
- Adjusting Jet Flow: The jets are tunable. Rotate the jet nozzle to adjust the flow rate and the angle of the water inflow to target specific areas for massage.
- Heated Soaking: The inline heater maintains the water temperature, allowing for extended soaking without the need to add more hot water. This feature ensures a consistently warm bath throughout your experience.
- Chromotherapy LED Lights: Activate the 7-color LED lights to enhance your bathing experience with chromotherapy. Cycle through the colors or select a preferred hue using the control panel.


Maintenance
Regular cleaning and maintenance will ensure your tub remains in excellent condition.
- Cleaning the Tub Surface: Use a soft cloth and a non-abrasive, mild bathroom cleaner. Avoid harsh chemicals or abrasive pads that can scratch the acrylic.
- Cleaning the Jets: Periodically run the whirlpool system with a tub cleaner specifically designed for jetted tubs to prevent buildup in the pipes and jets. Follow the cleaner's instructions.
- Access Panel: The removable access panel on the tub skirt facilitates easy access to the pump and other components for inspection or maintenance.
- Drain Maintenance: Regularly clean the pop-up drain and overflow assembly to prevent clogs.

Troubleshooting
If you encounter issues with your tub, refer to the following common troubleshooting steps. For problems not listed here, or if issues persist, contact customer support.
- Jets not operating: Ensure the tub is filled with water above the jet level. Check the circuit breaker for the tub's electrical supply.
- Water not heating: Verify the inline heater is activated. Ensure the water level is sufficient.
- Leaks: Immediately turn off the water supply and electrical power. Inspect all plumbing connections. Contact a professional if you cannot identify or resolve the leak.
Warranty and Support
WOODBRIDGE warrants this product to be free of defects in material and workmanship for a period of 1 year from the date of purchase. This warranty is subject to proper installation and normal use.
For warranty claims, technical assistance, or any questions regarding your WOODBRIDGE product, please contact our US-based customer support team. Our team is dedicated to providing fast and reliable assistance.
You can find more information and contact details on the official WOODBRIDGE website or through your retailer.


