Product Overview
The Abask Dash Cam J05Pro is a high-performance car camera system designed to record both the road ahead and the vehicle's interior. Featuring true 4K front recording and 1080P interior recording, it provides clear video evidence for various driving situations. Equipped with advanced features like infrared night vision, 24-hour parking monitoring, G-sensor, and built-in WiFi for app control, it offers comprehensive security and convenience.
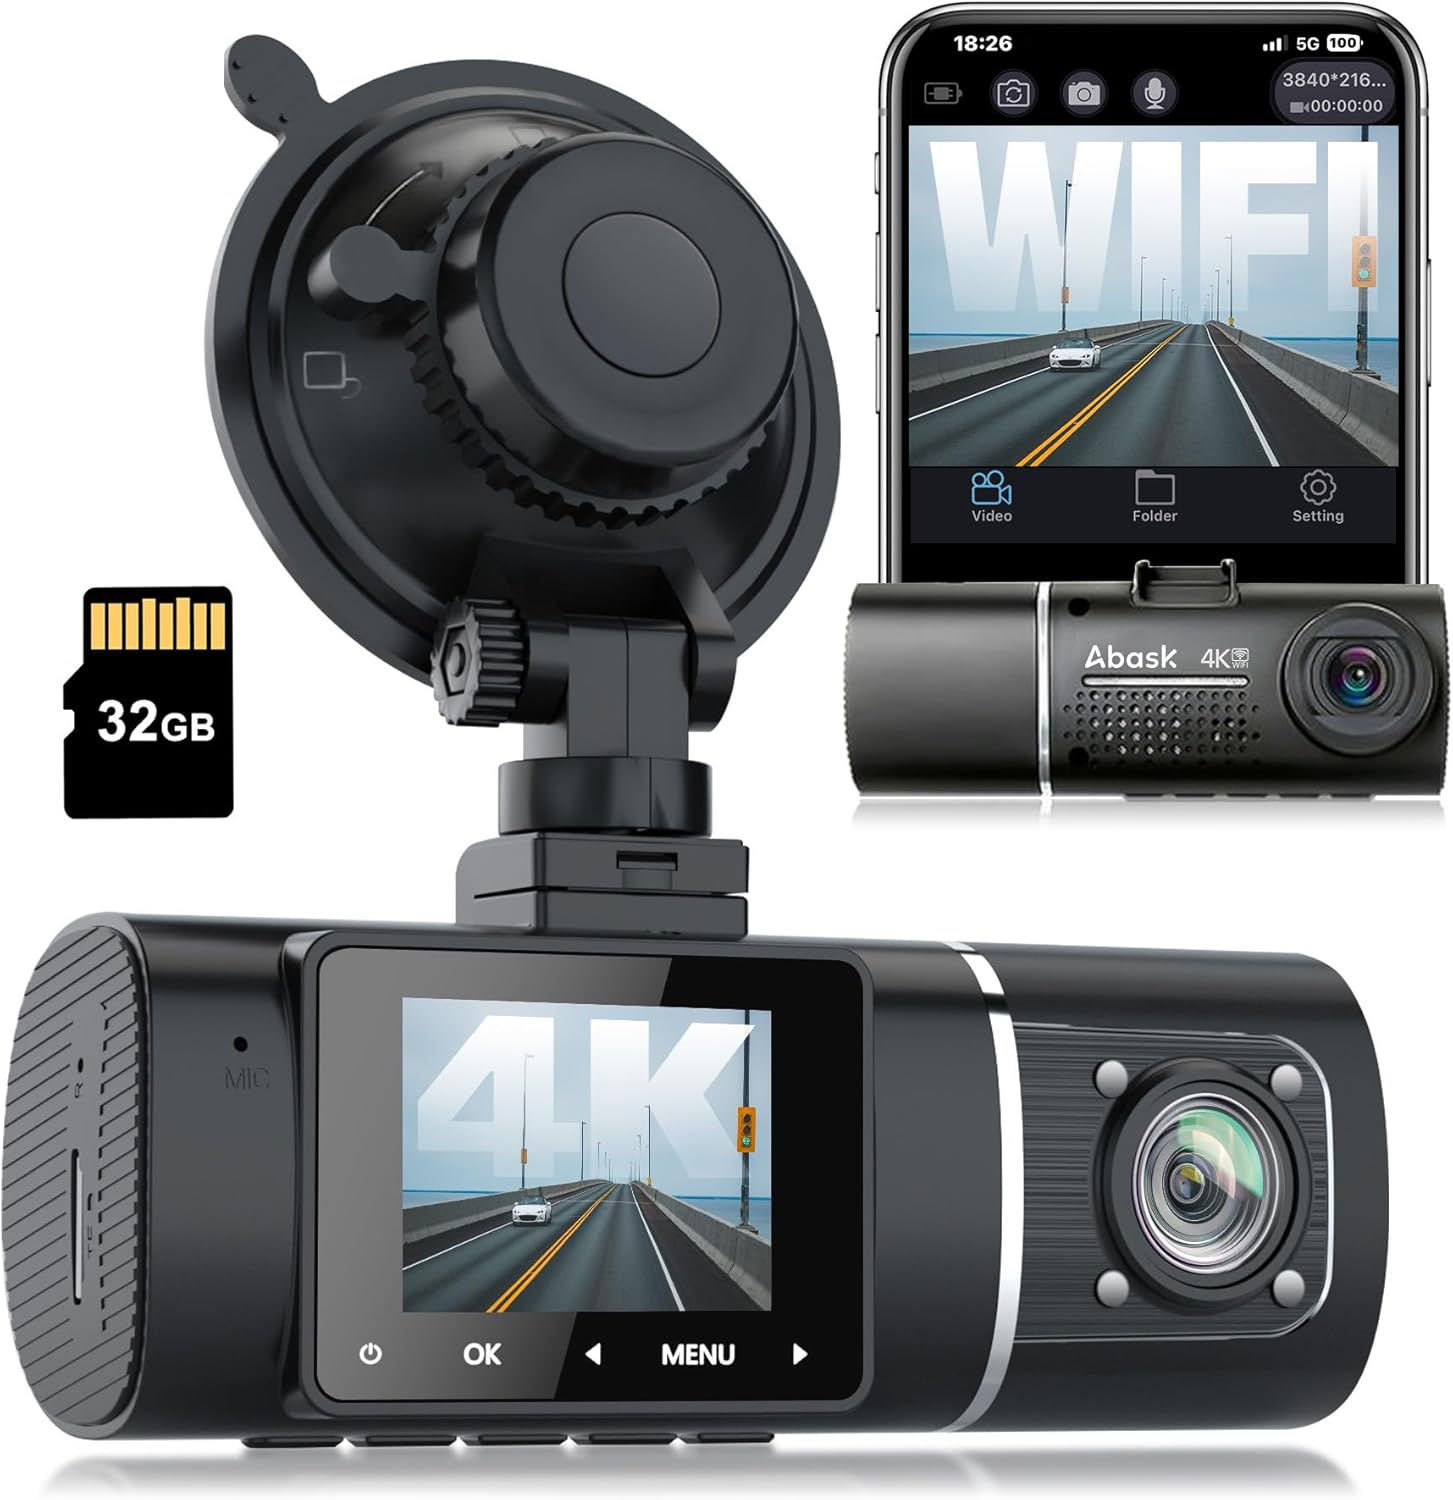
Figure 1: Abask Dash Cam J05Pro with included accessories.
Key Features:
- True 4K Front + 1080P Interior UHD Video: Simultaneously records high-resolution video and audio for both front (4K 3840*2160) and interior (1080P 1920*1080) views.
- Built-in WiFi & APP Control: Connects to the dedicated LuckyCam app for live viewing, settings management, and direct video download/sharing on Android/iOS devices.
- Super Infrared Night Vision: Utilizes 4K recording, HDR technology, and 4 inconspicuous infrared lights for clear video capture in low-light conditions, especially for the interior camera.
- 24-Hour Parking Surveillance and Motion Detection: Automatically begins recording if disturbances are detected while parked. Requires hardwiring to the fuse box for continuous operation.
- Automatic Storage, G-Sensor & Loop Recording: In the event of an accident, the G-sensor automatically locks and saves video evidence. Loop recording overwrites unlocked older footage to ensure continuous recording.
- Total 310° Wide-Angle Field of View: Provides a comprehensive view with 170° for the front camera and 140° for the interior camera.
What's in the Box
Upon opening the package, please verify that all the following items are included:
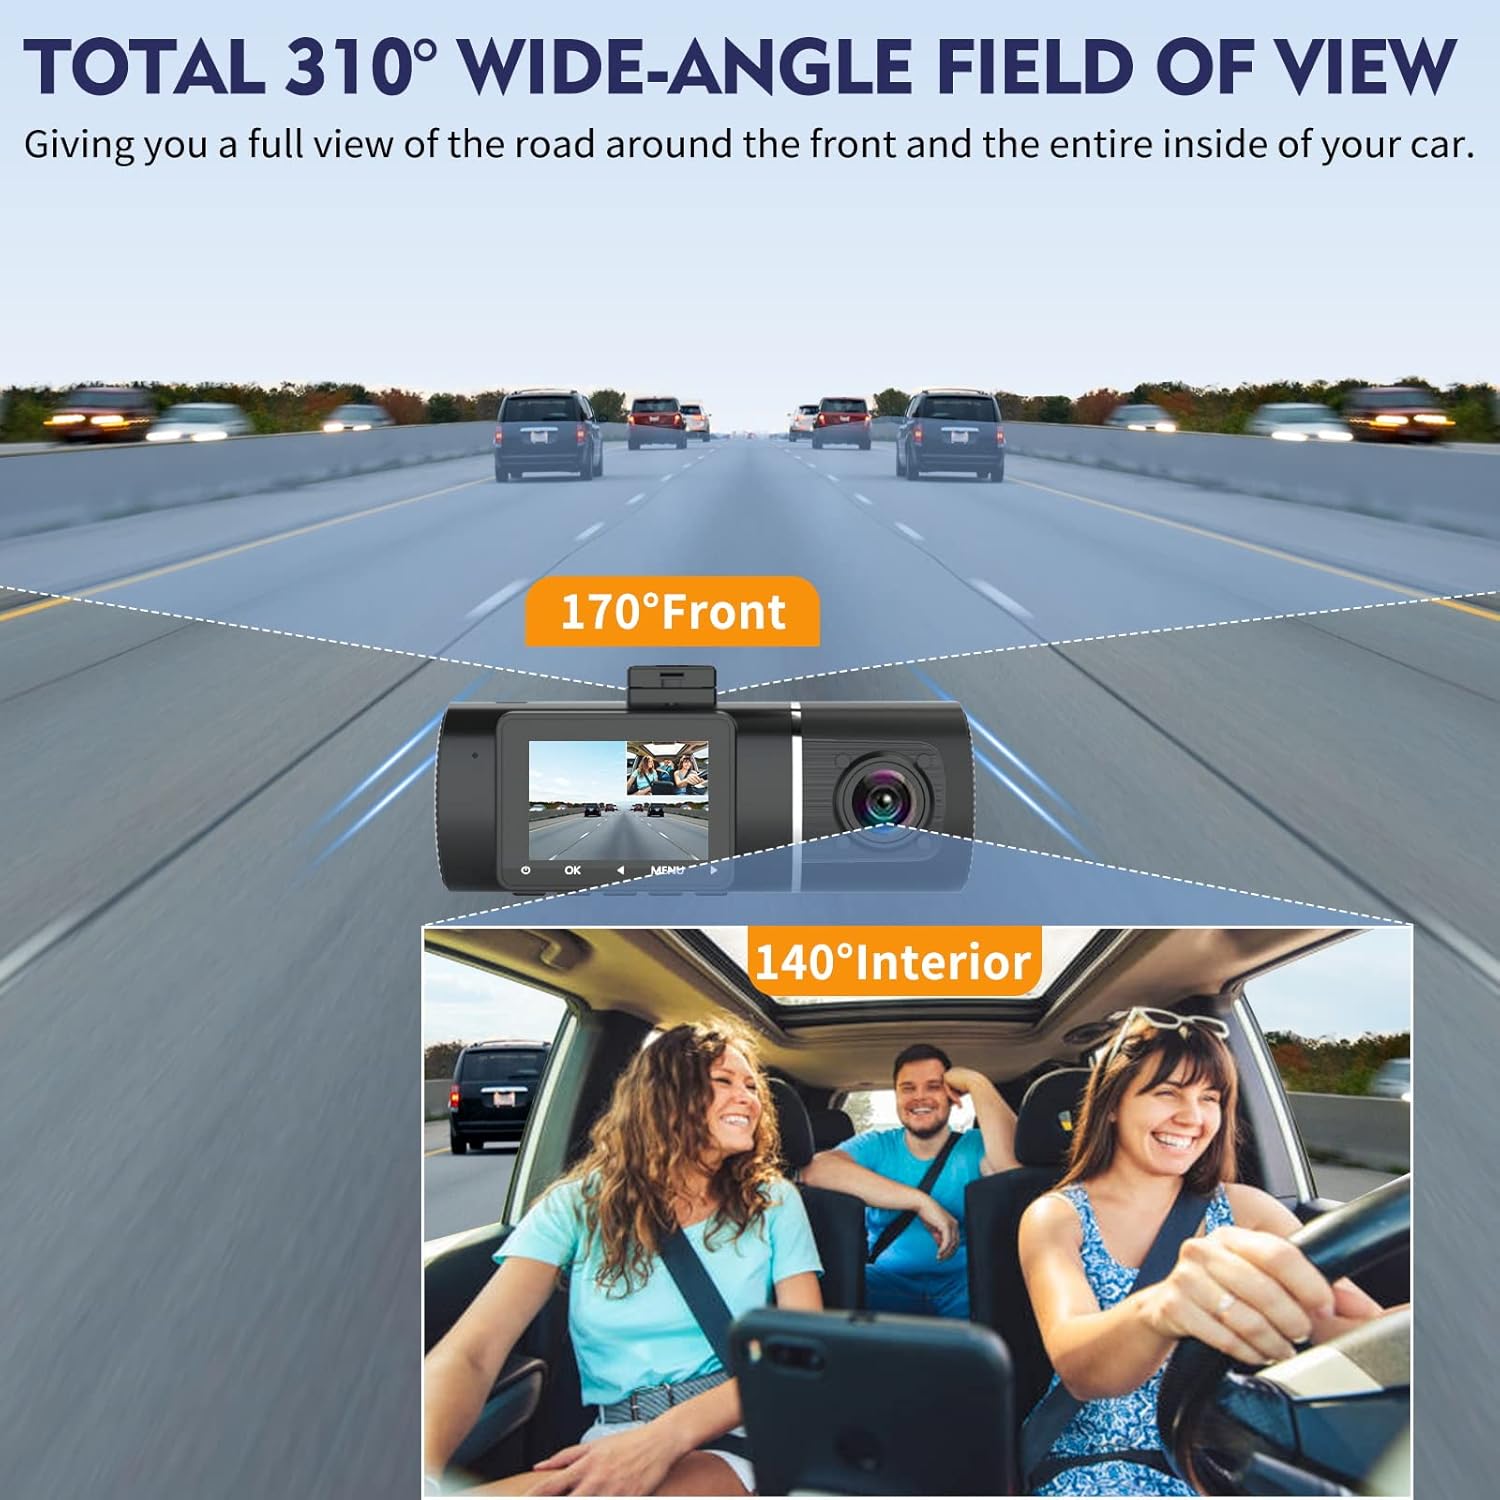
Figure 2: All components included in the Abask Dash Cam package.
- Abask Dash Cam J05Pro Unit
- Suction Cup Mount
- 32GB Micro SD Card (pre-installed or separate)
- Car Charger (connects to cigarette lighter)
- USB Data Cable
- Wiring Tool (plastic 'crowbar' for cable routing)
- Cable Clips (for neat cable management)
- User Manual
Product Overview Video:
Video 1: A brief overview of the Abask J05 Pro Dash Cam, highlighting its dual camera setup and WiFi connectivity.
Setup Guide
1. Mounting the Dash Cam
- Clean the windshield area where you intend to mount the dash cam. Ensure it is free from dust and grease.
- Attach the suction cup mount to the dash cam unit.
- Press the suction cup firmly against the windshield and twist the locking mechanism to secure it. Position the dash cam to ensure a clear view for both the front and interior cameras, without obstructing your driving view.

Figure 3: Proper mounting of the dash cam on the windshield.
2. Power Connection
- Insert the car charger into your vehicle's cigarette lighter socket.
- Connect the other end of the car charger cable to the dash cam's power input port.
- Route the power cable neatly along the edge of the windshield and dashboard using the provided cable clips and wiring tool to avoid obstructing your view or interfering with vehicle controls.
- The dash cam will automatically power on and begin recording when your vehicle's ignition is turned on.

Figure 4: Recommended cable routing for a tidy installation.
3. Initial Setup (Memory Card & Language)
The dash cam comes with a 32GB Micro SD card. It supports up to 128GB cards. For optimal performance, it is recommended to format the memory card before first use and periodically thereafter.
- Ensure the dash cam is powered on.
- Press the MENU button to access the settings.
- Navigate through the menu using the arrow buttons (< and >) to find "Format" and "Language" options.
- Select "Format" and confirm to clear the memory card.
- Select "Language" and choose your preferred language (e.g., English).
- Set the correct Date/Time in the settings menu.
Operation Instructions Video:
Video 2: Detailed instructions on operating the J05Pro Dash Cam, including initial setup and menu navigation.
Operating Instructions
1. Basic Operation
- Automatic On/Off: The dash cam is designed to power on and off automatically with your vehicle's ignition.
- Loop Recording: The dash cam continuously records video in short segments (e.g., 1, 3, or 5 minutes). When the memory card is full, it automatically overwrites the oldest unlocked footage.
- G-Sensor (Emergency Lock): In the event of a sudden impact or collision, the built-in G-sensor will automatically detect the event and lock the current video segment, preventing it from being overwritten by loop recording. This footage is saved as important evidence.
- Manual Lock: You can manually lock the current recording by pressing the OK button during recording.

Figure 5: G-sensor and Loop Recording functionality.
2. WiFi & App Control (LuckyCam)
The built-in WiFi allows you to connect your dash cam to your smartphone via the LuckyCam app for convenient control and access to recordings.
- Download the "LuckyCam" app from the App Store (iOS) or Google Play Store (Android).
- On the dash cam, navigate to the WiFi settings and turn WiFi "On". The WiFi name (SSID) and password will be displayed on the dash cam screen.
- On your smartphone, go to Wi-Fi settings, find the dash cam's WiFi network (e.g., "J05PROxxxx"), and connect using the displayed password.
- Open the LuckyCam app. You can now view the live feed, playback recorded videos, download videos to your phone, and adjust dash cam settings directly from the app.
- Videos downloaded to your smartphone can be easily shared on social media.

Figure 6: LuckyCam App interface for dash cam control.

Figure 7: WiFi & App Control with QR codes for app download.
WiFi Connection and App Usage Video:
Video 3: Demonstrates how to connect the dash cam to the LuckyCam app via WiFi and use its features.
Advanced Features
1. True 4K Front + 1080P Interior Video
The dash cam records simultaneously with a 4K (3840x2160) resolution for the front camera and 1080P (1920x1080) for the interior camera. This dual-channel recording ensures comprehensive coverage.
- Front Camera Angle: 170° wide angle, capturing multiple lanes of traffic.
- Interior Camera Angle: 140° wide angle, providing a clear view of the cabin.
- Total Coverage: Combined 310° field of view for maximum situational awareness.

Figure 8: Wide-angle coverage of the dash cam.

Figure 9: Comparison of 4K front and 1080P cabin video quality.
2. Super Infrared Night Vision
Equipped with HDR (High Dynamic Range) technology and 4 infrared (IR) lights for the interior camera, the dash cam delivers clear and detailed video even in challenging low-light conditions or complete darkness.

Figure 10: Night Vision technology for enhanced clarity.
3. 24-Hour Parking Monitoring & Motion Detection
This feature allows the dash cam to monitor your vehicle even when it's parked and the engine is off. If motion or impact is detected, the camera will automatically start recording.
- Activation: To enable 24-hour parking monitoring, the dash cam must be properly hardwired to the vehicle's fuse box (hardwire kit not included).
- Benefits: Provides security against vandalism, hit-and-runs, or other incidents while your vehicle is unattended.

Figure 11: 24-Hour Parking Monitoring in action.
Maintenance
- Lens Cleaning: Regularly clean the camera lenses with a soft, lint-free cloth to ensure clear video quality. Avoid abrasive materials or harsh chemicals.
- Memory Card Management: Format the Micro SD card every 2-4 weeks to prevent data corruption and ensure optimal recording performance. Back up any important footage before formatting.
- Temperature Control: Avoid exposing the dash cam to extreme temperatures (both hot and cold) for prolonged periods, as this can affect battery life and component longevity.
- Firmware Updates: Check the official ABASK website or LuckyCam app periodically for any available firmware updates to improve performance and add new features.
Troubleshooting
| Problem | Possible Cause | Solution |
|---|---|---|
| Dash cam does not power on. | No power from car charger; faulty cable; dead battery. | Check car charger connection and vehicle's cigarette lighter. Try a different USB cable. Ensure vehicle ignition is on. |
| Video footage is blurry or unclear. | Dirty lens; protective film still on lens; incorrect resolution settings. | Clean the camera lenses. Remove any protective film. Check video resolution settings in the menu or app. |
| WiFi connection issues with app. | Incorrect WiFi password; app not updated; dash cam WiFi off. | Verify WiFi password on dash cam screen. Ensure app is updated. Turn dash cam WiFi off and on again. Stay within 10 meters of the dash cam. |
| "Memory Card Full" error or not recording. | Memory card full; card not formatted; incompatible card. | Format the Micro SD card. Ensure loop recording is enabled. Use a Class 10 or higher Micro SD card (up to 128GB). |
| Parking monitor not working. | Not hardwired; parking monitor setting off. | Ensure the dash cam is properly hardwired to the vehicle's fuse box. Check parking monitor settings in the menu. |
Specifications
| Feature | Detail |
|---|---|
| Product Dimensions | 5.61 x 4.31 x 2.72 inches |
| Item Weight | 12.1 ounces |
| Item Model Number | J05Pro |
| Connectivity Technologies | Wi-Fi |
| Special Features | Night Vision, 24H Parking Monitoring, Motion Sensor, G-Sensor, Loop Recording, HDR |
| Video Capture Resolution | Front: 2160p (4K), Interior: 1080p |
| Included Components | Dash Cam Unit, Suction Cup Mount, 32GB Memory Card, Car Charger, USB Data Cable, Wiring Tool, Cable Clips |
| Mounting Type | Windshield Mount |
| Max SD Card Support | Up to 128 GB |
Warranty and Support
ABASK products are designed and manufactured to the highest quality standards. This product is covered by a limited warranty from the date of purchase. Please refer to the warranty card included in your package for specific terms and conditions.
For technical support, troubleshooting assistance, or warranty claims, please contact ABASK customer service through the following channels:
- Email: Refer to your product packaging or the official ABASK website for the most current contact email.
- Online Support: Visit the ABASK official website for FAQs, support articles, and contact forms.
Please have your product model number (J05Pro) and purchase details ready when contacting support.


