1. Introduction
Thank you for purchasing the Bellemave 30" Bathroom Vanity with Top Sink. This manual provides detailed instructions for the safe assembly, operation, and maintenance of your new bathroom vanity. Please read this manual thoroughly before beginning assembly or use, and retain it for future reference.
2. Safety Information
Important Safety Instructions:
- Weight Capacity: Do not exceed the weight capacity of 220 lbs for the overall cabinet and 50 lbs for the drawers. Overloading can cause structural damage or injury.
- Assembly: Always follow the assembly instructions carefully to ensure safe installation and prevent injuries. Ensure all fasteners are securely tightened.
- Stability: Place the vanity on a level and stable surface. If necessary, use shims to ensure stability and prevent tipping.
- Water Exposure: While the vanity is designed for bathroom use, avoid prolonged exposure to standing water to prevent damage to the wood and finish. Wipe up spills immediately.
- Children: Keep children away from the assembly area. Small parts can be a choking hazard. Do not allow children to climb on or play with the vanity.
- Tools: Use appropriate tools for assembly. Do not overtighten screws, as this can strip threads or crack wood.
3. Package Contents
Before beginning assembly, verify that all components are present and undamaged. If any parts are missing or damaged, please contact customer support.

Figure 3.1: Package Contents
The package includes the main cabinet, ceramic sink, hardware package, and instruction manual.
- 1x Main Cabinet
- 1x Ceramic Sink
- 1x Hardware Package (screws, hinges, drawer slides, handles)
- 1x Instruction Manual
4. Specifications
| Feature | Detail |
|---|---|
| Brand | Bellemave |
| Model Number | cabinet |
| Overall Product Dimensions | 30" (W) x 18" (D) x 34.05" (H) |
| Sink Dimensions | 30" (W) x 18.3" (D) x 6.7" (H) |
| Vanity Cabinet Dimensions | 29.4" (W) x 17.2" (D) x 33" (H) |
| Weight Capacity (Overall) | 220 lbs |
| Weight Capacity (Drawers) | 50 lbs |
| Material (Frame/Back) | Engineered Wood |
| Material (Basin) | Ceramic |
| Finish Type | Painted |
| Number of Drawers | 3 |
| Number of Doors | 1 (Soft-closing) |
| Faucet Holes | 4" Pre-drilled (faucet not included) |
| Mounting Type | Floor Mount, Freestanding |
| Assembly Required | Yes |
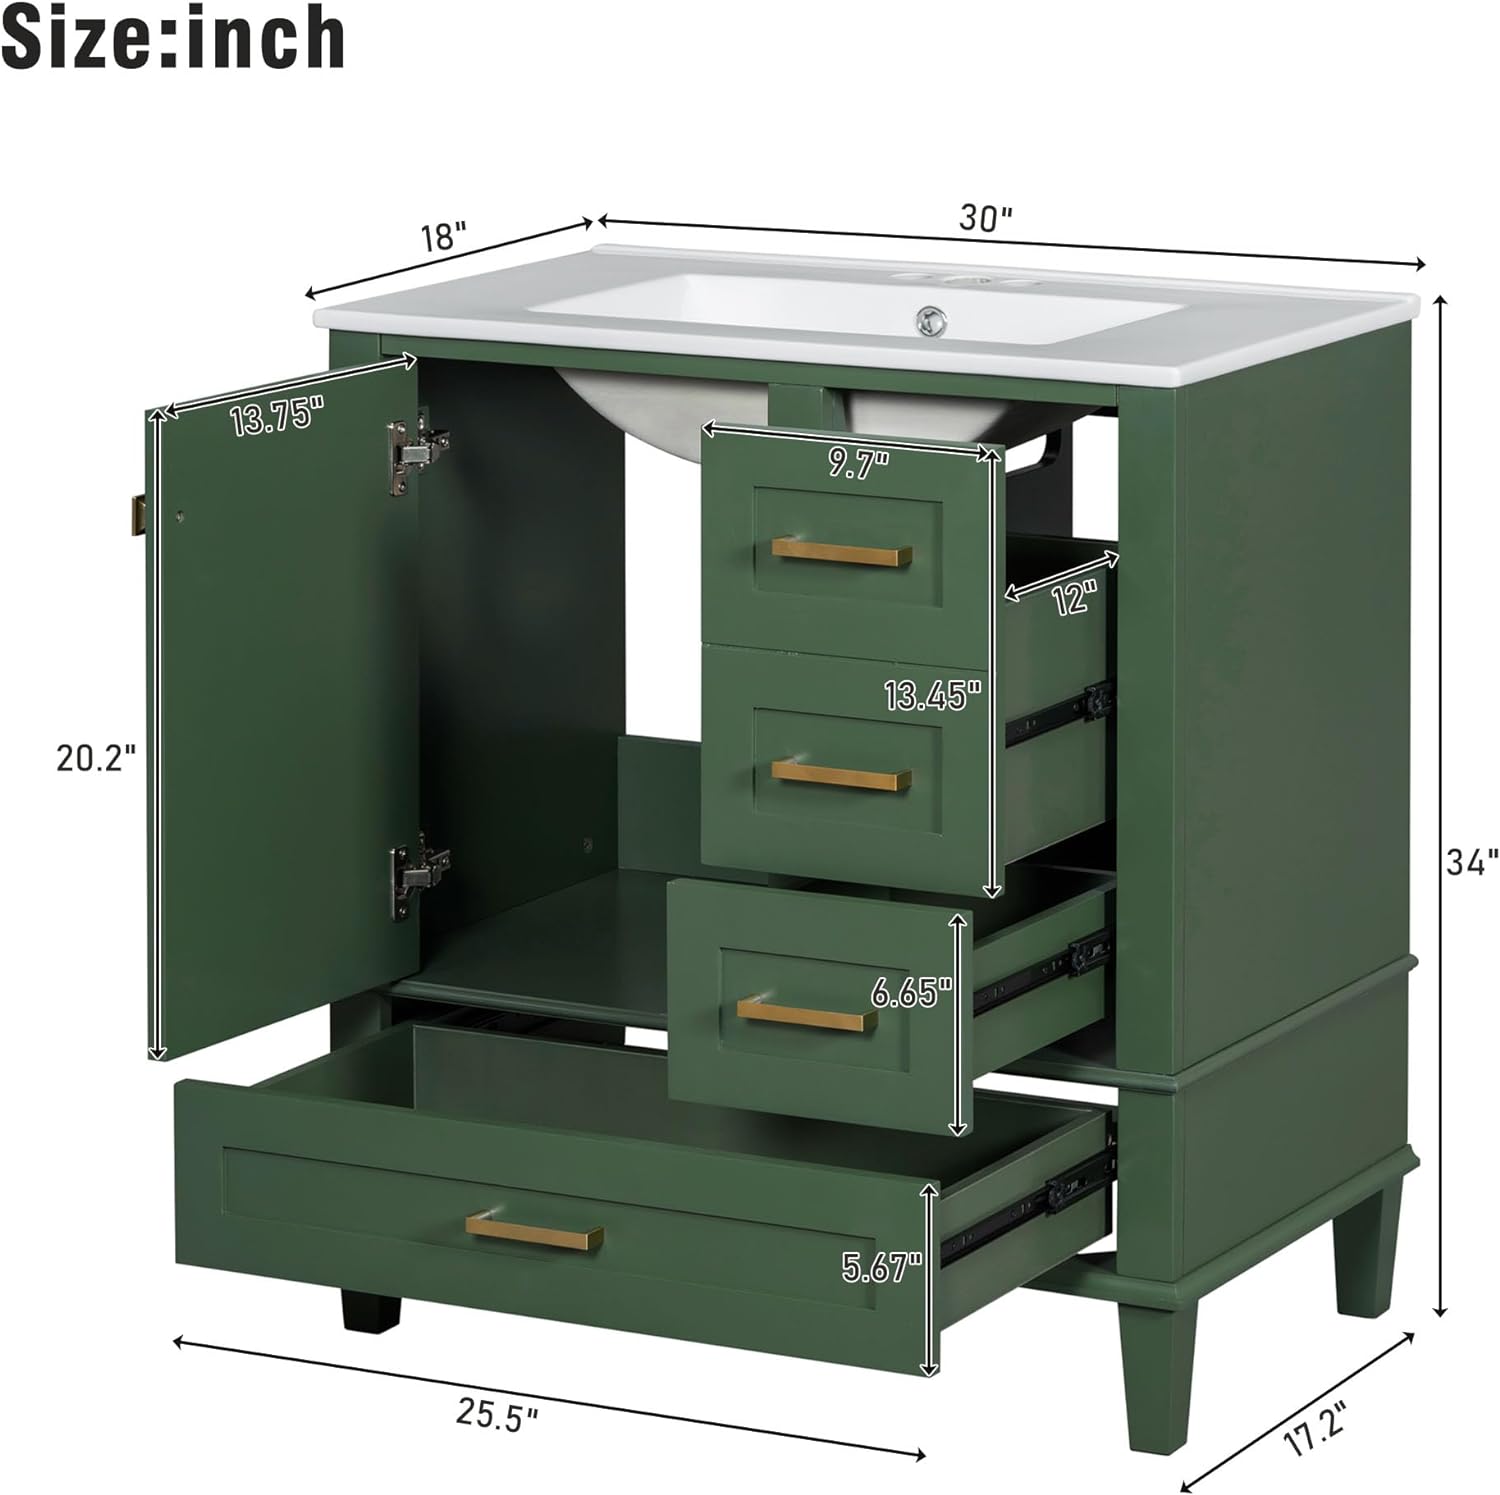
Figure 4.1: Vanity Dimensions
Detailed measurements of the vanity cabinet, including height, width, and depth of various sections.

Figure 4.2: Sink Dimensions
Detailed measurements of the ceramic sink, including basin depth, width, and faucet hole spacing.
5. Setup and Assembly
Assembly is required for this product. Please follow these steps carefully. It is recommended to have two people for assembly.
5.1 Before You Begin
- Clear a spacious, clean, and level area for assembly.
- Gather necessary tools (e.g., screwdriver, wrench).
- Unpack all components and verify against the package contents list.
- Review all diagrams and instructions before starting.
5.2 Assembly Steps (General Guidance)
- Assemble the Cabinet Frame: Follow the included hardware instructions to connect the main cabinet panels. Ensure all cam locks and screws are securely fastened.
- Install Drawer Slides: Attach the drawer slides to the cabinet interior and to the drawer boxes according to the hardware instructions. Ensure they are level and aligned for smooth operation.

Figure 5.1: Drawer Slide Installation
Ensure drawer slides are properly aligned for smooth drawer operation. - Attach Hinges and Door: Secure the soft-closing hinges to the cabinet and the door. Adjust hinges as needed for proper door alignment and closure.

Figure 5.2: Soft-Closing Hinge Detail
The door features soft-closing hinges to prevent slamming. - Install Handles: Attach the golden handles to the door and drawers.
- Place the Ceramic Sink Top: Carefully place the ceramic sink top onto the assembled cabinet. Ensure it is centered and aligned with the cabinet. Apply a bead of silicone sealant (not included) around the edges where the sink meets the cabinet to secure it and prevent water infiltration.
- Connect Plumbing: Install your chosen faucet (not included) into the pre-drilled holes. Connect the water supply lines and drain according to local plumbing codes. Ensure all connections are watertight.

Figure 5.3: Vanity Interior View
View of the vanity with the door and drawers open, illustrating the internal layout for plumbing and storage.

Figure 5.4: Ceramic Sink Features
The premium ceramic basin features 4-inch pre-drilled faucet holes and an anti-spill overflow hole.
6. Operating Instructions
6.1 General Use
The Bellemave bathroom vanity is designed for daily use in a bathroom environment. Its multiple storage options help keep your bathroom organized.

Figure 6.1: Multifunctional Storage Space
The vanity offers a cabinet door and three drawers of varying depths and widths for organizing bathroom essentials.

Figure 6.2: Cabinet Storage
The cabinet behind the soft-closing door provides ample space for larger items or plumbing access.
6.2 Door and Drawer Operation
- Soft-Closing Door: The cabinet door is equipped with soft-closing hinges. Gently push the door to close, and it will slowly and quietly shut. Avoid forcing the door closed.
- Drawers: The three drawers operate on smooth glides. Pull the golden handles to open and push to close. Do not overload drawers beyond the 50 lbs capacity.
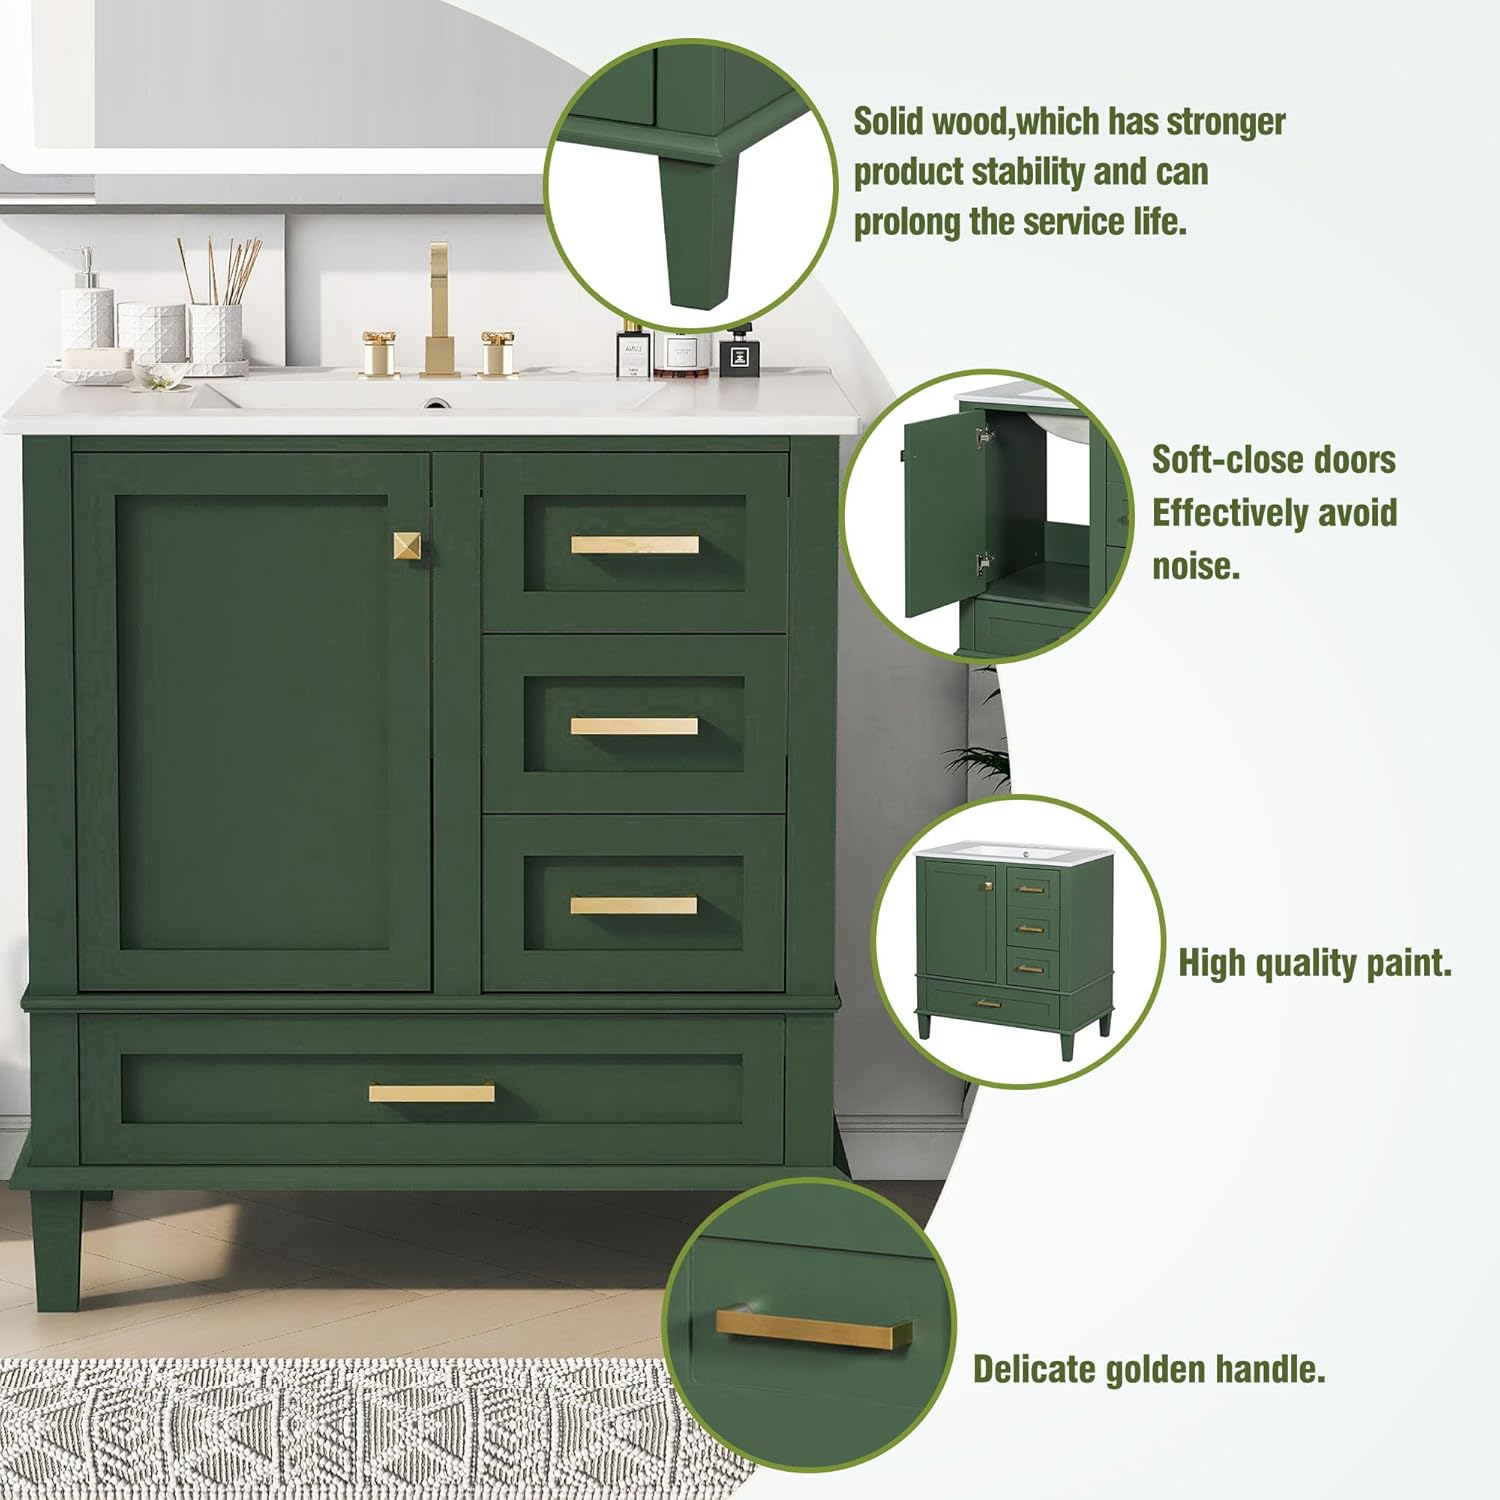
Figure 6.3: Key Features
Highlights include solid wood construction for stability, soft-close doors for quiet operation, high-quality paint, and elegant golden handles.
7. Maintenance and Care
Proper care and maintenance will extend the life and appearance of your Bellemave vanity.
- Cleaning the Cabinet: Wipe the cabinet surfaces with a soft, damp cloth. Use a mild, non-abrasive cleaner if necessary. Avoid harsh chemicals, ammonia-based cleaners, or abrasive pads, as these can damage the painted finish.
- Cleaning the Sink: Clean the ceramic sink with a non-abrasive bathroom cleaner and a soft sponge or cloth. Rinse thoroughly after cleaning. Avoid using abrasive powders or steel wool, which can scratch the ceramic surface.
- Spills: Wipe up water spills and splashes immediately to prevent water damage or staining to the wood and finish.
- Hardware: Periodically check all screws and fasteners to ensure they are tight. Retighten if necessary, but do not overtighten.
- Humidity: Maintain proper ventilation in your bathroom to minimize humidity, which can affect wood products over time.
8. Troubleshooting
This section addresses common issues you might encounter.
- Drawers not closing smoothly: Check if the drawer slides are properly aligned and free of obstructions. Ensure the drawer is not overloaded.
- Door not closing properly: Inspect the hinges for proper installation and adjustment. Soft-closing hinges may need minor adjustments if the door is misaligned.
- Water leaks around sink: Verify that all plumbing connections are tight. Check the silicone sealant around the sink for any gaps or deterioration. Reapply sealant if necessary.
- Vanity wobbles: Ensure the vanity is placed on a level floor. Use shims under the legs if needed to stabilize the unit.
9. Warranty and Support
For warranty information or customer support, please refer to the documentation included with your purchase or contact Bellemave customer service directly. Please have your model number (cabinet) and purchase date available when contacting support.