
Introduction
This manual provides essential instructions for the safe and effective use of your CCLIFE 1/4" 1-25 Nm Torque Wrench Set. This precision tool is designed for applying specific torque values to fasteners, crucial for the proper assembly and maintenance of bicycles, motorcycles, and automotive components. Please read this manual thoroughly before operation and retain it for future reference.

Image: The CCLIFE 1/4 inch 1-25 Nm Torque Wrench Set, including the wrench and various accessories, neatly arranged in its protective carrying case.
Safety Information
Always observe the following safety precautions to prevent injury and damage to the tool or workpiece:
- Wear appropriate personal protective equipment, such as safety glasses.
- Ensure the workpiece is securely clamped before applying torque.
- Do not exceed the maximum torque capacity of 25 Nm.
- Do not use the torque wrench as a breaker bar or for loosening seized fasteners.
- After each use, reset the torque wrench to its lowest setting (1 Nm) to relieve spring tension and maintain calibration accuracy.
- Keep the tool clean and free from oil or grease to ensure a secure grip.
- Store the torque wrench in its protective case in a dry, clean environment.
Package Contents
Your CCLIFE Torque Wrench Set includes the following items:
- 1x 1/4" Torque Wrench (1-25 Nm)
- 1x 100 mm (4 inch) 1/4" Extension Rod
- 1x 1/4" Universal Joint
- Hex Bits: H2, H2.5, H3, H4, H5, H6, H8, H10
- Torx Bits: T10, T20, T30
- Slotted Bit: SL4
- Phillips Bit: PH2
- 1x Plastic Storage Case
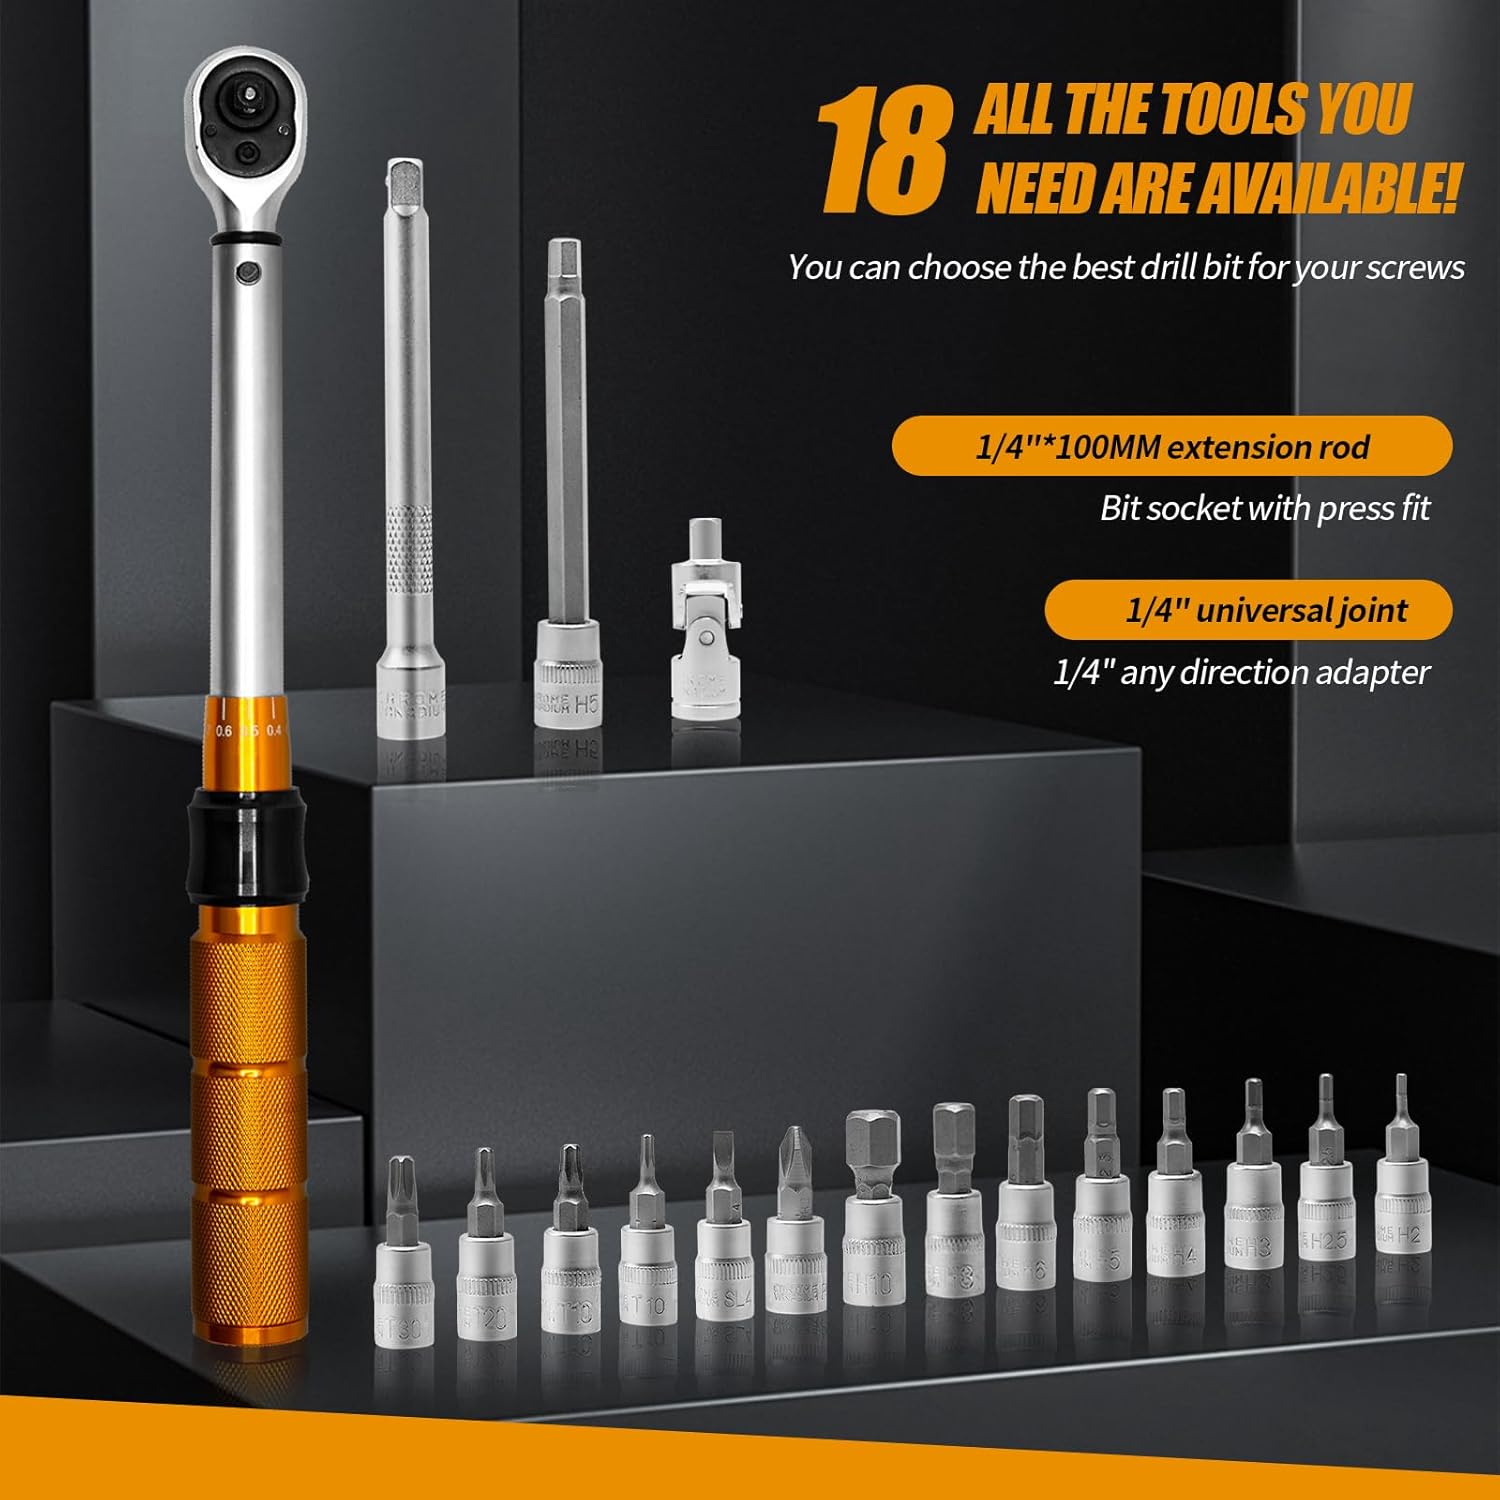
Image: A detailed view of the 1/4" torque wrench, extension rod, universal joint, and various HEX, TORX, SL, and PH bits included in the set.
Setup
- Select the Correct Bit: Choose the appropriate HEX, TORX, SL, or PH bit for your fastener.
- Attach Bit/Accessory: Insert the selected bit directly into the 1/4" square drive of the torque wrench. For hard-to-reach areas, attach the 100 mm extension rod or the universal joint first, then the bit. The quick-release button on the ratchet head allows for easy attachment and removal of accessories.

Image: Illustration showing the quick-release button on the ratchet head for attaching sockets and the two-way adjustment lever for changing direction.
- Set the Torque Value:
- Unlock the adjustment mechanism by pulling down the black collar on the handle.
- Rotate the handle to align the desired torque value on the main scale with the zero mark on the micrometer scale.
- For fine adjustments, continue rotating the handle until the desired increment on the micrometer scale aligns with the main scale line.
- Once the desired torque is set, push the black collar back up to lock the adjustment mechanism.

Image: A close-up view of the torque wrench handle, showing the laser-etched scale for setting torque values from 1 to 25 Nm and the locking collar.
Operating Instructions
- Direction of Rotation: Use the lever on the ratchet head to select the desired direction for tightening (clockwise) or loosening (counter-clockwise). For torque application, ensure it is set to tighten.
- Apply Torque: Place the bit onto the fastener. Apply smooth, steady pressure to the handle of the torque wrench. Do not jerk or apply sudden force.
- Listen for the "Click": As the preset torque value is reached, the wrench will produce an audible "click" and a slight tactile impulse in the handle. This indicates that the desired torque has been achieved. Stop applying force immediately.
- Release Tension: After each use, always reset the torque wrench to its lowest torque setting (1 Nm) to relieve tension on the internal spring. This is crucial for maintaining the wrench's accuracy and extending its lifespan.

Image: Examples of the torque wrench in use for various applications, including tightening a car wheel lug nut, adjusting a bicycle component, and securing a wooden joint.
Maintenance
- Cleaning: Wipe the torque wrench with a clean, dry cloth after each use. Do not use solvents or harsh chemicals, as these can damage the finish or internal components.
- Storage: Store the torque wrench in its original plastic case to protect it from dust, moisture, and impact. Ensure the wrench is set to its lowest torque value (1 Nm) before storage.
- Calibration: Torque wrenches are precision instruments and should be calibrated periodically by a qualified technician to ensure continued accuracy. The frequency of calibration depends on usage, but annual calibration is generally recommended for professional use.
Troubleshooting
| Problem | Possible Cause | Solution |
|---|---|---|
| Wrench does not "click" | Torque setting too low; fastener already tight; improper grip. | Verify torque setting; ensure fastener is not already at desired torque; apply smooth, steady force. |
| Inaccurate torque application | Wrench not calibrated; improper usage (e.g., using as breaker bar); dropped tool; torque not reset after previous use. | Have wrench calibrated; use only for torque application; inspect for damage; always reset to lowest setting after use. |
| Difficulty setting torque value | Adjustment collar not unlocked; dirt or debris in mechanism. | Ensure black collar is pulled down to unlock; clean the adjustment area. |
Specifications
| Feature | Detail |
|---|---|
| Brand | CCLIFE |
| Model Number | 5522 |
| Drive Size | 1/4 inch |
| Torque Range | 1 - 25 Nm |
| Torque Increment | 0.1 Nm |
| Accuracy | ±4% |
| Ratchet Head | 72 teeth, reversible |
| Material | Chrome Vanadium Steel (CS), Rubber, Plastic |
| Item Weight | 940 g |
| Package Dimensions | 35.79 x 9.1 x 8.4 cm |