1. Introduction
This manual provides detailed instructions for the installation, operation, and maintenance of your EVERSECU HD Analog Outdoor PTZ Bullet Camera. Please read this manual thoroughly before using the product to ensure proper function and safety. Retain this manual for future reference.
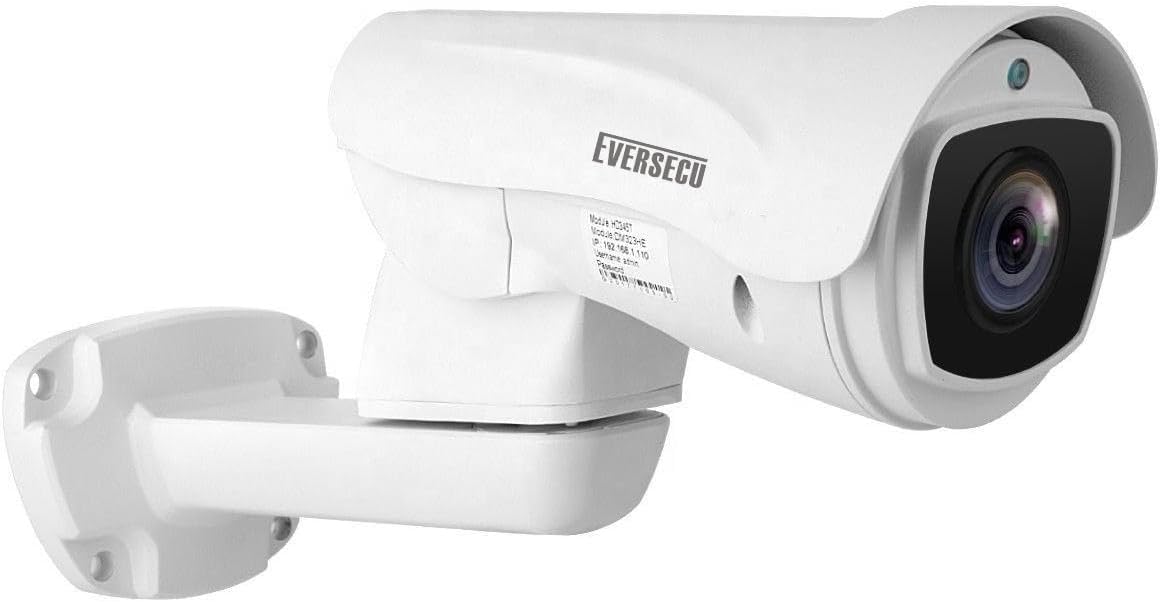
Image 1.1: Front view of the EVERSECU HD Analog Outdoor PTZ Bullet Camera, showing its robust white casing and lens.
2. Product Overview
2.1 Key Features
- High Definition Video: 1080P resolution for clear image capture.
- 5X Optical Zoom: Allows for detailed magnification of distant objects.
- Pan-Tilt-Zoom (PTZ) Functionality: Horizontal rotation of 220° and vertical tilt of 0-96° with auto-flip support.
- RS485 Control: Supports control via RS485 port or UTC function over coaxial cable.
- Multiple Video Formats: Compatible with HD-CVI, HD-TVI, AHD, and CVBS DVRs.
- Infrared Night Vision: Equipped with 6 powerful IR LED arrays for up to 200ft (60m) effective night vision.
- Weatherproof Design: IP66 rated for outdoor use in various weather conditions.
- Programmable Presets: Supports 128 programmable presets, 4 tour sets, 1 pattern, AB Scan, and Auto Pan.
- Durable Construction: Full metal casing for enhanced durability.
2.2 Package Contents
Verify that all items are present in the package:
- EVERSECU HD Analog Outdoor PTZ Bullet Camera (Model: B0CFFNVZ3Z)
- Mounting Hardware (screws, wall plugs)
- Power Adapter (DC12V)
- Instruction Manual (this document)
3. Safety Information
- Ensure the power supply matches the camera's requirements (DC12V).
- Do not attempt to disassemble or modify the camera. This will void the warranty and may cause damage.
- Install the camera in a secure location to prevent unauthorized access or tampering.
- Avoid pointing the camera directly at strong light sources for extended periods, as this may affect image quality and sensor lifespan.
- Ensure all cables are properly connected and secured to prevent water ingress or accidental disconnection.
4. Setup and Installation
4.1 Pre-installation Checklist
- A DVR/XVR with an RS485 port that supports 2MP AHD/TVI/CVI video format.
- Coaxial cable for video signal transmission.
- RS485 control cable (if using external PTZ controller).
- Power source (DC12V).
- Optional: PTZ keyboard controller (e.g., ASIN: B08YVQ4XLC).
4.2 Mounting the Camera
- Choose a suitable mounting location that provides the desired field of view and is within reach of power and video cables.
- Use the provided mounting template (if applicable) or mark the drill holes on the wall/ceiling.
- Drill pilot holes and insert wall plugs if mounting on masonry.
- Secure the camera bracket to the mounting surface using the provided screws.
- Adjust the camera's angle as needed.

Image 4.1: Illustration of proper cable routing through the camera mount to prevent cable breakage and ensure weather protection.
4.3 Wiring Connections
Connect the camera to your DVR/XVR system as follows:
- Video Connection: Connect the BNC connector from the camera to a video input on your DVR/XVR using a coaxial cable.
- Power Connection: Connect the DC12V power adapter to the camera's power input and plug it into a power outlet.
- RS485 Control:
- For DVRs with PTZ Coaxial Control (UTC function): The PTZ commands can be sent over the coaxial cable.
- For external RS485 keyboard controllers: Connect the RS485 A and B terminals from the camera to the corresponding A and B terminals on your PTZ controller or DVR's RS485 port. Ensure correct polarity (RS485 Yellow to A, RS485 Orange to B).

Image 4.2: Detailed wiring diagram showing connections for video (BNC), power (DC12V), and RS485 control to a DVR and optional PTZ joystick. Note that CVI/TVI modes use RS485 control, while AHD mode supports coaxial control.
5. Operation
5.1 Pan-Tilt-Zoom (PTZ) Control
The camera's PTZ functions can be controlled via your DVR/XVR interface or a dedicated RS485 PTZ keyboard controller.
- Pan: Horizontal rotation up to 220° continuously. Speed: 0°/s to 25°/s.
- Tilt: Vertical movement from 0° to 96°. Speed: 0°/s to 20°/s.
- Zoom: 5X optical zoom to adjust the field of view and magnify details.
- Focus: Auto-focus and manual focus options are available.

Image 5.1: Diagram illustrating the camera's pan (220°) and tilt (95°) rotation capabilities, enabling wide area coverage.

Image 5.2: Example demonstrating the 5X optical zoom, showing a wide view of a house and a magnified inset of a dog, highlighting the camera's ability to capture distant details.
5.2 Programmable Functions
- Presets: Store up to 128 specific camera positions (pan, tilt, zoom settings). These can be recalled quickly.
- Tour Sets: Configure sequences of preset positions for automated monitoring. The camera will move through these presets in a defined order.
- Pattern: Record and playback a specific sequence of manual pan, tilt, and zoom movements.
- AB Scan: Define two points (A and B) and the camera will continuously scan between these two points.
- Auto Pan: The camera will automatically pan horizontally across its range.

Image 5.3: Visual representation of preset points, showing the camera monitoring different areas (Preset 1, Preset 4, Preset 6, Preset 8) in a residential setting.
5.3 Day/Night Vision
The camera automatically switches between day (color) and night (black and white infrared) modes based on ambient light conditions. The built-in IR LEDs provide clear vision in low-light or complete darkness.
- IR Distance: Up to 200ft (60 meters).
- IR Cut Filter: Automatically engages for optimal day/night surveillance.

Image 5.4: Comparison of camera footage during daytime (color) and nighttime (infrared, black and white), demonstrating the effective night vision capabilities around a pool area.
6. Maintenance
- Cleaning: Regularly clean the camera lens with a soft, dry cloth to ensure clear image quality. Do not use harsh chemicals.
- Cable Inspection: Periodically check all cables for signs of wear, damage, or loose connections.
- Firmware Updates: Check the manufacturer's website for any available firmware updates to ensure optimal performance and security.
- Environmental Protection: While IP66 rated, ensure the camera is not subjected to extreme conditions beyond its specifications.
7. Troubleshooting
| Problem | Possible Cause | Solution |
|---|---|---|
| No video signal |
|
|
| PTZ control not working |
|
|
| Poor night vision |
|
|
8. Specifications
| Feature | Detail |
|---|---|
| Model | B0CFFNVZ3Z |
| Video Capture Resolution | 1080p (2 MP) |
| Optical Zoom | 5X |
| Pan Rotation | 220° continuous (0°/s-25°/s) |
| Tilt Rotation | 0-96° (0°/s-20°/s) |
| Connectivity Protocol | RS485 |
| Video Formats Supported | HD-CVI, HD-TVI, AHD, CVBS |
| Night Vision Range | Up to 200ft (60 meters) |
| IR LEDs | 6 pcs |
| Weatherproof Rating | IP66 |
| Power Source | Corded Electric (DC12V) |
| Material | Full Metal |
| Dimensions | Approximately 15.12 x 7.09 x 5.63 inches |
| Item Weight | 3.63 pounds |
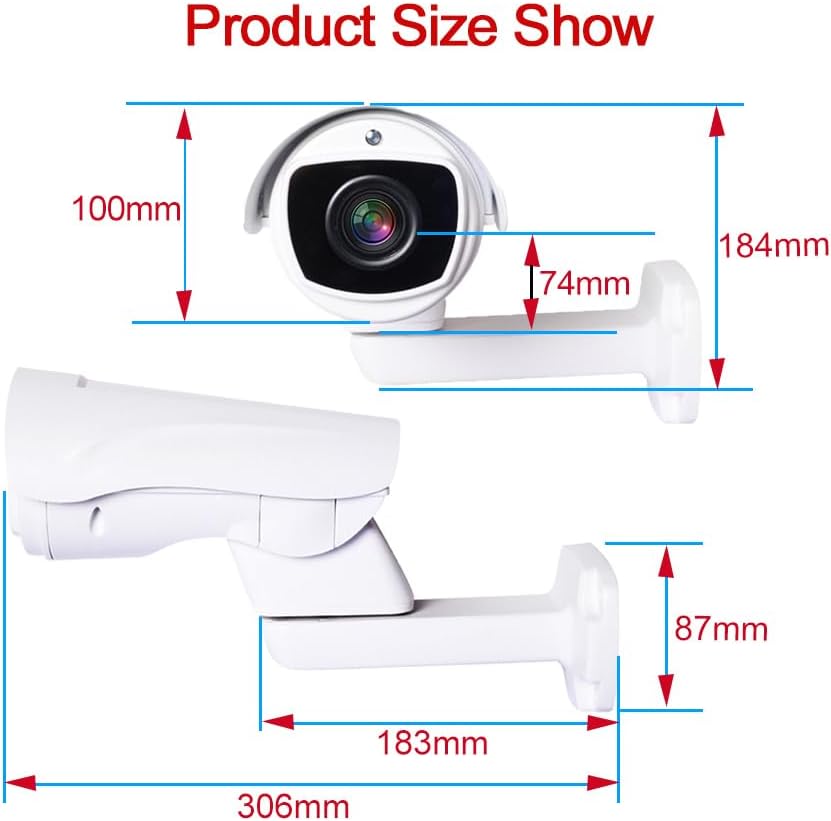
Image 8.1: Diagram showing the physical dimensions of the EVERSECU HD Analog Outdoor PTZ Bullet Camera.
9. Warranty and Support
EVERSECU provides lifetime technical support for this product. For warranty information, technical assistance, or customer service inquiries, please refer to the contact information provided with your purchase or visit the official EVERSECU website.
For additional support or to purchase compatible accessories like a PTZ keyboard controller, search for ASIN: B08YVQ4XLC on Amazon.
