1. Important Safety Information
Please read this manual carefully before using the Midea M9 Robot Vacuum Cleaner and retain it for future reference. Adhere to all safety warnings and instructions to prevent injury or damage.
- This appliance can be used by children aged 8 years and above and persons with reduced physical, sensory or mental capabilities or lack of experience and knowledge if they have been given supervision or instruction concerning use of the appliance in a safe way and understand the hazards involved.
- Children should be supervised to ensure they do not play with the appliance.
- Cleaning and user maintenance shall not be made by children without supervision.
- Only use the original power adapter provided by the manufacturer.
- Do not use the robot vacuum in wet environments or near water.
- Ensure the charging base is placed on a level surface against a wall, with clear space around it.
- Remove any loose cables, small objects, or fragile items from the cleaning area before operation.
2. Package Contents
Verify that all items are present in the package. If any components are missing or damaged, contact customer support.
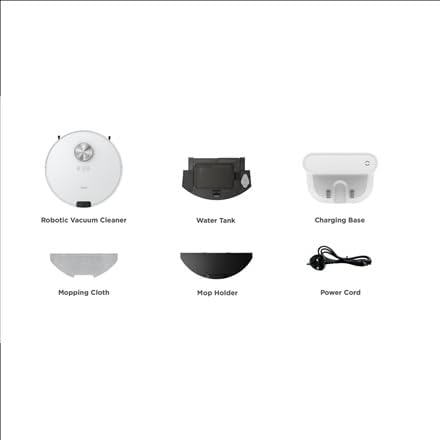
Image: Overview of the Midea M9 Robot Vacuum Cleaner's package contents. This image displays the main robotic vacuum cleaner unit, a water tank, a charging base, a mopping cloth, a mop holder, and a power cord.
- Robotic Vacuum Cleaner
- Water Tank
- Charging Base
- Mopping Cloth
- Mop Holder
- Power Cord
3. Product Overview
3.1 Top View
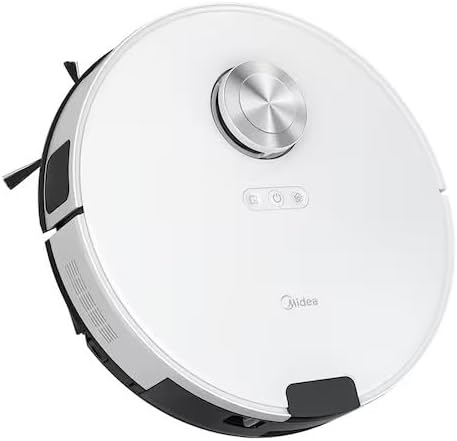
Image: Top view of the Midea M9 Robot Vacuum Cleaner. This image shows the circular design of the robot, with a central LiDAR navigation sensor tower, power button, and other control indicators on its surface.
The top of the Midea M9 features the LiDAR navigation sensor, which allows the robot to map your home and navigate efficiently. It also includes control buttons for starting/pausing cleaning and returning to the charging base.
3.2 Bottom View

Image: Bottom view of the Midea M9 Robot Vacuum Cleaner. This image displays the two side brushes, the main rolling brush, the driving wheels, and the mopping pad attachment area.
The underside of the robot houses the main rolling brush, two side brushes for edge cleaning, driving wheels, and cliff sensors to prevent falls. The mopping pad attachment area is also visible.
4. Setup
4.1 Charging Base Placement
- Place the charging base against a wall on a hard, level surface.
- Ensure there is at least 0.5 meters (1.6 feet) of clear space on both sides of the charging base and 1.5 meters (4.9 feet) in front of it.
- Connect the power cord to the charging base and plug it into a power outlet.
4.2 Initial Charging
- Place the robot vacuum onto the charging base, ensuring the charging contacts align.
- Allow the robot to charge completely before its first use. This typically takes 4-6 hours. The indicator light on the robot will change to indicate a full charge.
4.3 App Connection (Optional)
- Download the Midea Smart app from your mobile device's app store.
- Follow the in-app instructions to connect your Midea M9 Robot Vacuum Cleaner to your home Wi-Fi network. This enables advanced features like remote control, scheduling, and cleaning mode selection.
5. Operating Instructions
5.1 Starting/Stopping Cleaning
- To Start: Press the power button on the robot or use the Midea Smart app. The robot will begin cleaning in Auto mode.
- To Pause: Press the power button again during cleaning.
- To Stop/Return to Base: Press and hold the power button for a few seconds, or use the 'Return to Base' function in the app.
5.2 Cleaning Modes
The Midea M9 offers various cleaning modes:
- Auto Mode: The robot intelligently navigates and cleans your entire home.
- Spot Mode: Cleans a specific area more intensely. Place the robot in the center of the dirty area and activate Spot mode via the app.
- Edge Mode: The robot cleans along walls and furniture edges. Activate via the app.
5.3 Mopping Function
- Fill the water tank with clean water. Do not use detergents or cleaning solutions not approved by Midea.
- Attach the mopping cloth to the mop holder, then slide the mop holder with the cloth onto the water tank.
- Insert the assembled water tank and mop holder into the robot.
- The robot will automatically switch to mopping mode or combined vacuuming and mopping.
6. Maintenance
Regular maintenance ensures optimal performance and extends the lifespan of your robot vacuum.
6.1 Dustbin and Water Tank Cleaning
- Empty the dustbin after each use.
- Rinse the dustbin and filter with water as needed, ensuring they are completely dry before reinstallation.
- Empty and clean the water tank after each mopping session to prevent mold and odors.
6.2 Brush Cleaning
- Main Brush: Remove the main brush cover and lift out the brush. Use the cleaning tool to remove hair and debris. Clean weekly.
- Side Brushes: Check for tangled hair or debris. Remove and clean as needed. Replace if worn or damaged. Clean monthly.
6.3 Sensor Cleaning
- Wipe the cliff sensors, wall sensors, and charging contacts with a clean, dry cloth monthly to ensure proper function.
7. Troubleshooting
If you encounter issues, refer to the following common problems and solutions:
| Problem | Possible Cause | Solution |
|---|---|---|
| Robot does not charge | Charging contacts are dirty; Power adapter not connected; Robot not properly aligned with base. | Clean charging contacts; Ensure power adapter is plugged in; Realign robot on charging base. |
| Robot gets stuck frequently | Loose cables or small objects on the floor; Robot stuck on high thresholds. | Clear obstacles from cleaning path; Use virtual walls or no-go zones in the app. |
| Poor cleaning performance | Dustbin full; Brushes tangled; Filter clogged. | Empty dustbin; Clean main and side brushes; Clean or replace filter. |
| Robot cannot connect to Wi-Fi | Incorrect Wi-Fi password; Router too far; Only supports 2.4GHz Wi-Fi. | Verify password; Move robot closer to router; Ensure router is set to 2.4GHz. |
8. Specifications
| Feature | Detail |
|---|---|
| Brand | Midea |
| Model Name | Midea M9 |
| Dimensions (L x W x H) | 32 x 32 x 10 cm |
| Weight | 4 Kilograms |
| Special Features | Smart mapping, Portable |
| Surface Recommendation | Carpet |
9. Warranty and Support
For warranty information and technical support, please refer to the warranty card included with your product or visit the official Midea website. Keep your purchase receipt as proof of purchase.