1. Introduction
This manual provides comprehensive instructions for the installation, operation, and maintenance of your HAvern Smart Electronic Fingerprint Door Lock. Please read this manual carefully before installation and use to ensure proper functionality and security.

Image 1.1: Front and back view of the HAvern Smart Electronic Fingerprint Door Lock.
2. Product Features
The HAvern Smart Electronic Fingerprint Door Lock offers multiple secure access methods and advanced functionalities:
- Multiple Unlock Methods: Supports unlocking via mobile application, numeric password, fingerprint, physical key, and RFID card.
- Integrated Camera: Features a cat eye camera for visual verification and an operation display.
- Temporary Password Generation: Ability to generate and send temporary passwords for guests or service personnel.
- Durable Construction: Manufactured from high-quality materials for long-lasting and stable performance.
- Easy Installation: Designed for straightforward installation.

Image 2.1: Visual representation of the multiple unlock methods supported by the lock.
3. Product Components and Identification
Familiarize yourself with the various parts of your smart door lock:

Image 3.1: Labeled diagram of the HAvern Smart Electronic Fingerprint Door Lock components.
- Display: Shows user interface and video feed.
- Cat Eye Camera: Captures images and video of visitors.
- Operation Display: Provides feedback during lock operation.
- Card Identification Area: For RFID card access.
- Doorbell: Integrated doorbell function.
- One Key Lock: Button for quick locking.
- Fingerprint Sensor: For biometric access.
- Rotary Handle: Interior handle for manual operation.
- Mechanical Knob: Interior manual lock/unlock.
- Lock Knob: Interior manual lock/unlock.
- Open Key / Close Key: Buttons for specific functions.
- Keyhole: For emergency mechanical key access.
- Power Indicator Light: Shows power status.
4. Setup and Installation
Proper installation is crucial for the lock's security and functionality. It is recommended to have a professional install the lock if you are unfamiliar with door hardware installation.
4.1 Pre-installation Checks
- Ensure your door thickness and frame dimensions are compatible with the lock's specifications.
- Verify the door's opening direction (left-hand or right-hand) to ensure correct orientation of the lock.
4.2 Mortise Dimensions
Refer to the diagram below for the mortise dimensions required for installation. Accurate measurements are essential.
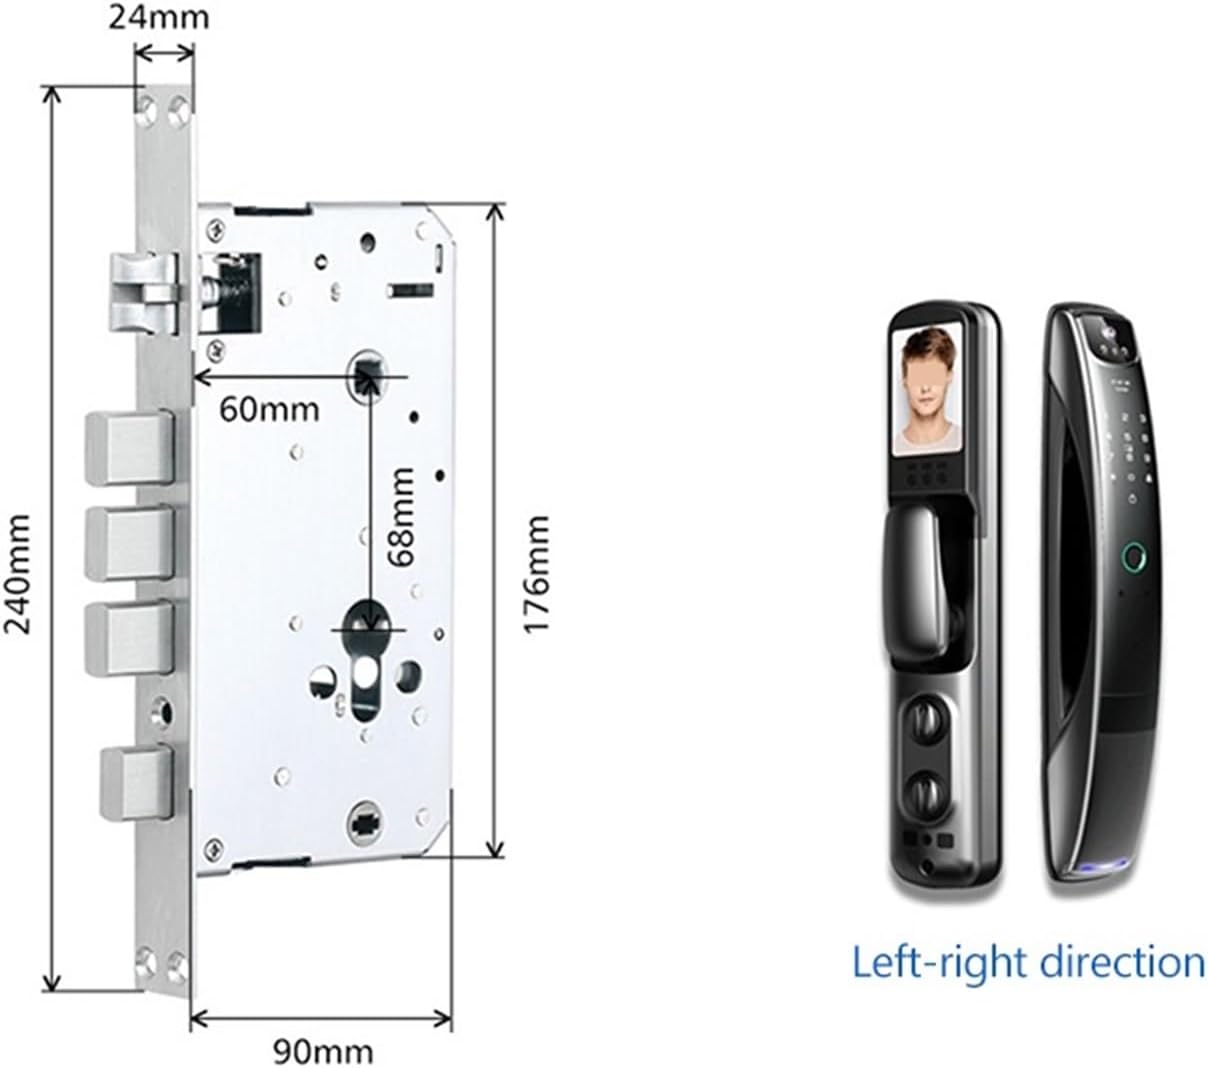
Image 4.1: Mortise dimensions for installation.
- Mortise Width: 24mm
- Mortise Height: 240mm
- Mortise Depth: 90mm
- Backset: 60mm
- Center Distance: 68mm
4.3 General Installation Steps (Summary)
- Prepare the door by drilling necessary holes according to the provided template (not included in this manual, refer to packaging).
- Install the mortise into the door edge.
- Mount the exterior and interior lock panels, ensuring cables are properly connected and routed.
- Secure the panels with screws.
- Install batteries and test basic mechanical functions.
- Configure the lock via the mobile application.
5. Operating Instructions
5.1 Initial Setup and User Registration
Upon first power-up, follow the on-screen prompts or mobile application instructions to set up an administrator password and register initial users (fingerprints, RFID cards, passwords).
5.2 Unlocking Methods
- Fingerprint Unlock: Place your registered finger on the fingerprint sensor. The lock will unlock upon successful verification.
- Numeric Keypad Password Unlock: Enter your registered password on the keypad and press the '#' key.
- RFID Card Unlock: Present your registered RFID card to the card identification area.
- Mobile Application Unlock: Use the Tuya APP to remotely unlock the door.
- Mechanical Key Unlock: In case of emergency or battery depletion, insert the physical key into the keyhole and turn to unlock.
5.3 Tuya APP Integration
The lock integrates with the Tuya mobile application for enhanced control and monitoring.

Image 5.1: Remote unlocking via the Tuya APP.
- Remote Unlocking: Unlock your door from anywhere using the app.
- Temporary Password Management: Generate and send temporary access codes to visitors.
- Video Capture Function: When the doorbell is rung, the integrated camera can capture a photo and upload it to your phone for viewing, allowing you to see who is at your door remotely.

Image 5.2: Tuya APP video capture and remote unlocking request interface.
6. Maintenance
Regular maintenance ensures the longevity and optimal performance of your smart door lock.
- Cleaning: Wipe the lock's surface with a soft, dry cloth. Avoid using abrasive cleaners or solvents that could damage the finish or electronic components.
- Battery Replacement: Replace batteries promptly when the low battery indicator appears. Use high-quality alkaline batteries.
- Fingerprint Sensor Care: Keep the fingerprint sensor clean and dry for accurate readings.
- Mechanical Parts: Periodically check the mechanical components for smooth operation. Do not lubricate with oil-based products unless specifically recommended by the manufacturer.
- Software Updates: Keep the Tuya APP and lock firmware updated to benefit from the latest features and security enhancements.
7. Troubleshooting
If you encounter issues with your HAvern Smart Electronic Fingerprint Door Lock, refer to the following common problems and solutions:
| Problem | Possible Cause | Solution |
|---|---|---|
| Lock does not respond | Dead batteries | Replace batteries with new ones. Use the mechanical key for immediate access. |
| Fingerprint not recognized | Dirty sensor, wet finger, unregistered fingerprint | Clean the sensor. Ensure finger is dry. Re-register fingerprint if necessary. Try another unlock method. |
| Password not working | Incorrect password, unregistered password | Ensure correct password entry. Verify password in the app. Reset password if forgotten. |
| App connection issues | Bluetooth/Wi-Fi off, app not updated, network issues | Ensure Bluetooth/Wi-Fi is on. Update Tuya APP. Check internet connection. Restart phone and lock. |
| Lock is jammed or stiff | Misalignment, debris in mechanism | Check door alignment. Inspect for obstructions. Do not force the handle. Contact support if issue persists. |
If the problem persists after attempting these solutions, please contact HAvern customer support for further assistance.
8. Specifications
| Feature | Detail |
|---|---|
| Brand | HAvern |
| Model | B0CDSJZYMP |
| Unlock Methods | Application, Password, Fingerprint, Key, RFID Card |
| Color | B |
| Item Weight | 1 Grams (0.035 ounces) - Note: This weight may refer to a component, not the full lock. |
| Manufacturer | dengzhiyongg |
9. Warranty and Support
For warranty information, please refer to the documentation included with your purchase or contact the seller directly. HAvern is committed to providing reliable products and customer support.
If you require technical assistance or have questions regarding your HAvern Smart Electronic Fingerprint Door Lock, please contact your point of purchase or HAvern customer service.


