
FEELWORLD F6 PLUSX-OF-AU
Contents
FEELWORLD F6 PLUSX 5.5 Inch Field Monitor User Manual
Model: F6 PLUSX-OF-AU
Introduction
The FEELWORLD F6 PLUSX is a high-brightness 5.5-inch field monitor designed for DSLR and mirrorless cameras. It features a 1600nit daylight viewable display, Full HD 1920x1080 IPS panel, and REC-709 color calibration for sharp and accurate images. The monitor supports various professional monitoring functions including Waveform, HDR, 3D LUT, and Peaking Focus Assist, making it an essential tool for professional videographers.
This manual provides detailed instructions on setting up, operating, and maintaining your FEELWORLD F6 PLUSX monitor to ensure optimal performance and longevity.

Figure 1: FEELWORLD F6 PLUSX 5.5 Inch Field Monitor with waveform and histogram displays.
What's in the Box
Upon unboxing your FEELWORLD F6 PLUSX monitor, please verify that all the following items are included:
- 1 × FEELWORLD F6 PLUSX Monitor
- 1 × Micro HDMI Cable
- 1 × Sunshade
- 1 × Tilt Arm
- 1 × User Manual
Note: Battery and power adapter are not included and must be purchased separately.

Figure 2: Visual representation of the items included in the FEELWORLD F6 PLUSX package.
Setup
1. Power Supply Options
The F6 PLUSX offers flexible power supply options to suit various shooting environments:
- Sony NP-F Battery: Attach a compatible Sony NP-F series battery to the battery plate on the rear of the monitor.
- Canon LP-E6 Battery: Attach a compatible Canon LP-E6 battery to the battery plate on the rear of the monitor.
- Type-C 5V Input: Connect a Type-C power source (e.g., power bank) to the DC IN 5V (Type-C) port.
- DC 12V Input: Use a DC 12V power adapter connected to the DC IN 12V port.

Figure 3: Overview of the various power input options for the monitor, including Type-C, DC, and battery plates.
2. Mounting the Monitor
The monitor features standard 1/4" mounting threads on the bottom and right side, allowing for versatile mounting options:
- Attach the included Tilt Arm to your camera's hot shoe or cold shoe mount.
- Secure the monitor to the Tilt Arm using the 1/4" screw thread.
- Alternatively, use a magic arm or other compatible bracket for custom setups.

Figure 4: Examples of how the monitor can be mounted on a camera, rig, or gimbal using its 1/4" screw threads.
3. Connecting to Your Camera
Connect your camera to the monitor using the appropriate HDMI cable. The F6 PLUSX supports 4K HDMI input and loop-out.
- Connect one end of the Micro HDMI Cable (included) to your camera's HDMI output port.
- Connect the other end to the HDMI IN port on the F6 PLUSX monitor.
- If needed, use the HDMI OUT port to loop the signal to another monitor or device.
- The monitor also features a DC 8.4V OUT port, which can power your DSLR or mirrorless camera using an optional dummy battery adapter.

Figure 5: Close-up view of the HDMI IN, HDMI OUT, and DC OUT 8.4V ports on the monitor.

Figure 6: The monitor connected to and powering a DSLR camera via a dummy battery adapter.
Operating Instructions
1. Powering On/Off
Press and hold the power button (usually located near the Type-C port) to turn the monitor on or off. The FEELWORLD logo will appear during startup.
2. Touchscreen Operation
The F6 PLUSX features an intuitive touchscreen interface for quick access to functions. You can use simple tap and swipe gestures.
- Double-tap the screen: Opens the main menu.
- Swipe up from the bottom: Opens the shortcut function menu.
- Swipe up/down on the left side: Adjusts backlight brightness.
- Swipe up/down on the right side: Adjusts volume.
- Pinch to zoom: Zoom in/out on the image.
- Click the TOUCH button: Toggles the touchscreen function on/off.

Figure 7: Demonstrates various touchscreen gestures for controlling the monitor's functions, including adjusting backlight and volume.
3. Menu Navigation (Scroll Wheel)
In addition to the touchscreen, you can navigate menus using the scroll wheel:
- Click the wheel: Opens or confirms menu options.
- Turn the wheel: Toggles through menu options.
- Long press the scroll wheel: Returns to the previous menu.
4. Professional Monitoring Tools
The F6 PLUSX includes a suite of professional tools to assist with accurate exposure and focus:
- Waveform: Displays luminance and chrominance levels.
- Vector: Shows color saturation and hue.
- Histogram: Visualizes the tonal distribution of the image.
- Focus Assist (Peaking): Highlights in-focus areas with a selectable color.
- False Color: Helps set proper exposure by displaying different exposure levels as distinct colors.
- Check Field: Isolates specific color channels (Red, Green, Blue) for analysis.
- Embedded Audio: Monitors audio levels.
- Pixel to Pixel: Displays the image at its native resolution.
- Frame Guides & Nine Grid: Assists with composition and framing.

Figure 8: Examples of monitoring tools such as Vectorscope, Brightness Histogram, YUV Parade, and Y Parade.
5. 3D LUT Import and Application
The monitor supports uploading up to 32 custom 3D LUTs (Look-Up Tables) to preview filming looks in real-time.
- Save your .cube LUT files to the root directory of an SD card.
- Insert the SD card into the monitor's SD card slot.
- Navigate to the LUT menu option (usually under "User Option" or "System").
- Select "LUT Import" and confirm to load the LUTs from the SD card.
- Once imported, you can select and apply your desired LUT from the "LUT Table" list.
- To clear LUTs, insert a blank SD card and follow the import process.
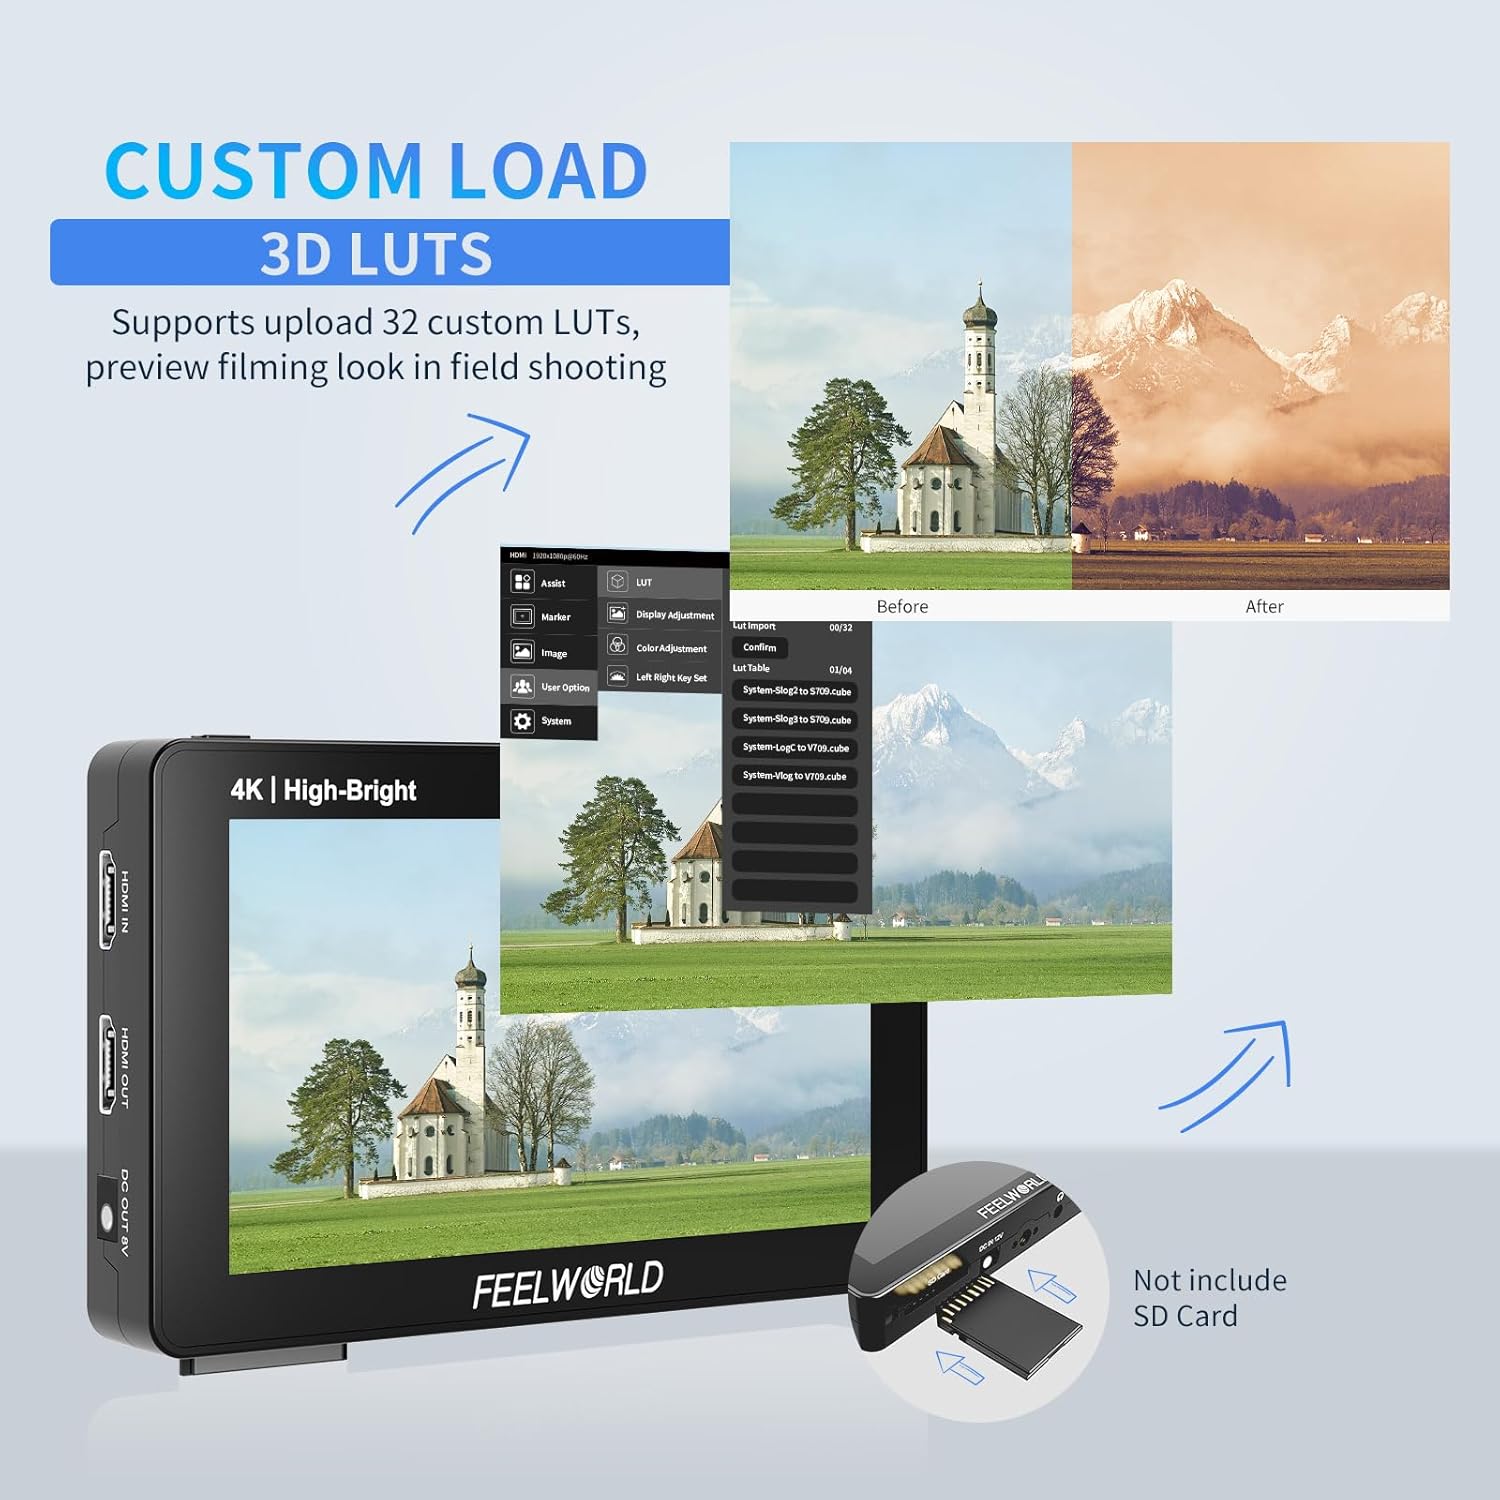
Figure 9: Illustrates the process of loading custom 3D LUTs via the SD card slot for real-time color grading preview.
6. Firmware Update
To update the monitor's firmware:
- Download the latest firmware from the official FEELWORLD website.
- Copy the firmware file to the root directory of a formatted SD card.
- Insert the SD card into the monitor.
- Navigate to the "System" menu and select "Firmware Update".
- Follow the on-screen prompts to complete the update. Do not power off the monitor during the update process.
7. Official Operation Guide Video
For a comprehensive visual guide on operating your FEELWORLD F6 PLUSX monitor, please watch the official operation guide video below:
Video 1: FEELWORLD F6 PLUSX 1600nit Field Monitor Operation Guide. This video demonstrates the interface, power options, and various operational features of the monitor.
Maintenance
Proper maintenance ensures the longevity and optimal performance of your FEELWORLD F6 PLUSX monitor:
- Cleaning: Use a soft, lint-free cloth to clean the screen and body. For stubborn smudges, slightly dampen the cloth with water or a screen-safe cleaning solution. Avoid harsh chemicals.
- Storage: When not in use, store the monitor in a dry, cool place, away from direct sunlight and extreme temperatures. Use the sunshade or a protective case to prevent scratches and dust accumulation.
- Handling: Always handle the monitor with care. Avoid dropping it or subjecting it to strong impacts, which can damage internal components or the screen.
- Connectivity: Ensure all cables are connected and disconnected gently to prevent damage to the ports.
Troubleshooting
If you encounter issues with your FEELWORLD F6 PLUSX monitor, try the following troubleshooting steps:
| Problem | Possible Cause | Solution |
|---|---|---|
| No image on screen | No power; Incorrect HDMI connection; Input signal issue. | Check power source and connections. Ensure camera is outputting signal. Try a different HDMI cable. |
| Touchscreen unresponsive | Touch function disabled; Firmware issue. | Press the TOUCH button to enable. Restart the monitor. Consider a firmware update. |
| Image flickering/distortion | Loose cable; Incompatible signal; Environmental interference. | Secure HDMI cable. Check camera's output resolution/frame rate. Move away from strong electromagnetic sources. |
| Monitor not powering camera | Incorrect dummy battery; Cable issue; Camera power requirements. | Ensure correct dummy battery and cable are used. Verify camera's power input requirements. |
If the problem persists after attempting these solutions, please contact FEELWORLD customer support for further assistance.
Specifications
| Feature | Detail |
|---|---|
| Product Dimensions | 10.16 x 1.54 x 7.56 inches |
| Item Weight | 3.7 pounds |
| ASIN | B0CDLBR8T2 |
| Item Model Number | F6 PLUSX-OF-AU |
| Manufacturer | Feelworld |
| Display Size | 5.5 Inch |
| Brightness | 1600nit |
| Resolution | 1920x1080 Full HD IPS |
| Color Calibration | REC-709 |
| Video Input | 4K HDMI In |
| Video Output | 4K HDMI Out |
| Power Input | Type-C, DC 12V, NP-F/LP-E6 Battery |
| Power Output | DC 8.4V Out |
Warranty and Support
FEELWORLD products typically come with a 1-year warranty, dedicated to quality and stability. For detailed warranty information, technical support, or service inquiries, please visit the official FEELWORLD website or contact their customer service directly.
Official FEELWORLD Store: FEELWORLD Store on Amazon
Ask a question about this manual
Ask about setup, troubleshooting, compatibility, parts, safety, or missing instructions. Manuals+ will review the question and use this page’s manual context to help answer it.