1. Product Overview
The ARMYJY SCO2 is a portable dual-channel digital oscilloscope designed for a wide range of applications, including appliance repair, mobile phone repair, automotive repair, and electronic DIY projects. It features a 50M sampling rate, 10MHz analog bandwidth, and a 3.2-inch LCD display for clear waveform visualization.
Key Features:
- High Sampling Rate: 50M samples per second (1 channel) for detailed signal capture.
- Dual Channel: Allows simultaneous measurement and comparison of two signals.
- Wide Bandwidth: 10MHz analog bandwidth and 2MHz effective bandwidth.
- Comprehensive Trigger Functions: Single, Normal, and Automatic modes for stable waveform display.
- One-Key AUTO Function: Simplifies waveform display without complex adjustments.
- Deep Storage: 20KB storage depth with waveform compression and expansion support.
- Current Measurement: Integrated 0-6A current measurement with 2mA precision.
- High Voltage Protection: Supports anti-burn high-pressure function.
- Expandability: Designed for future module expansion (e.g., audio, function generator, transistor tester modules).
- PC Software Support: Enables system updates and future features like FTT and computer communication.

Figure 1.1: Front view of the ARMYJY SCO2 Digital Oscilloscope, showing the display screen, control buttons, and input/output ports.
2. Setup
2.1 Unpacking and Inspection
Carefully unpack the oscilloscope and all accessories. Verify that all components listed in your specific set are present and undamaged. The available sets are:
- Set 1: 1 Standard Oscilloscope, 2 Alligator Clips.
- Set 2: 1 High-End Oscilloscope, 1 Alligator Clip, 1 High Voltage Probe.
- Set 3: 1 High-End Oscilloscope, 1 Alligator Clip, 2 High Voltage Probes.
2.2 Charging the Device
Before first use, ensure the oscilloscope is fully charged. Connect the device to a 5V power source using a compatible USB cable. The battery capacity is 2500mA, providing approximately 4.5-6 hours of continuous operation on a full charge.
2.3 Connecting Probes
Connect the appropriate probes (alligator clips or high voltage probes) to the CH1 and CH2 input BNC connectors on the top of the oscilloscope. Ensure connections are secure. For high voltage measurements, always use the provided high voltage probes and observe safety precautions.

Figure 2.1: Angled view of the oscilloscope, highlighting the BNC input connectors for CH1 and CH2, and the power button.
3. Operating Instructions
3.1 Power On/Off
Press and hold the 'OFF/ON' button located on the top right of the device to power on or power off the oscilloscope.
3.2 Basic Controls
The device features several control buttons on the right side of the display:
- Menu: Accesses the main menu for settings and configurations.
- Flexo: (Function not explicitly detailed in source, likely a flexible function button or mode switch).
- Auto: Activates the one-key AUTO function for automatic waveform display adjustment.
- Ok/Hold: Confirms selections or pauses the waveform display.
- Left / Right Arrows: Navigate through menus or adjust parameters.
- + / - Buttons: Adjust values or zoom levels.

Figure 3.1: Close-up view of the oscilloscope's control panel, showing the arrangement of buttons for menu navigation, auto-adjustment, and parameter control.
3.3 Waveform Measurement
The SCO2 supports various waveform measurements and displays. Use the 'Auto' button for quick setup. The display shows parameters such as Max, Min, Vpp, Rms, and Frequency. The device can display dual-channel oscilloscope waveforms, Lissajous patterns, and current waveforms.

Figure 3.2: The oscilloscope displaying a typical waveform with measurement parameters visible on the screen.
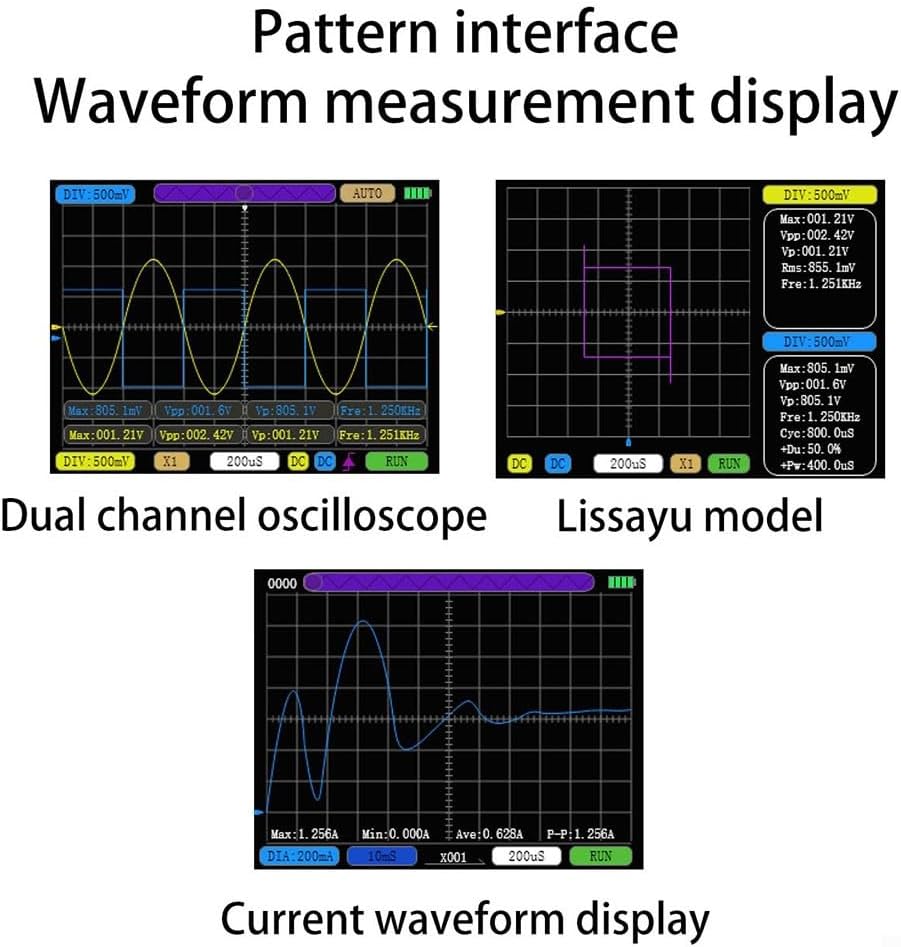
Figure 3.3: Examples of different waveform displays, including dual-channel, Lissajous, and current waveforms, demonstrating the device's versatility.
3.4 Current Measurement
The oscilloscope includes a current measurement function, capable of measuring 0-6A with a minimum precision of 2mA and a sampling rate of 2.4KSa/s. Refer to the on-screen interface for current waveform display and parameters.
4. Maintenance
4.1 Cleaning
To clean the device, use a soft, dry cloth. For stubborn dirt, a slightly damp cloth with mild detergent can be used, ensuring no liquid enters the device. Avoid abrasive cleaners or solvents.
4.2 Storage
Store the oscilloscope in a cool, dry place away from direct sunlight and extreme temperatures. When not in use for extended periods, ensure the battery is partially charged (around 50%) to prolong its lifespan.
4.3 Battery Care
To maintain battery health, avoid fully discharging the battery frequently. Recharge the device when the battery indicator is low. If the device will not be used for a long time, charge it every few months.
5. Troubleshooting
5.1 No Power
- Ensure the device is fully charged. Connect it to a 5V power source and check the charging indicator.
- Verify the power button is pressed and held correctly.
5.2 Unstable Waveform Display
- Press the 'Auto' button to automatically adjust the display settings.
- Check the trigger settings (Single, Normal, Auto) and adjust them according to the signal type.
- Ensure probes are securely connected and making good contact with the circuit.
5.3 Incorrect Measurement Readings
- Verify the probe attenuation setting (X1, X10) matches the physical probe in use.
- Ensure the input impedance is correctly set (1MΩ).
- Check for proper grounding of the oscilloscope and the circuit under test.
5.4 Device Not Responding
- Perform a soft reset by holding down the power button for an extended period (e.g., 10-15 seconds) until the device restarts.
- If the issue persists, contact customer support.
6. Specifications
The following table details the technical specifications of the ARMYJY SCO2 Digital Oscilloscope:

Figure 6.1: Detailed technical specifications for the SCO2 model, including sampling rate, channels, bandwidth, and measurement capabilities.
| Parameter | Specification |
|---|---|
| Maximum Measurable Voltage | ±400V |
| Sampling Rate | 50MSa/s (1 channel) |
| Number of Channels | 2 |
| Analog Bandwidth | 10MHz (1CH) |
| Effective Bandwidth | 2MHz (1CH) |
| Measurement Voltage | X1 (±40V), X10 (±400V) |
| Input Impedance | 1MΩ |
| Storage Depth | 20KB |
| Parameter Display Types | 12 types |
| Current Measurement Range | 0-6A |
| Minimum Current Precision | 2mA |
| Current Sampling Rate | 2.4KSa/s |
| Display | 3.2-inch LCD, 320x240 resolution |
| Charging Voltage | 5V |
| Battery Capacity | 2500mA |
| Continuous Working Time | 4.5-6 hours |
| Shell Dimensions | 120mm x 66mm x 18.5mm |
7. Warranty and Support
7.1 Warranty Information
Please refer to your purchase documentation or contact the seller for specific warranty terms and conditions. General return policies may apply as per the retailer's guidelines.
7.2 Customer Support
For technical assistance, troubleshooting beyond this manual, or inquiries regarding future software updates and module expansions, please contact ARMYJY customer service. Firmware updates, including features like FTT and advanced computer communication, are planned for future releases. Users can update the system via PC software. Contact customer service for the latest firmware after September 1, 2023.
The oscilloscope is designed with rich scalability, supporting the use of different modules to expand more functions. Currently, these modules are under development and will include audio modules, bidirectional function generator modules, and transistor tester modules in the future.

Figure 7.1: Illustration of the diverse applications for the SCO2 oscilloscope, including appliance, mobile phone, and automotive repair, as well as electronics DIY and power supply maintenance.