
1. Introduction
Thank you for choosing the MMOBIEL Foldable LCD Digital Alarm Clock. This compact and versatile device is designed to provide accurate timekeeping along with several practical functions, including an alarm, timer, date, day, and temperature display. Its foldable design makes it ideal for both home use and travel. This manual will guide you through the setup, operation, and maintenance of your new alarm clock.

This image highlights the key features of the MMOBIEL Digital Alarm Clock, including its 9cm screen, date, temperature, alarm, and two-level backlight functions. The clock is shown on a desk next to a coffee cup and a plant.
2. Product Features
- Compact & Foldable Design: Easily portable for travel, office, or home use.
- LCD Display: Clear digital display for time, date, day, and temperature.
- Backlight: Instant backlight for easy reading in low-light conditions.
- Alarm Function: Features 10 different alarm sounds and a snooze function.
- Timer Function: Adjustable timer for various needs.
- Time Format: Switch between 12-hour and 24-hour display.
- Date & Day Display: Automatically adjusts for leap years.
- Temperature Display: Shows temperature in Celsius or Fahrenheit.

This image illustrates the compact design of the MMOBIEL Digital Alarm Clock, placed next to a smartphone for scale. It shows the clock's dimensions as 8 cm wide and 8.5 cm high, emphasizing its portability for home, office, and travel.
3. Package Contents
- 1 x MMOBIEL Foldable LCD Digital Alarm Clock
- 1 x CR2032 Battery (pre-installed)
4. Setup
4.1 Battery Installation
The MMOBIEL Digital Alarm Clock comes with a pre-installed CR2032 battery. If the display is blank or dim upon first use, gently pull out any plastic insulation tab from the battery compartment at the back of the clock. If replacing the battery, open the battery compartment cover, remove the old CR2032 battery, and insert a new one with the positive (+) side facing up. Close the compartment cover securely.
4.2 Initial Power On
Once the battery is correctly installed, the clock display should activate. The default time and date may need to be set. Proceed to the Operating Instructions section to configure your clock.
5. Operating Instructions
Familiarize yourself with the buttons located on the back of the clock:
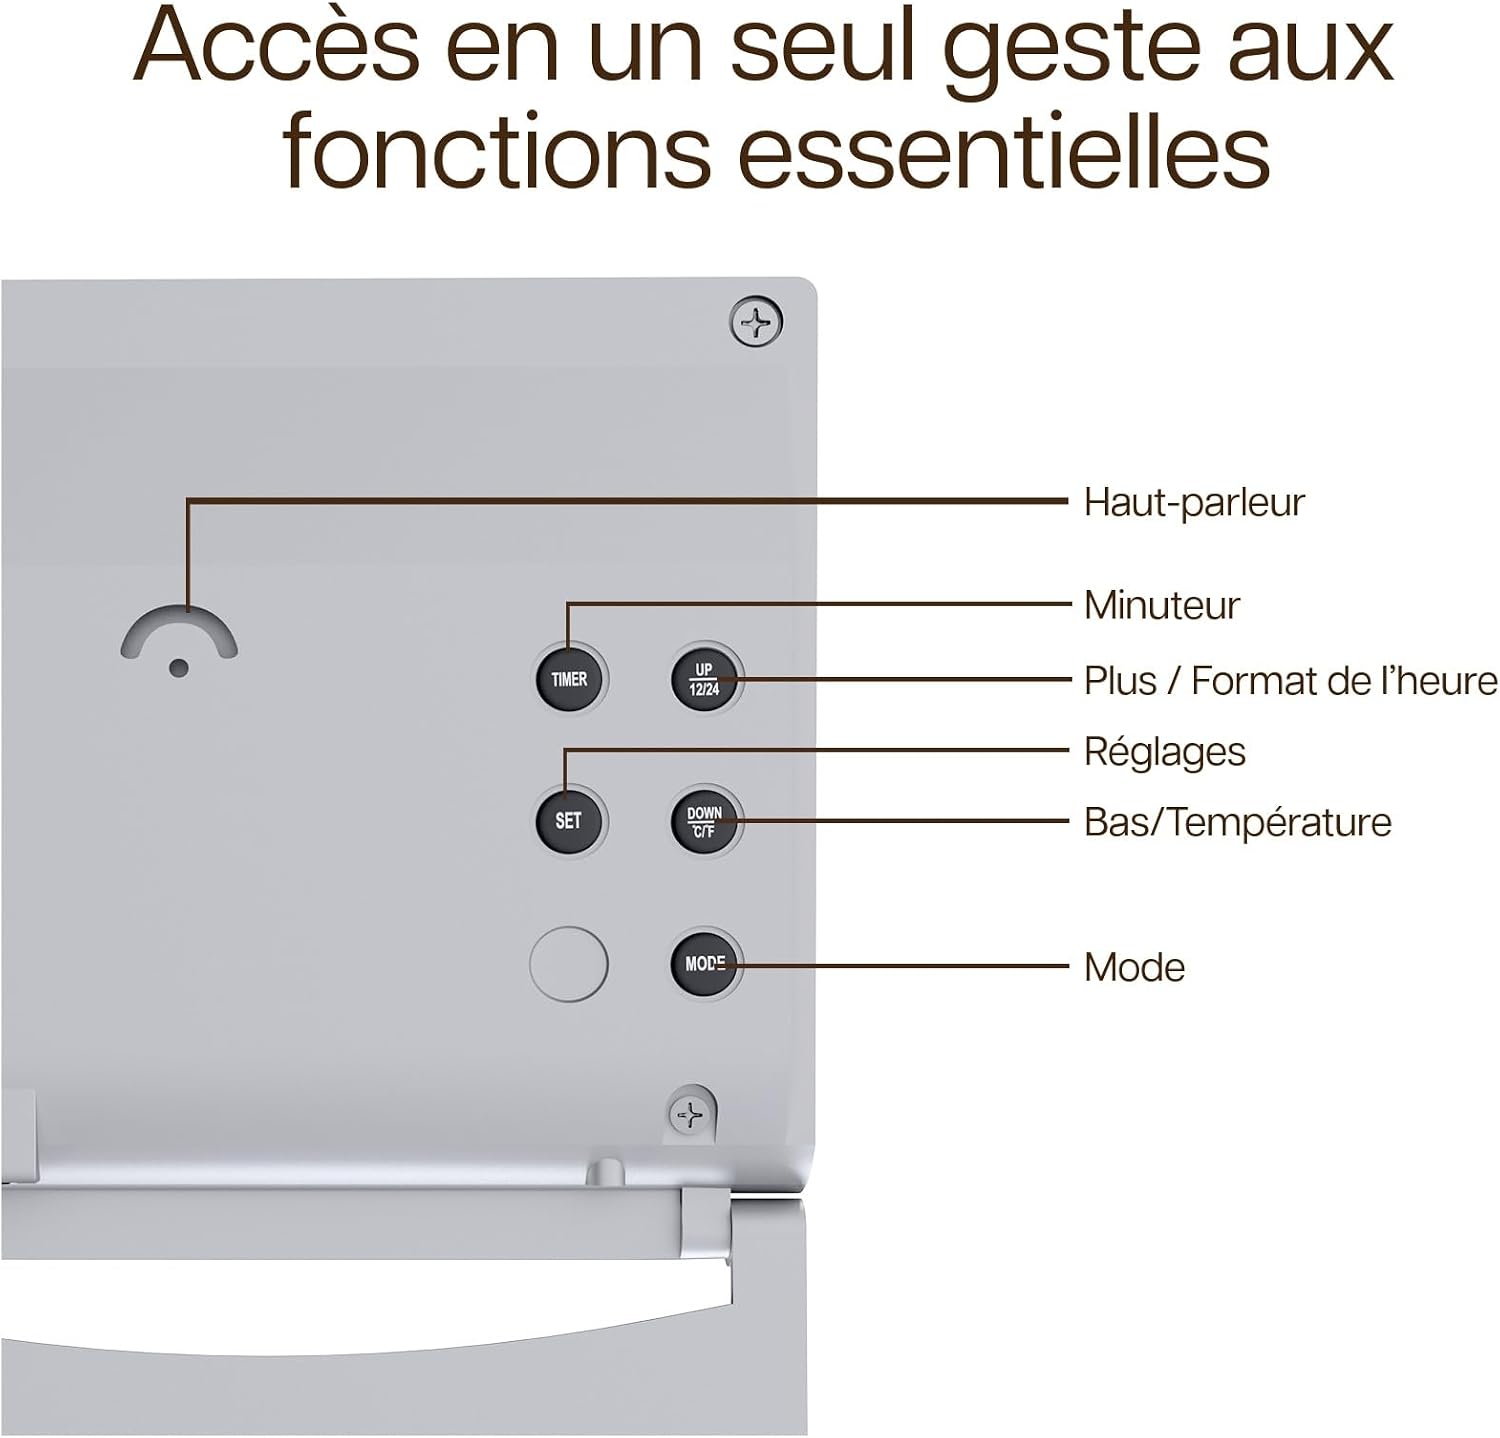
This diagram shows the rear panel of the MMOBIEL Digital Alarm Clock, identifying each control button: Speaker, TIMER, UP / 12/24, SET, DOWN / °C/°F, and MODE. These buttons are used for accessing and adjusting the clock's various functions.
- MODE: Cycles through Time, Alarm, and Timer display modes.
- SET: Enters setting mode for the currently displayed function.
- UP / 12/24: Increases values during setting; toggles between 12-hour and 24-hour time format.
- DOWN / °C/°F: Decreases values during setting; toggles between Celsius and Fahrenheit temperature display.
- TIMER: Activates or adjusts the countdown timer.
5.1 Setting Time and Date
- Press the MODE button until the time is displayed.
- Press and hold the SET button until the hour digit flashes.
- Use the UP or DOWN buttons to adjust the hour.
- Press SET again to move to the minute digit, then use UP or DOWN to adjust.
- Continue pressing SET to cycle through year, month, and day settings, adjusting each with UP or DOWN.
- Press SET one last time or wait a few seconds for the clock to exit setting mode.
5.2 Setting the Alarm
- Press the MODE button until the alarm time is displayed (usually indicated by an alarm icon).
- Press and hold the SET button until the alarm hour flashes.
- Use the UP or DOWN buttons to adjust the alarm hour.
- Press SET again to move to the alarm minute digit, then use UP or DOWN to adjust.
- Press SET again to select the alarm sound (cycle through 10 options with UP/DOWN).
- Press SET one last time or wait for the clock to exit setting mode.
- To activate/deactivate the alarm, press the UP button while in alarm display mode. An alarm icon will appear/disappear on the screen.
5.3 Snooze Function
When the alarm sounds, press any button (except SET or MODE) to activate the snooze function. The alarm will temporarily stop and sound again after a few minutes (default snooze duration is typically 5-10 minutes, not adjustable on this model). To turn off the alarm completely, press the SET button when it is sounding.
5.4 12/24 Hour Format
In time display mode, press the UP / 12/24 button to switch between 12-hour (with AM/PM indicator) and 24-hour formats.
5.5 Celsius/Fahrenheit Display
In time display mode, press the DOWN / °C/°F button to switch the temperature unit between Celsius (°C) and Fahrenheit (°F).
5.6 Timer Function
- Press the MODE button until the timer is displayed.
- Press the TIMER button to start or pause the timer.
- To set the timer duration, press and hold the TIMER button until the digits flash. Use UP or DOWN to adjust hours, minutes, and seconds. The timer can be set for up to 24 hours.
- Press TIMER again to confirm the setting.
5.7 Backlight Activation
To activate the backlight, gently press the top of the clock. The backlight will illuminate for a few seconds, providing temporary visibility in dark environments.

This image demonstrates the instant backlight feature of the MMOBIEL Digital Alarm Clock, providing easy readability in low-light conditions. The clock is shown on a wooden bedside table.

This collage illustrates the versatility of the MMOBIEL Digital Alarm Clock, showcasing its use in different environments: during air travel, on a bedside table, in an office setting, and outdoors while camping. This highlights its suitability as a travel and everyday clock.
6. Maintenance
6.1 Cleaning
To clean the clock, use a soft, dry cloth. Do not use abrasive cleaners, solvents, or chemical sprays, as these can damage the display or casing.
6.2 Battery Replacement
When the display becomes dim or the clock stops functioning, it is time to replace the CR2032 battery. Follow the instructions in section 4.1 for battery installation.
6.3 Storage
Store the clock in a cool, dry place away from direct sunlight and extreme temperatures when not in use for extended periods.
7. Troubleshooting
- Display is blank or dim: Check if the battery insulation tab has been removed. Replace the CR2032 battery if it is depleted.
- Time/Date is incorrect: Re-set the time and date following the instructions in section 5.1.
- Alarm is not sounding: Ensure the alarm is activated (alarm icon visible on display). Check that the alarm time is set correctly.
- Buttons are unresponsive: Remove and re-insert the battery to perform a soft reset. If the issue persists, the battery may be too low.
8. Specifications
| Feature | Specification |
|---|---|
| Model Number | EM5-108 |
| Dimensions (L x W x H) | 8.6 x 3.81 x 7.5 cm (3.38 x 1.5 x 2.95 inches) |
| Weight | 91 grams (3.21 ounces) |
| Battery Type | 1 x CR2032 (included) |
| Display Type | Digital LCD |
| Special Features | Snooze, Backlight, Date, Day, Temperature Display |
| Power Source | Battery Powered |
| Usage Environment | Indoor |
9. Warranty and Support
For any questions, technical support, or warranty inquiries regarding your MMOBIEL Foldable LCD Digital Alarm Clock, please contact the seller or manufacturer directly through your purchase platform. Please retain your proof of purchase for warranty claims.