
1. Introduction
This manual provides detailed instructions for the setup, operation, and maintenance of your BOMGE CT80S-pro 8-Channel Professional Mixer. Please read this manual thoroughly before using the device to ensure proper functionality and to prevent damage.
The BOMGE CT80S-pro 8-channel mixer supports wired and wireless connections for microphones, instruments, and other audio sources. It is suitable for various applications including home KTV, band performances, campus events, and conferences.
2. Product Overview
The BOMGE CT80S-pro is a compact 8-channel audio mixer designed for versatile audio mixing and recording. It features multiple input options, integrated digital signal processing (DSP) effects, Bluetooth connectivity, and USB recording capabilities.
2.1 Key Features
- 8 input channels with XLR and 6.35mm unbalanced jacks.
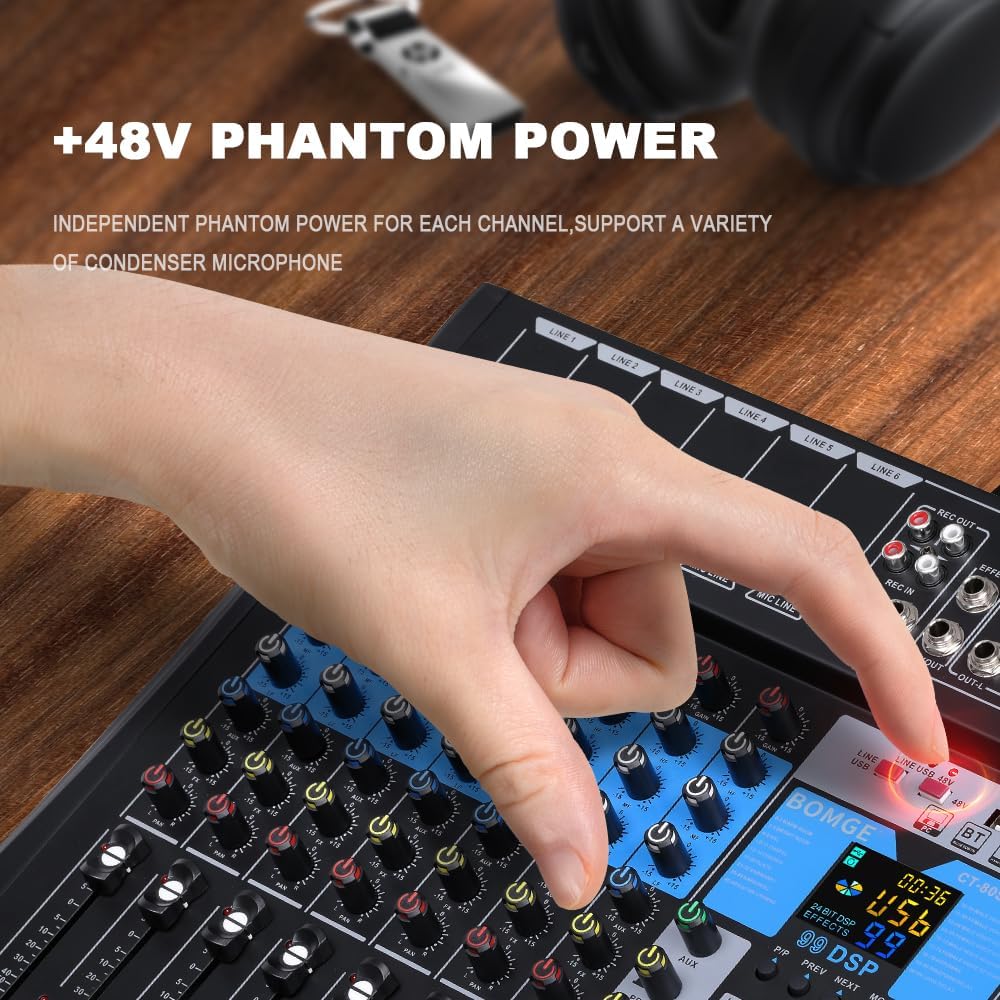
- +48V Phantom Power for condenser microphones.
- Integrated 99-bit DSP effects processor.
- 3-band equalizer on all channels.
- USB/Flash drive/MP3 compatibility for playback and recording.
- Bluetooth wireless streaming.
- LED peak level indicators and 10-segment stereo output level meter.
- Compact chassis with sealed rotary controls for dust resistance.
2.2 Mixer Layout

The mixer features a control panel with individual channel controls, master controls, and a digital display for DSP effects and media playback. Input and output ports are located on the top and rear panels.
3. Setup
3.1 Power Connection
The mixer operates on a 5V power supply. It can be powered via a power bank, a standard power plug, or a computer USB port.
- Connect the provided USB power cable to the DC 5V input port on the rear of the mixer.
- Connect the other end of the USB cable to a compatible 5V power source (e.g., power bank, USB wall adapter, computer USB port).
- Press the POWER button on the top right of the mixer to turn it on.
3.2 Connecting Audio Sources
The mixer provides multiple input options for various audio devices.

- Microphones: Connect XLR or 6.35mm (1/4 inch) microphone cables to the MIC/LINE input jacks (LINE 1-6). For condenser microphones requiring phantom power, activate the +48V PHANTOM POWER button for the respective channel.
- Line-level Instruments/Devices: Connect instruments or other line-level devices using 6.35mm (1/4 inch) cables to the MIC/LINE input jacks.

Important: Ensure phantom power is only activated when using condenser microphones that require it. Do not activate phantom power for dynamic microphones or other devices that do not require it, as this may cause damage.
3.3 Connecting Output Devices
- Main Output: Connect your main speakers or amplifier to the OUT-L and OUT-R (TRS or XLR) jacks.
- Headphones: Connect headphones to the PHONES jack for monitoring.
- Recording Output: Use the REC OUT (RCA) for connecting to a recording device.
4. Operating Instructions
4.1 Channel Controls

- GAIN: Adjusts the input sensitivity for each channel. Set this to achieve a strong signal without clipping (distortion).
- 3-Band EQ (HIGH, MIDDLE, LOW): Adjusts the treble, midrange, and bass frequencies for each channel.
- AUX: Controls the send level to the auxiliary output or internal effects processor.
- PAN: Adjusts the stereo position (left/right) of the channel in the main mix.
- LEVEL FADER: Controls the output volume of the individual channel to the main mix.
- PFL (Pre-Fader Listen): Activates pre-fader monitoring of the channel through headphones.

4.2 Master Controls
- MAIN L/R FADERS: Control the overall volume of the stereo main output.
- PHONES: Adjusts the headphone output volume.
- LEVEL INDICATOR: A 10-segment LED meter displays the main output level. Adjust channel and master faders to keep levels within the optimal range, avoiding the red "peak" indicators.

4.3 DSP Effects
The mixer includes an integrated DSP processor with 99 selectable effects.

- Use the PROGRAM knob to select one of the 99 available effects. The selected effect number will be displayed on the screen.
- Adjust the FX PARA (Effect Parameter) knob to modify parameters of the selected effect (e.g., delay time, reverb decay).
- Use the FX LEVEL control to adjust the overall volume of the effects send.
- The FX TO MAIN fader controls how much of the processed effect signal is sent to the main stereo output.
4.4 USB/MP3 Playback and Recording
The mixer supports playback from USB flash drives and can function as a USB audio interface for computers.

- USB Playback: Insert a USB flash drive containing MP3 files into the USB port. Use the integrated controls (PLAY/PAUSE, PREV, NEXT, MODE) to navigate and play tracks.
- USB Audio Interface: Connect the mixer to a computer via the USB-B port. The mixer can function as an external sound card, allowing you to mix and record audio directly to your computer.
- Recording: The mixer can record audio to a connected USB device or a computer via the USB-B interface. Refer to your recording software's instructions for setting up the mixer as an input device.
4.5 Bluetooth Connectivity
The mixer allows for wireless audio streaming from Bluetooth-enabled devices.
- Press the MODE button on the USB/MP3 section until "BT" (Bluetooth) is displayed.
- On your smart device (e.g., smartphone, tablet), search for available Bluetooth devices and select "BOMGE Mixer" (or similar name).
- Once paired, you can stream audio wirelessly from your device to the mixer.
5. Maintenance
- Cleaning: Use a soft, dry cloth to clean the mixer's surface. Avoid using liquid cleaners or solvents.
- Storage: Store the mixer in a cool, dry place away from direct sunlight and extreme temperatures.
- Dust Protection: The sealed rotary controls are designed to resist dust. However, regular cleaning helps maintain optimal performance.
6. Troubleshooting
| Problem | Possible Cause | Solution |
|---|---|---|
| No power | Power cable not connected; Power source faulty; Mixer not switched on. | Ensure power cable is securely connected. Check power source. Press the POWER button. |
| No sound output | Volume faders are down; Mute engaged; Incorrect input/output connections; Faulty cables. | Increase channel and main faders. Check all cable connections. Test with different cables. |
| Distorted sound | Input gain too high; Output level too high; Faulty cable/device. | Reduce input GAIN. Lower main output faders. Check for red peak indicators. Test cables. |
| Phantom power not working | +48V button not pressed; Condenser microphone not connected. | Ensure the +48V button is pressed for the specific channel. Verify condenser microphone connection. |
| Bluetooth connection issues | Mixer not in Bluetooth mode; Device not discoverable; Interference. | Ensure mixer is in BT mode. Make sure your device's Bluetooth is on and discoverable. Try re-pairing. |
7. Specifications
| Feature | Detail |
|---|---|
| Brand | BOMGE |
| Model Number | 8Channel-99DSP (CT80S-pro) |
| Dimensions (L x W x H) | 37.5 x 34 x 3.7 cm |
| Weight | 1.34 Kilograms |
| Number of Channels | 8 |
| Connectivity Technology | Bluetooth, USB |
| Power Source | Battery Powered (via 5V USB) |
| Voltage | 5 Volts |
| Output Connector Type | RCA, TRS, XLR |
| Audio Input | USB |
| DSP Effects | 99 built-in effects |
| Phantom Power | +48V |
| UPC | 768447426622 |
8. Warranty and Support
Information regarding product warranty and customer support is not available in the provided product data. Please refer to the product packaging or the manufacturer's official website for details on warranty coverage and how to contact customer support.


