1. Introduction
Thank you for choosing the OidoZac SL388 Laminator Machine. This manual provides essential information for the safe and efficient operation, maintenance, and troubleshooting of your new laminator. Please read this manual thoroughly before using the device and retain it for future reference.
The OidoZac SL388 is a versatile 11-in-1 laminator designed for home, office, and school use. It features dual-roller technology for smooth, bubble-free lamination, rapid preheating, and an integrated design with various accessories to enhance your document protection and crafting needs.
2. Safety Instructions
To ensure safe operation and prevent damage to the laminator or injury, please observe the following safety precautions:
- Always connect the laminator to a grounded power outlet with the correct voltage.
- Do not operate the laminator if the power cord or plug is damaged.
- Keep the laminator away from water or other liquids. Do not operate with wet hands.
- Ensure adequate ventilation around the machine during operation to prevent overheating.
- The laminator's surface can become hot during use. Avoid touching the lamination slot directly.
- Do not insert metal objects or anything other than laminating pouches into the machine.
- Unplug the laminator when not in use or before cleaning.
- This appliance is not intended for use by persons (including children) with reduced physical, sensory or mental capabilities, or lack of experience and knowledge, unless they have been given supervision or instruction concerning use of the appliance by a person responsible for their safety.
3. Package Contents
Upon unpacking, please verify that all items listed below are included in your package:
- OidoZac SL388 Laminator Machine
- 36 Laminating Pouches (various sizes: 4*A4, 8*A5, 8*4R, 8*3R, 8*2R)
- Built-in Paper Trimmer (with Linear, Dashed, and Wave Line cutting heads)
- Corner Rounder
- Hole Puncher
- 3 Iron Rings
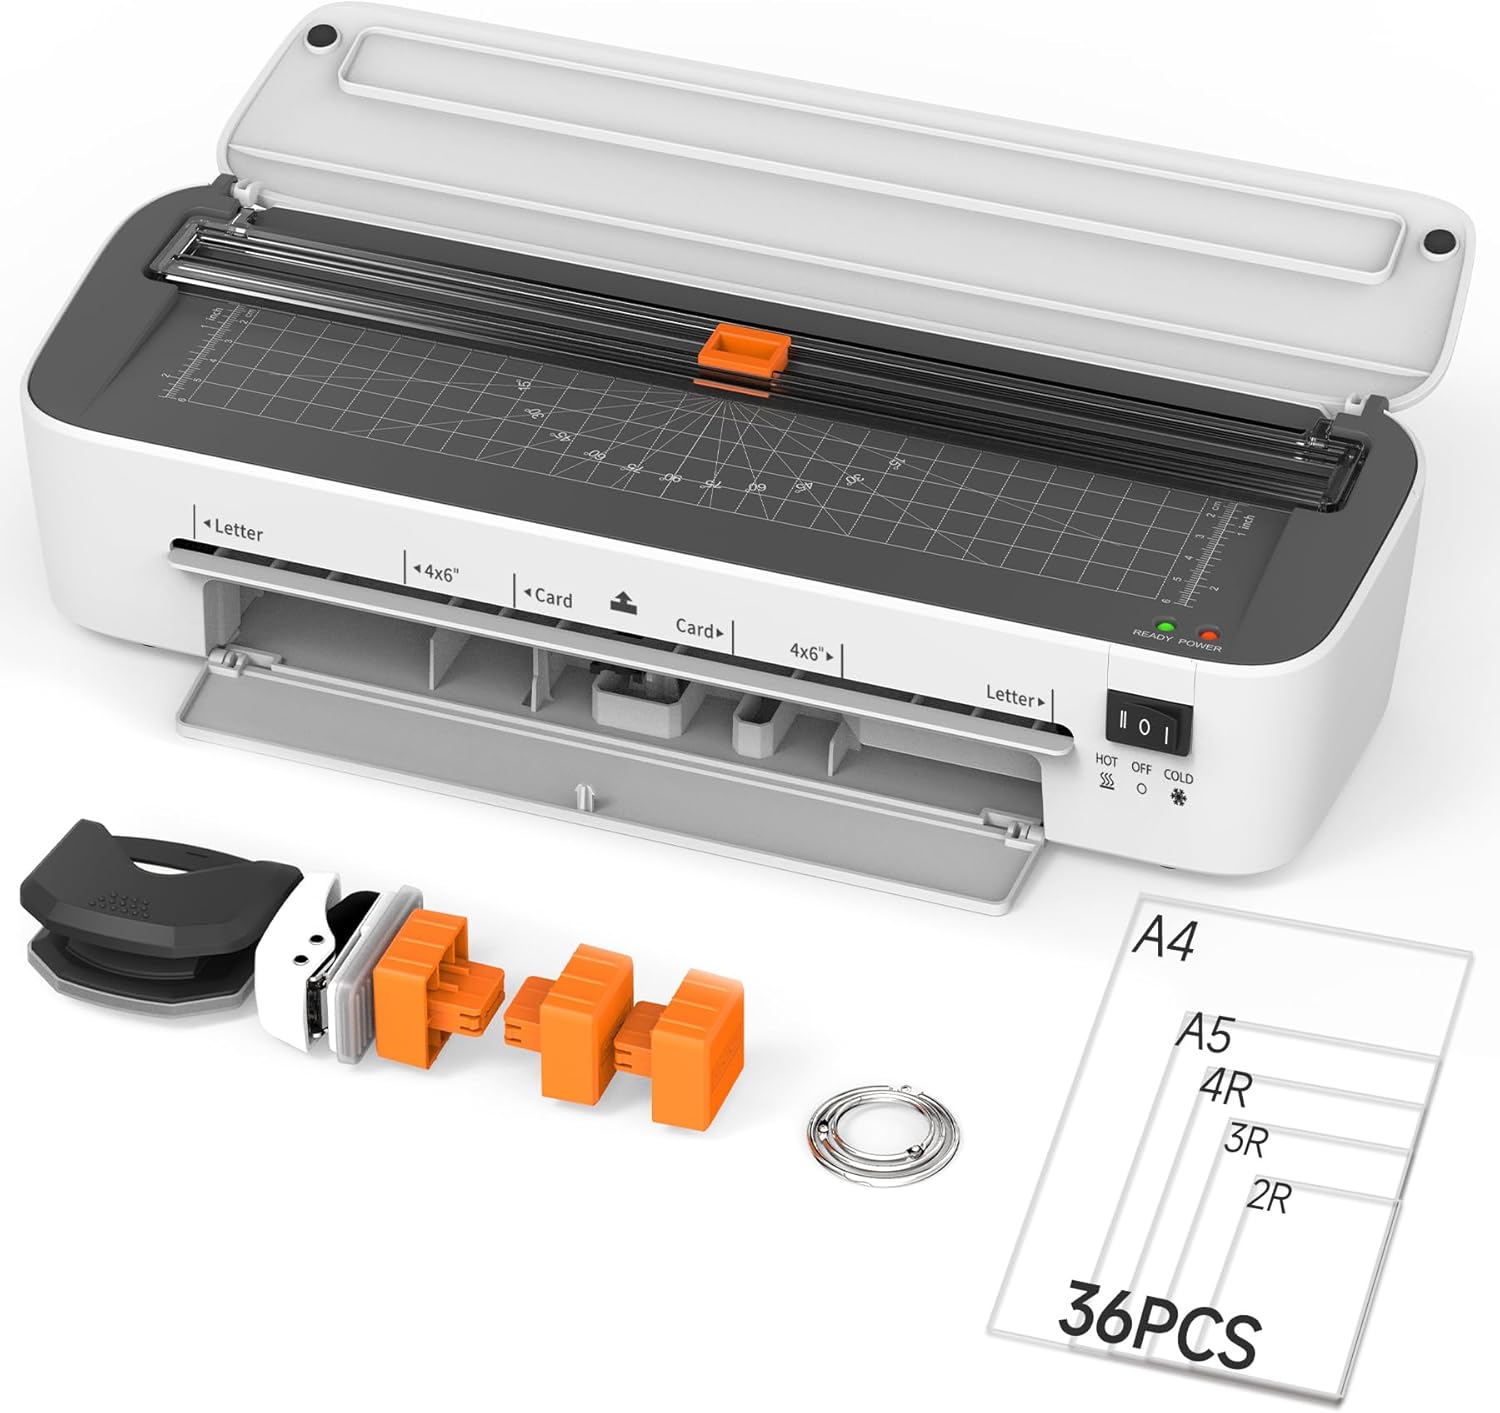
Image: The OidoZac SL388 Laminator Machine shown with all its included accessories, including laminating pouches, paper trimmer, corner rounder, hole puncher, and iron rings.

Image: A detailed diagram highlighting the 11-in-1 multifunction features of the laminator, including the integrated storage for accessories like the corner rounder, hole puncher, and three cutting heads.
4. Product Overview
Familiarize yourself with the main components of your OidoZac SL388 Laminator:
- Lamination Entry Slot: Where the laminating pouch is inserted.
- Control Switch: Used to select HOT, OFF, or COLD lamination modes.
- Power/Ready Indicator Lights: Indicate the machine's status (Power: Red, Ready: Green).
- ABS Jam Release Button: Used to clear misfed or jammed pouches.
- Integrated Paper Trimmer: Located on top, with grid lines for precise cutting.
- Accessory Storage Slot: Located at the bottom front, for storing cutting heads, corner rounder, and hole puncher.
5. Setup
Follow these steps to set up your laminator for first use:
- Unpack: Carefully remove the laminator and all accessories from the packaging.
- Placement: Place the laminator on a stable, flat, and heat-resistant surface. Ensure there is enough space behind the machine for laminated documents to exit freely.
- Power Connection: Plug the power cord into a standard electrical outlet.
6. Operating Instructions
6.1 Power On and Mode Selection
- Locate the control switch on the side of the laminator.
- Slide the switch to 'HOT' for thermal lamination or 'COLD' for cold lamination. The red 'POWER' indicator light will illuminate.
- For 'HOT' mode, wait for the green 'READY' indicator light to turn on, indicating the machine has reached the optimal laminating temperature (approximately 3.5 minutes preheating time).

Image: A visual guide demonstrating the four easy steps to operate the laminator: turning on, waiting for the ready light, inserting the document, and switching off.
6.2 Hot Lamination
Hot lamination is suitable for most documents, photos, and materials that can withstand heat.
- Ensure the laminator is in 'HOT' mode and the green 'READY' light is on.
- Place your document inside a laminating pouch, ensuring it is centered and there is an even border around the edges. The SL388 supports 3mil and 5mil pouch thicknesses.
- Insert the sealed edge of the laminating pouch straight into the lamination entry slot. Do not force the pouch. The machine will automatically feed it through.
- Once the pouch exits the rear of the machine, allow it to cool on a flat surface before handling.

Image: An illustration detailing the applications for Hot and Cold lamination modes, along with the benefits of using 3mil versus 5mil pouch thickness.

Image: Demonstrates the wide range of applications and supported pouch sizes (2R, 3R, 4R, A5, A4) for the laminator.
6.3 Cold Lamination
Cold lamination is ideal for heat-sensitive documents, such as old photographs, thermal prints, or certain types of artwork. Note that cold laminating film is not included with the machine.
- Ensure the laminator is in 'COLD' mode. No preheating is required.
- Prepare your document with a self-adhesive cold laminating pouch.
- Insert the sealed edge of the cold laminating pouch straight into the lamination entry slot.
- The machine will feed the pouch through, applying pressure to seal it.
6.4 Jam Release (ABS Button)
In the event of a paper jam or misfed pouch, use the ABS button to safely release the document:
- Immediately switch the laminator to 'OFF'.
- Press and hold the 'ABS' button located on the side of the machine. This will disengage the rollers.
- Gently pull the misfed pouch out of the entry or exit slot.
- Release the ABS button and ensure the pouch is completely removed before attempting to laminate again.

Image: A step-by-step visual guide on how to use the ABS jam-release button to resolve paper jams and protect documents.
6.5 Using Accessories
The OidoZac SL388 comes with integrated and separate accessories for enhanced functionality:
Paper Trimmer
The built-in paper trimmer allows for precise cutting of documents. It includes three interchangeable cutting heads:
- Linear Paper Cutter: For straight cuts.
- Dashed Paper Cutter: For perforated lines.
- Wave Line Paper Cutter: For decorative wavy edges.
To use, place the document under the trimmer bar, align with the grid lines, and slide the cutting head along the track.
Corner Rounder
Use the corner rounder to smooth sharp corners of laminated documents, preventing accidental cuts and improving appearance.
Hole Puncher & Iron Rings
The hole puncher creates a single hole in your document, which can then be used with the included iron rings for binding multiple sheets together.

Image: Visual demonstrations of the three types of paper cutters (linear, dashed, wave line), the hole puncher with iron ring binding, and the corner rounder in action.
7. Maintenance
Proper maintenance ensures the longevity and optimal performance of your laminator:
- Cleaning: Ensure the laminator is unplugged and completely cool before cleaning. Use a soft, dry cloth to wipe the exterior. Do not use abrasive cleaners or solvents.
- Roller Cleaning: Occasionally, run a piece of plain paper through the hot laminator to help clean the rollers of any adhesive residue.
- Storage: When not in use, store the laminator in a cool, dry place, away from direct sunlight and extreme temperatures. Utilize the integrated accessory storage to keep all components organized.
8. Troubleshooting
If you encounter issues with your laminator, refer to the following common problems and solutions:
| Problem | Possible Cause | Solution |
|---|---|---|
| Laminator does not turn on. | No power connection; Power switch is off. | Check power cord connection; Ensure switch is set to HOT or COLD. |
| Pouch jams in the machine. | Pouch inserted crookedly; Pouch too thick; Overheating. | Use ABS button to release and re-insert straight; Ensure pouch thickness is 3mil or 5mil; Allow machine to cool if overheated. |
| Laminated document has bubbles or wrinkles. | Not enough heat; Pouch inserted too quickly; Old pouches. | Wait for green 'READY' light; Ensure pouch is inserted slowly and straight; Use fresh pouches. |
| Laminated document is cloudy or unclear. | Temperature too low; Incorrect pouch type. | Ensure machine is fully preheated; Use appropriate thermal pouches for hot lamination. |
| Paper trimmer does not cut cleanly. | Blade dull or misaligned; Too many sheets. | Ensure cutting head is properly seated; Cut only one sheet at a time. |
9. Specifications
Key technical specifications for the OidoZac SL388 Laminator Machine:
- Model: SL388
- Brand: OidoZac
- Item Weight: 3.2 pounds
- Product Dimensions: 14.2 x 4.7 x 3.1 inches
- Color: White
- Sheet Size (Max Width): 9 inches (A4/A5/4R/3R/2R)
- Lamination Speed: 360mm/min
- Preheating Time: Approximately 3.5 minutes
- Pouch Thickness Supported: 3mil, 5mil
- Heating Technology: Mica Sheet Technology
- Safety Features: Overheat Protection, ABS Jam Release
10. Warranty and Support
OidoZac is committed to providing high-quality products and excellent customer service. Your SL388 Laminator Machine comes with dedicated support to ensure your satisfaction.
- Customer Support: OidoZac offers 24/7 online support to assist with any questions or issues you may encounter.
- Replacement Policy: We provide a 180-day free replacement for quality issues.
For assistance, please visit the official OidoZac store on Amazon or contact their customer service directly via the contact information provided with your purchase.

Image: Icons representing OidoZac's customer support, including 24/7 professional response, 180 days free replacement for quality issues, and VIP service.