
1. Introduction
This manual provides essential information for the proper installation, operation, and maintenance of your Sonew Sound and Light Alarm Strobe Siren, Model Sonewog3gxt821e. Please read this manual thoroughly before installation and use to ensure safe and effective performance of the device. This device is designed to provide audible and visual alerts in emergency situations.
2. Safety Information
Important Safety Instructions:
- Always disconnect power before installing or servicing the device.
- Installation should be performed by qualified personnel in accordance with all local and national electrical codes.
- Ensure the power supply voltage matches the device's requirements (DC12V or DC24V).
- Do not expose the device to excessive moisture or extreme temperatures.
- Do not paint over the strobe light or siren openings, as this may impair functionality.
3. Product Overview
3.1. Features
- Audible and visual alarm for effective alerts.
- Simple two-wire system for straightforward wiring.
- Compatible with DC12V or DC24V power supplies.
- Equipped with six LEDs for bright, enhanced visibility strobe flashes.
- Offers three different selectable tones.
3.2. Components
The Sonew Sound and Light Alarm Strobe Siren consists of a durable red casing, an integrated siren, and a clear lens covering six high-intensity LED strobe lights. The rear panel houses the wiring terminals for power connection.

Figure 1: Front view of the Sonew Sound and Light Alarm Strobe Siren, showing the 'FIRE' label and LED strobe lights.
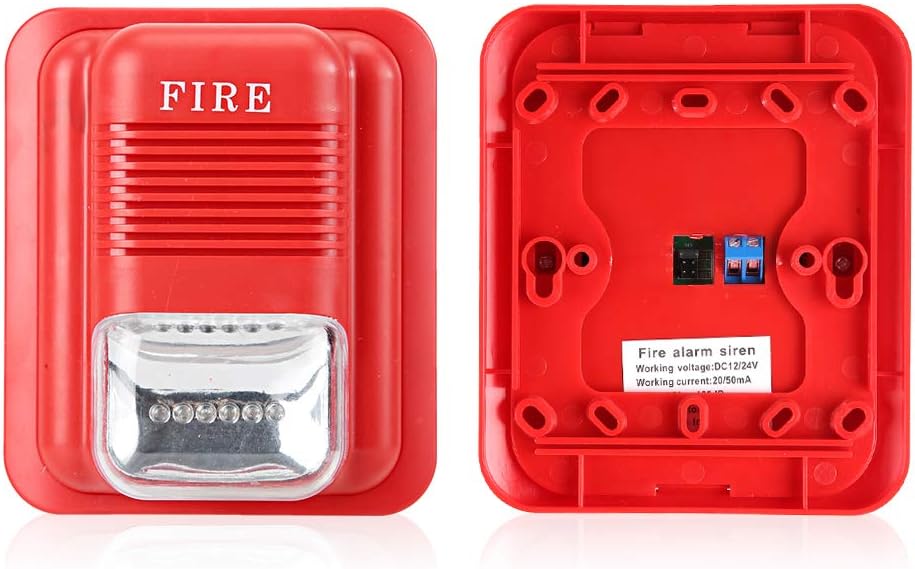
Figure 2: Front and rear views of the alarm. The rear panel displays the wiring terminals for power input.
4. Specifications
4.1. Technical Specifications
| Specification | Value |
|---|---|
| Brand | Sonew |
| Model Number | Sonewog3gxt821e |
| Color | Red |
| Power Source | Corded Electric |
| Voltage | 12V / 24V DC |
| Audible Noise | 105 Decibels |
| Control Method | Touch (Refers to internal tone selection jumpers) |
| Mounting Type | Wall Mount |
| Product Dimensions (L x W x H) | 5.28" x 4.53" x 1.89" (133mm x 115mm x 48mm) |
| Sensor Technology | Photoelectric Sensor (Internal component for alarm activation) |

Figure 3: Physical dimensions of the alarm unit.
5. Setup and Installation
5.1. Mounting
- Select a suitable wall location for mounting, ensuring clear visibility of the strobe light and unobstructed sound propagation.
- Use appropriate screws and anchors (not included) to securely fasten the alarm unit to the wall. The mounting holes are visible on the rear plate (refer to Figure 2).
5.2. Wiring
The unit features a two-wire system for power connection. Ensure power is disconnected before proceeding with wiring.
- Identify the two main power cables from your DC12V or DC24V power supply.
- Connect the positive (+) wire from the power supply to the positive terminal on the alarm unit.
- Connect the negative (-) wire from the power supply to the negative terminal on the alarm unit.
- Ensure all connections are secure and properly insulated.
Note: The unit can be connected to either a 12V or 24V DC power source. Verify your power source matches the device's requirements.
5.3. Tone Selection
The alarm unit offers three different tones. These are typically selected via jumpers or switches located on the circuit board inside the unit (refer to Figure 2 for general location of internal components). Consult the specific markings on your device for detailed tone selection instructions.
6. Operation
Once properly installed and powered, the Sonew Sound and Light Alarm Strobe Siren will activate upon receiving a trigger signal from a compatible alarm system (e.g., a fire alarm control panel). Upon activation, the unit will emit a loud audible siren (105 dB) and bright, flashing LED lights to alert occupants of an emergency.

Figure 4: The alarm provides effective alerts in commercial environments.

Figure 5: The alarm is suitable for diverse applications, from industrial to residential.
7. Maintenance
7.1. Cleaning
Periodically clean the exterior of the alarm unit with a soft, dry cloth. Do not use abrasive cleaners or solvents, as these can damage the casing or lens.
7.2. Inspection
Regularly inspect the unit for any signs of physical damage, loose wiring, or obstructions to the siren or strobe light. Ensure the mounting remains secure. Test the alarm functionality periodically as part of your overall safety system maintenance.
8. Troubleshooting
| Problem | Possible Cause | Solution |
|---|---|---|
| Alarm does not activate | No power supply; Incorrect wiring; Faulty trigger signal. | Check power connections and voltage; Verify wiring polarity; Test the trigger source. |
| Strobe light not flashing | LEDs damaged; Power issue. | Ensure proper power supply; If LEDs are damaged, unit may require replacement. |
| Siren not sounding | Siren component damaged; Power issue. | Ensure proper power supply; If siren is damaged, unit may require replacement. |
| Alarm sounds continuously or falsely | Faulty trigger signal; Wiring short. | Inspect trigger source and wiring for faults or shorts. |
9. Warranty and Support
For warranty information or technical support, please refer to the product packaging or contact your retailer. Keep your purchase receipt as proof of purchase.