1. Introduction
Thank you for choosing the Acekool Portable Air Conditioner. This 3-in-1 unit provides powerful cooling, efficient dehumidification, and effective air circulation through its fan mode. Designed for convenience and portability, it is ideal for cooling rooms up to 35 square meters. Please read this manual thoroughly before operation to ensure proper use, maintenance, and safety.
2. Safety Information
To reduce the risk of fire, electric shock, or injury when using your air conditioner, follow these basic precautions:
- Always plug the unit into a grounded 220V AC outlet. Do not use extension cords or adapter plugs.
- Do not operate the unit with a damaged cord or plug.
- Do not block air inlets or outlets. Ensure adequate clearance around the unit for proper airflow.
- Keep the unit away from heat sources, direct sunlight, and flammable materials.
- Do not insert fingers or foreign objects into the air inlets or outlets.
- Unplug the unit before cleaning or performing any maintenance.
- This appliance is not intended for use by persons (including children) with reduced physical, sensory or mental capabilities, or lack of experience and knowledge, unless they have been given supervision or instruction concerning use of the appliance by a person responsible for their safety.
- Ensure the unit is placed on a flat, stable surface to prevent tipping.
3. Product Features
- Powerful and Efficient: Delivers strong cooling power to quickly and effectively cool your room. Enjoy personal comfort at the touch of a button.
- Flexible and Mobile: Equipped with wheels for easy movement between rooms. Provides a pleasant climate in bedrooms, living rooms, or offices. Adjustable settings allow customization of cooling needs.
- Easy to Use and Control: Features an intuitive control panel and remote control for setting temperature, timer, and fan speed. The convenient timer function allows pre-programming for energy saving.
- Energy-efficient and Environmentally Friendly: Designed for low power consumption, helping to reduce energy costs. Uses R290 refrigerant, contributing to environmental protection.
- Elegant and Compact: Boasts a sleek and modern design that blends seamlessly into any room, making it an attractive addition to your home or office.

Image: The unit's compact size delivers high cooling performance, suitable for rooms up to 300 sq. ft. with 9000 BTU cooling capacity and 350m³/h airflow.

Image: The unit uses environmentally friendly R290 refrigerant, promoting energy efficiency and cost savings.

Image: The 3-in-1 operation system includes cooling (down to 16°C), dehumidifying (up to 42L/day), and fan (2 speeds) functions.
4. Product Specifications
| Specification | Value |
|---|---|
| Brand | Acekool |
| Model Number | CF9 |
| Product Dimensions (L x W x H) | 45 x 89 x 44 cm |
| Weight | 26 Kilograms |
| Energy Efficiency Rating | A |
| Cooling Capacity | 9000 BTU |
| Dehumidification Capacity | 42 Liters/day |
| Annual Power Consumption | 1000 Watts |
| Noise Level | 55 dB |
| Installation Type | Window |
| Special Feature | Dehumidifier |
| Color | Black |
| Voltage | 220 Volts |
| Power | 1000 Watts |
| Seasonal Energy Efficiency Ratio (SEER) | 2.6 |
5. Package Contents
Please check that all components are present and in good condition:
- Acekool Portable Air Conditioner Unit
- Exhaust Hose
- Window Seal Kit (includes window slider kit and adapter)
- Remote Control
- Drain Hose (for continuous drainage in dehumidifier mode)
- User Manual (this document)
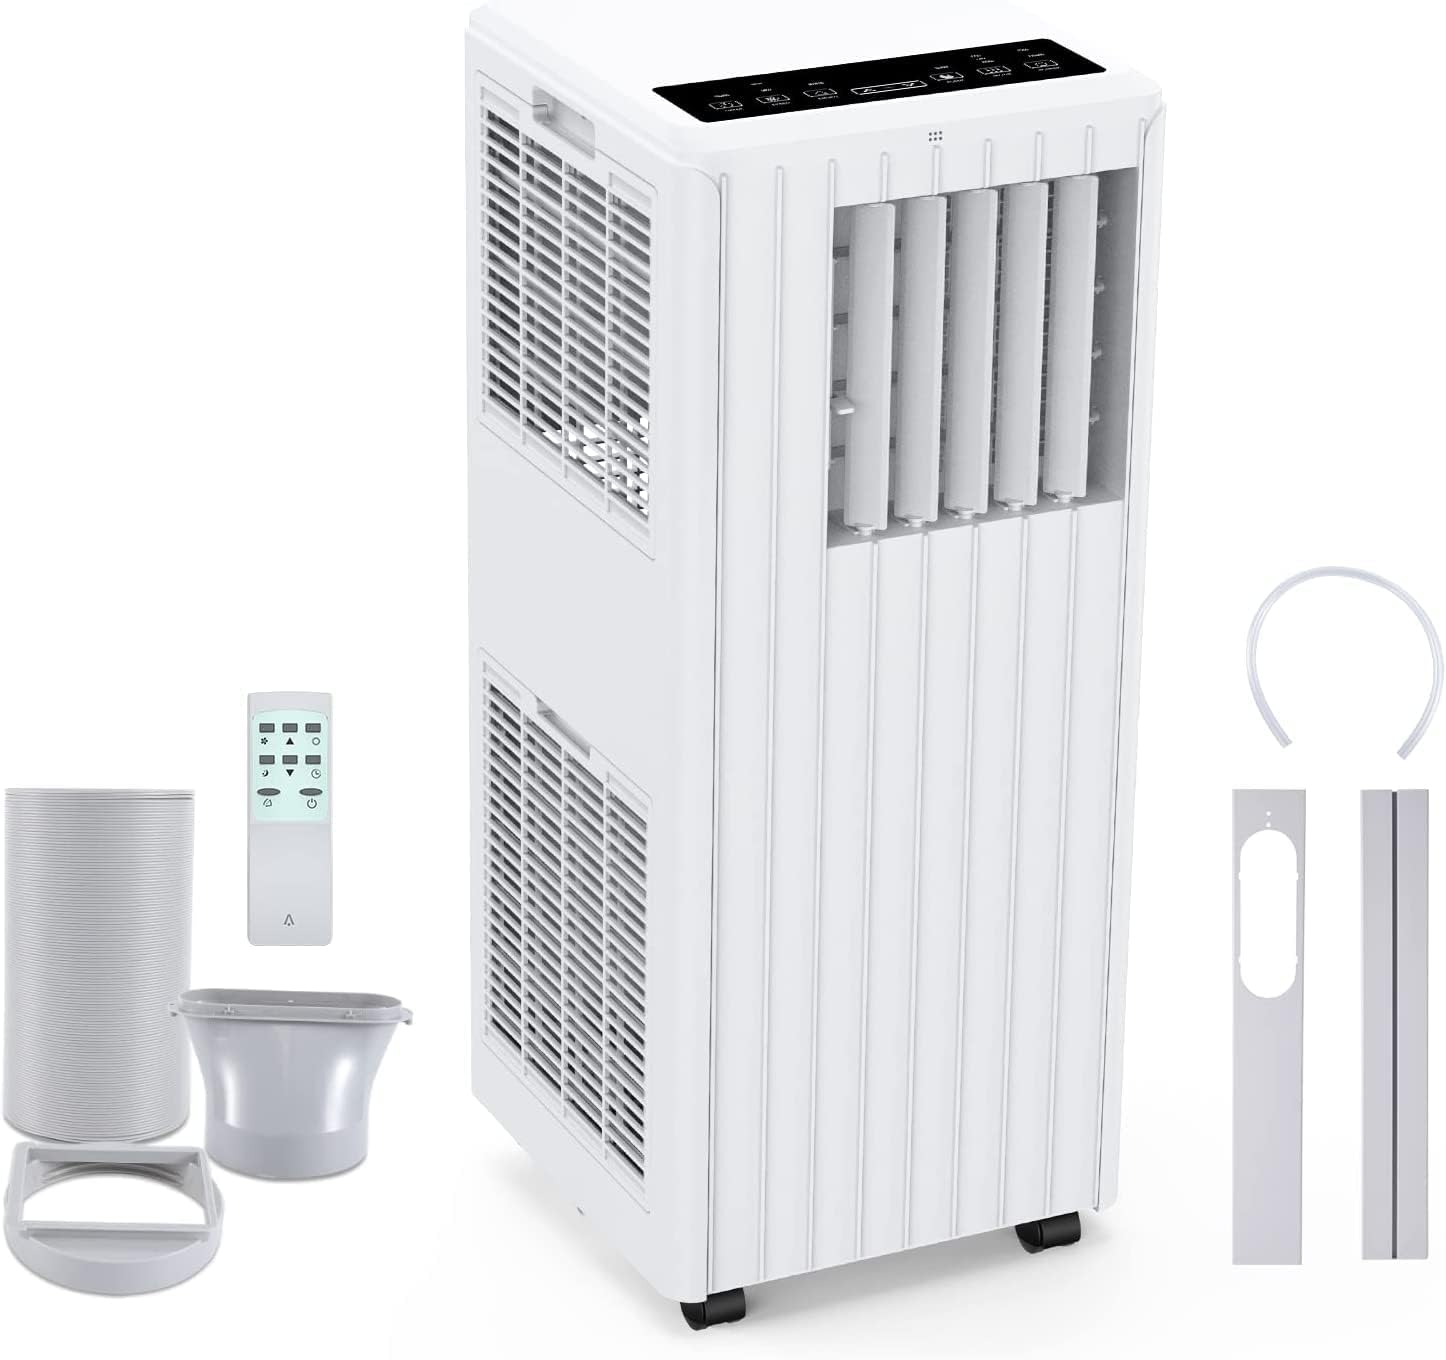
Image: All components included in the package: the main unit, exhaust hose, window sealing plate, remote control, and drain bucket.
6. Setup and Installation
Follow these steps to set up your portable air conditioner:
- Positioning: Place the air conditioner on a flat, stable surface near a window and a grounded electrical outlet. Ensure there is at least 20 cm (8 inches) of space around the unit for proper airflow.
- Attach Exhaust Hose: Screw one end of the exhaust hose into the air outlet on the back of the unit.
- Install Window Seal Kit: Adjust the window slider kit to fit your window opening. Secure it in place.
- Connect Exhaust Hose to Window Kit: Attach the other end of the exhaust hose to the adapter on the window slider kit, ensuring a tight seal to prevent hot air from re-entering the room.
- Power Connection: Plug the power cord into a grounded 220V AC outlet.

Image: Visual guide for easy installation, showing how to connect the exhaust hose to the unit and the window sealing plate.
7. Operating Instructions
Your Acekool Portable Air Conditioner can be operated using the control panel on the unit or the included remote control.
Control Panel and Remote Control
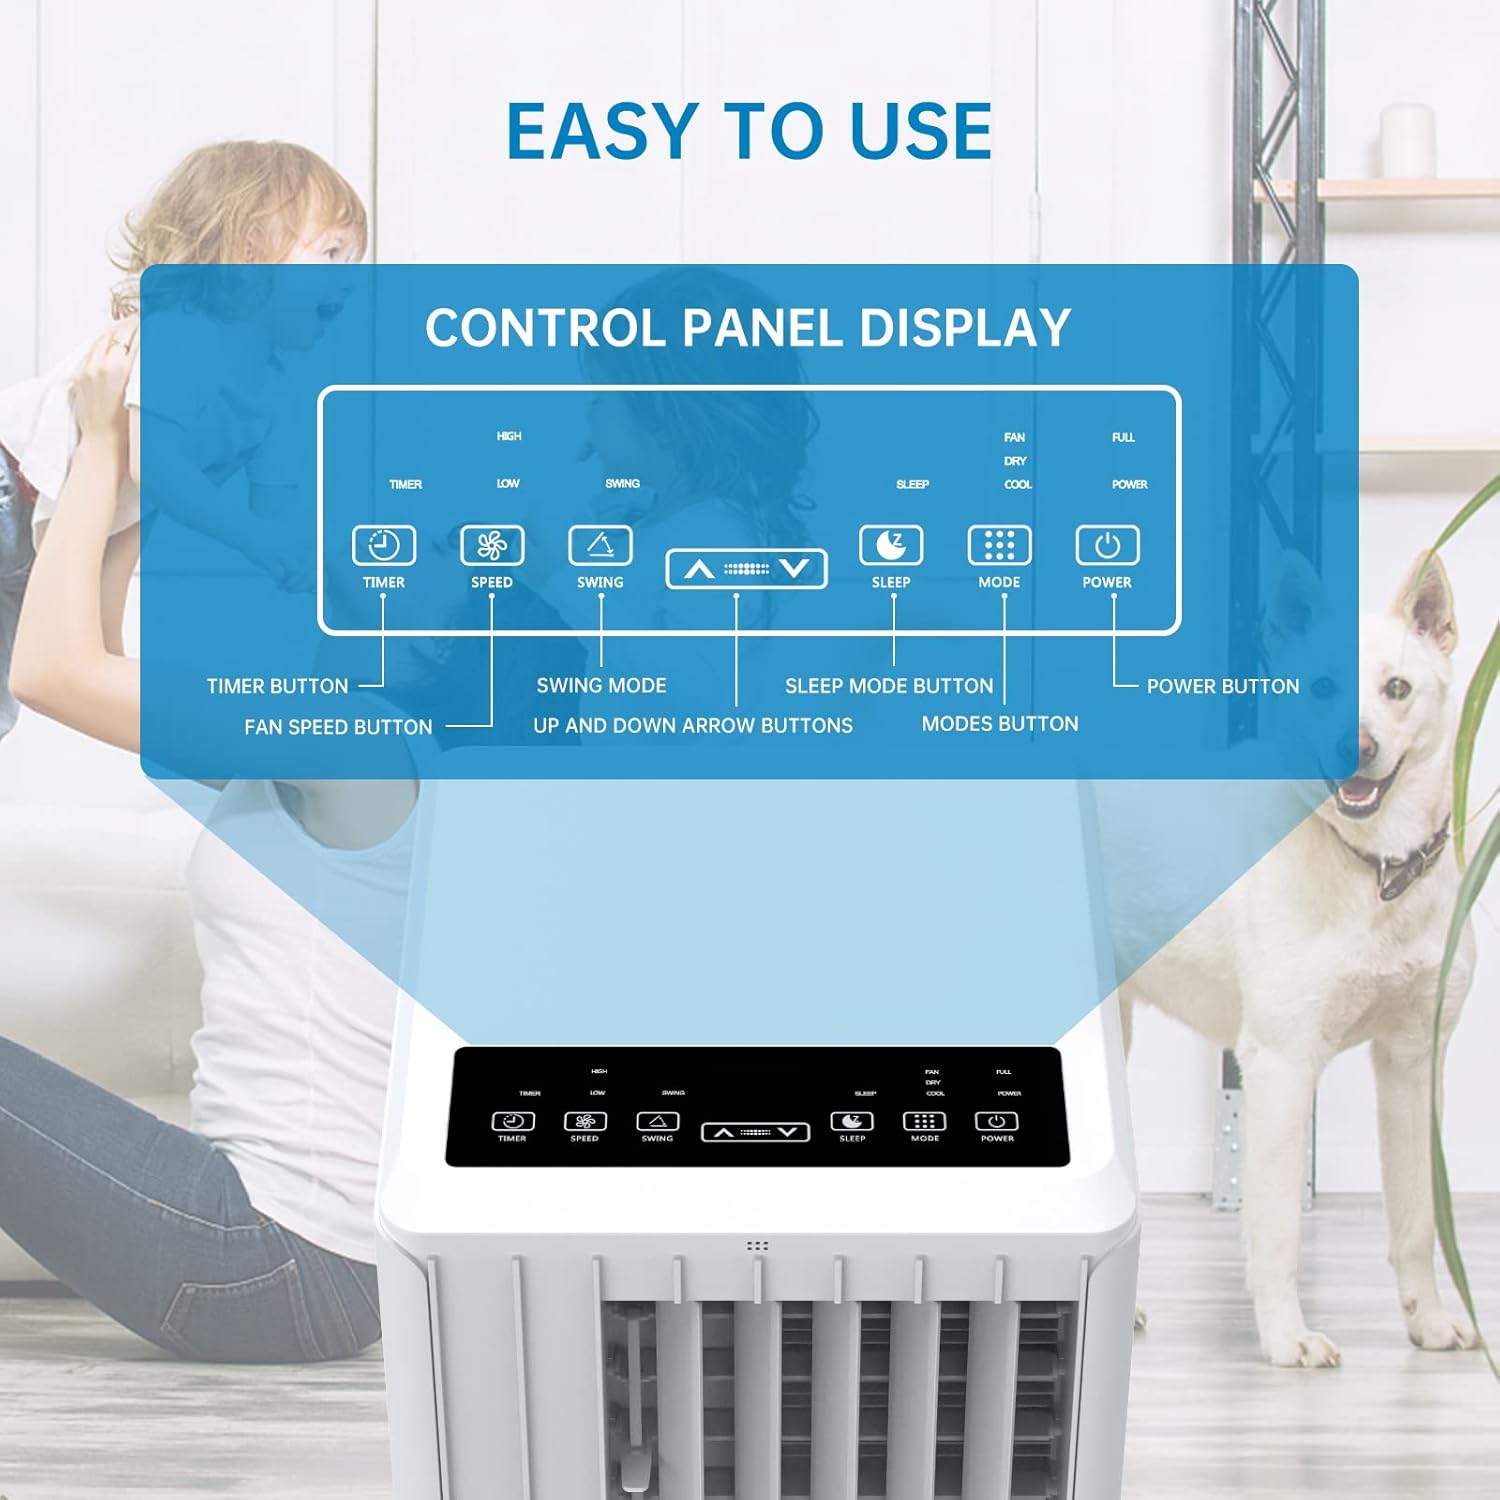
Image: Detailed view of the control panel display, indicating buttons for Timer, Speed, Swing, Sleep, Mode, and Power.

Image: The unit can be conveniently controlled via the remote control, and features a swing mode for wider air distribution.
Operating Modes

Image: Overview of the main operating modes: Cool, Fan, Dry (Dehumidifying), and Sleep, along with smart timer functionality.
- Cool Mode: Press the "Mode" button until the snowflake icon appears. Use the Up/Down arrows to set your desired temperature (16°C - 30°C). The unit will cool the room to the set temperature.
- Fan Mode: Press the "Mode" button until the fan icon appears. In this mode, the unit circulates air without cooling. Use the "Speed" button to adjust fan speed (Low/High).
- Dehumidify Mode (Dry): Press the "Mode" button until the water drop icon appears. The unit will remove excess moisture from the air. In this mode, the fan speed cannot be adjusted. Ensure the continuous drainage hose is connected for prolonged use.
- Sleep Mode: Press the "Sleep" button. In this mode, the unit operates quietly and gradually increases the temperature by 1°C after the first hour and another 1°C after the second hour, maintaining this temperature for 6 hours before returning to normal operation. This mode is ideal for nighttime use.

Image: The sleep mode offers automatic shut-off, quiet operation (55dB), and a 24-hour smart timer for comfortable nighttime use.
Additional Functions
- Timer Function: Press the "Timer" button to set the desired operating time (1-24 hours) for automatic turn on/off.
- Fan Speed: In Cool or Fan mode, press the "Speed" button to cycle through Low and High fan speeds.
- Swing Function: Press the "Swing" button to activate or deactivate the automatic vertical oscillation of the air louvers, distributing air more evenly.
8. Maintenance
Regular maintenance ensures optimal performance and extends the lifespan of your air conditioner. Always unplug the unit before cleaning.
Cleaning the Air Filter
The air filter should be cleaned every two weeks or more frequently depending on usage and air quality.
- Remove the air filter from the back of the unit.
- Wash the filter with warm, soapy water. Rinse thoroughly.
- Allow the filter to air dry completely before reinserting it into the unit.
Draining Water
The unit has an internal water tank that collects condensed water. When the tank is full, the unit will stop operating and display a "FULL" indicator. You will need to drain the water manually.
- Place a shallow pan or bucket under the drain port at the bottom rear of the unit.
- Remove the drain plug to allow water to flow out.
- Once drained, replace the drain plug securely.
For continuous dehumidification, attach the provided drain hose to the continuous drain port.
Cleaning the Unit Exterior
Wipe the exterior of the unit with a soft, damp cloth. Do not use harsh chemicals or abrasive cleaners.
Storage
If storing the unit for an extended period:
- Drain all water from the unit.
- Clean the air filter.
- Store the unit in a dry, cool place, away from direct sunlight.
9. Troubleshooting
Before contacting customer support, please refer to the following troubleshooting guide for common issues:
| Problem | Possible Cause | Solution |
|---|---|---|
| Unit does not turn on | No power supply; Power cord unplugged; Circuit breaker tripped; Water tank full. | Check power outlet; Plug in power cord securely; Reset circuit breaker; Drain water tank. |
| Unit is not cooling effectively | Air filter dirty; Exhaust hose not properly installed/sealed; Room too large; Doors/windows open; Air inlet/outlet blocked. | Clean air filter; Ensure exhaust hose is properly installed and sealed; Close doors/windows; Clear obstructions from air inlets/outlets. |
| Unit is noisy | Unit not on a flat surface; Air filter dirty; Internal components vibrating. | Place unit on a flat, stable surface; Clean air filter; If noise persists, contact customer support. |
| Water leaks from unit | Drain plug loose; Continuous drain hose not properly connected or blocked. | Ensure drain plug is secure; Check continuous drain hose for proper connection and clear any blockages. |
| Remote control not working | Batteries dead or incorrectly inserted; Obstruction between remote and unit. | Replace batteries; Ensure line of sight between remote and unit. |
10. Warranty and Support
For warranty information and customer support, please refer to the warranty card included with your product or visit the official Acekool website. Do not attempt to repair the unit yourself, as this may void the warranty and pose safety risks. For any issues not covered in this manual, please contact Acekool customer service.


