1. Introduction
This manual provides detailed instructions for the assembly, operation, and maintenance of your Tilta Full Camera Cage designed specifically for the Canon R8 camera. Please read these instructions thoroughly before using the product to ensure proper setup and optimal performance.
2. Product Overview
The Tilta Full Camera Cage for Canon R8 is engineered to provide comprehensive protection and expandability for your camera. It features multiple mounting points for accessories, maintains access to all camera controls, and supports quick release systems.

Figure 2.1: Tilta Full Camera Cage installed on a Canon R8 camera, viewed from the front-right side.

Figure 2.2: Diagram illustrating the silicone padding within the Tilta Full Camera Cage for all-around camera protection.

Figure 2.3: Annotated image of the Tilta Full Camera Cage on a Canon R8, highlighting features like 1/4"-20 threads, wrist strap holders, lens adapter support, and ARCA Quick Release.

Figure 2.4: Annotated image of the bottom and side of the Tilta Full Camera Cage, showing the security track, 3/8"-16 thread, 1/4"-20 threads, and an integrated magnetic flathead screwdriver.
3. Package Contents
- 1x Tilta Full Camera Cage for Canon R8
- 1x Integrated Magnetic Flathead Screwdriver
- 1x Cable Clamp
4. Setup and Installation
- Prepare the Camera: Ensure your Canon R8 camera is powered off. Remove any existing camera straps or accessories that might obstruct the cage installation.
- Align the Cage: Carefully align the camera body with the Tilta Full Camera Cage. The cage is designed to precisely fit the contours of the Canon R8.
- Secure the Bottom: Use the integrated magnetic flathead screwdriver (located at the bottom of the cage) to tighten the 1/4"-20 screw into the camera's tripod mount. Ensure it is snug but do not overtighten.
- Secure the Side: The cage features additional side attachment points. Use the provided screws and the magnetic screwdriver to secure these points, ensuring the camera is firmly seated within the cage.
- Attach Cable Clamp (Optional): If using external cables (e.g., HDMI, USB-C), attach the cable clamp to the side of the cage using the thumb screw. Adjust the clamp to securely hold your cables, preventing accidental disconnection or damage. The clamp supports cable sizes between 7.1-7.7mm.
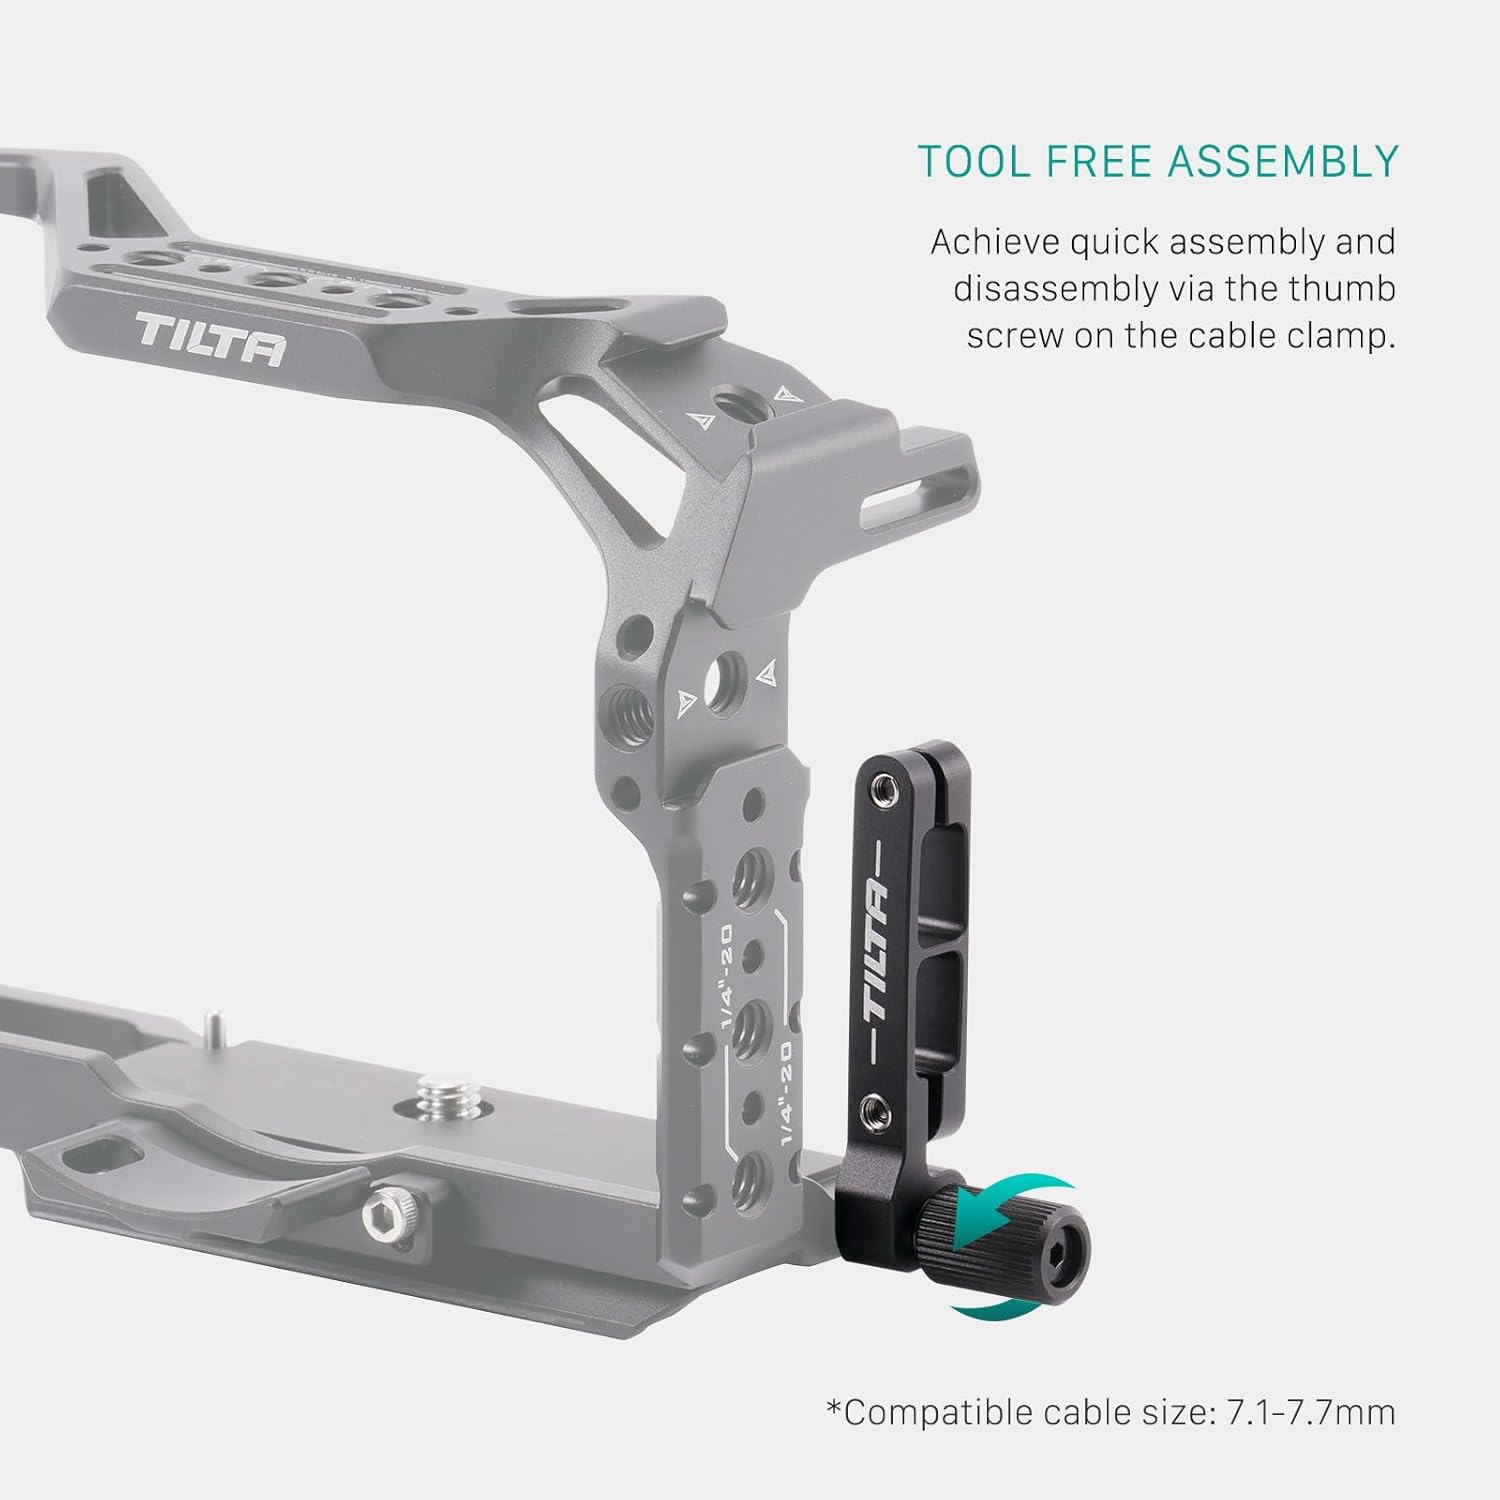
Figure 4.1: Tool-free assembly with thumb screw on cable clamp.

Figure 4.2: Tilta Full Camera Cage installed on a Canon R8, showing unobstructed access to the battery compartment.
Note: No relevant official product videos from the seller (Tilta) demonstrating the installation process for the Canon R8 cage were found in the provided data.
5. Operating Instructions
The Tilta Full Camera Cage enhances your Canon R8's functionality by providing various attachment points and maintaining essential access.
- Accessory Mounting: Utilize the numerous 1/4"-20 and 3/8"-16 threads with locating points to attach external monitors, microphones, lights, and other camera accessories.
- Cold Shoe Receivers: The cage includes cold shoe receivers for quick attachment of accessories like wireless microphone receivers or small LED lights.
- NATO Rail: A NATO rail is integrated for quick release and attachment of NATO-compatible handles or other accessories.
- Unobstructed Access: The cage design ensures full access to the camera's battery compartment, memory card slot, and all buttons and ports, including the flip-out screen.
- ARCA Quick Release: The base of the cage is ARCA-Swiss standard compatible, allowing for quick mounting and dismounting on ARCA-compatible tripods or gimbals.
- Lens Adapter Support: The cage provides support for the original Canon EF-EOS R lens adapter, enhancing stability when using EF lenses.
6. Maintenance
To ensure the longevity and optimal performance of your Tilta Full Camera Cage, follow these maintenance guidelines:
- Cleaning: Use a soft, dry cloth to wipe down the cage. Avoid using harsh chemicals or abrasive materials that could damage the finish.
- Inspection: Periodically check all screws and connection points to ensure they are secure. Tighten any loose screws using the integrated magnetic flathead screwdriver.
- Storage: Store the cage in a dry, dust-free environment when not in use.
7. Troubleshooting
If you encounter any issues with your Tilta Full Camera Cage, refer to the following common troubleshooting steps:
- Camera Not Fitting Correctly:
Ensure the camera is properly aligned with the cage's cutouts. Verify that all mounting screws are loosened before attempting to insert the camera. Check for any foreign objects obstructing the fit. - Accessories Not Attaching Securely:
Confirm that the accessory's mounting screw or attachment mechanism matches the cage's thread size (1/4"-20 or 3/8"-16) or cold shoe/NATO rail standard. Ensure screws are fully tightened. - Cable Clamp Issues:
Adjust the thumb screw on the cable clamp to match your cable's diameter (7.1-7.7mm). Ensure the cable is seated correctly within the clamp's groove.
8. Specifications

Figure 8.1: Tilta Full Camera Cage Product Specifications.
| Feature | Detail |
|---|---|
| Product Dimensions | 7 x 5.8 x 3 inches |
| Item Weight | 12.8 ounces |
| ASIN | B0CD14R1PY |
| Manufacturer | Tilta |
| Color | Black |
| Brand | Tilta |
| Compatible Devices | Camera (Canon R8) |
| UPC | 810076277592 |
9. Warranty and Support
Tilta products are manufactured to high-quality standards. For specific warranty information and terms, please refer to the documentation included with your purchase or visit the official Tilta website.
For technical support, product inquiries, or assistance with your Tilta Full Camera Cage, please contact Tilta customer service through their official channels. Contact details are typically available on the product packaging or the manufacturer's website.


