1. Introduction
The HIDALIFE Keyless Entry Door Lock HL668 offers a secure and convenient way to manage access to your property. Featuring a touchscreen keypad, anti-peep password protection, and an auto-locking mechanism, this lock is designed for ease of use and enhanced security.

Image: The HIDALIFE Keyless Entry Door Lock HL668 in Matte Black, featuring a touchscreen keypad and a handle with a keyhole.
Key Features:
- Touchscreen Keypad: Responsive and backlit for visibility in low light.
- Anti-Peep Password: Allows entry of random digits before and after the correct code to prevent unauthorized viewing.
- Auto-Locking: Automatically locks the door after a set period (default 5 seconds) for added security.
- Interchangeable Handle: Designed to fit both left and right-handed doors.
- Mechanical Key Override: Provides traditional key access as a backup.
2. Package Contents
Verify that all components are present before beginning installation.

Image: An exploded diagram showing all parts of the HIDALIFE Keyless Entry Door Lock, including the keypad, handle, bolt, strike plate, and various screws.
- Exterior Keypad Assembly (with Handle)
- Interior Base Plate
- Interior Fixed Pad
- Interior Handle
- Latch Bolt
- Strike Plate
- Square Tube
- Emergency Keys (2)
- Mounting Screws (various types: Fixed Pad Screws, Handle Screws, Plate Screws)
- Sponge Gasket
3. Installation Guide
3.1 Door Compatibility Check
Ensure your door meets the following specifications for proper installation:
- Door Holes: 2-1/8" (54mm) diameter. Not compatible with 1-1/2" (38mm) door holes.
- Door Thickness: 1-3/8" (35mm) to 2" (50mm).
- Backset: Adjustable to 2-3/8" (60mm) or 2-3/4" (70mm).
- Latch Hole: Requires a rectangular latch hole. Not compatible with rounded latch holes.

Image: A diagram illustrating the required door hole diameter, door thickness, and backset measurements for installation.

Image: A visual guide indicating compatible door configurations and latch types (rectangular latch hole is required).
3.2 Installation Steps
Installation typically takes about 15 minutes with a screwdriver. Detailed steps are usually provided in the quick start guide included with the product. General steps include:
- Prepare the door by ensuring the correct hole sizes and backset.
- Install the latch bolt into the door edge.
- Install the exterior keypad assembly, feeding the cable through the door hole.
- Install the interior mounting plate.
- Connect the cable from the exterior assembly to the interior assembly.
- Install the interior assembly and secure it with screws.
- Install 4 AAA batteries (not included) into the interior assembly.
- Perform the door handing process (usually by turning the handle or following specific instructions to calibrate the lock).
Note: For detailed visual instructions, refer to the QR codes or video links provided in your product packaging, if available.
4. Operating Instructions
4.1 Initial Setup and Programming Code
Upon first use, it is crucial to change the default programming code to prevent unauthorized access. The programming code is used to add or delete user codes and configure lock settings.
- Locate the default programming code in your quick start guide.
- Enter the default programming code followed by the '#' key.
- Follow the voice prompts or indicator lights to change the programming code to a new 4-10 digit code.
- Record your new programming code and store it in a secure location.
4.2 Adding User Codes
The lock supports up to 9 unique user codes, each 4-10 digits long.

Image: A visual representation of how multiple family members or guests can have their own user codes for the lock.
- Enter your Programming Code followed by the '#' key.
- Press '1' to enter the 'Add User Code' menu.
- Enter a new 4-10 digit user code.
- Press '#' to confirm.
- Repeat for additional user codes.
4.3 Unlocking the Door
Using a User Code:
- Touch the keypad to activate it (backlight will illuminate).
- Enter your 4-10 digit user code.
- Press the '#' key. The lock will unlock.

Image: A hand interacting with the backlit touchscreen keypad, demonstrating its visibility in low-light conditions.
Anti-Peep Function:
To enhance security, you can enter random digits before or after your actual user code. For example, if your code is 1234, you can enter 567123489#.

Image: A graphic explaining the anti-peep password feature, showing how random digits can be added before and after the correct password.
Using the Mechanical Key:
Insert the emergency key into the keyhole and turn to unlock the door manually.
4.4 Locking the Door
Automatic Locking:
The lock will automatically engage the deadbolt 5 seconds after being unlocked or closed. A countdown may be displayed on the keypad.

Image: A visual demonstrating the auto-lock feature, where the handle returns to its locked position and the door automatically secures itself after 5 seconds.
Manual Locking:
From the exterior, press and hold the '#' key for 2 seconds to manually lock the door.
4.5 Passage Mode (Optional)
Passage mode allows the door to remain unlocked for continuous entry without requiring a code. This is useful for high-traffic periods.
- Enter your Programming Code followed by the '#' key.
- Press '3' to toggle Passage Mode.
- To exit Passage Mode, repeat the steps.

Image: A graphic suggesting the lock can operate quietly, which might be related to a silent mode or passage mode setting.
5. Maintenance
5.1 Battery Replacement
The lock requires 4 AAA batteries (not included). When the batteries are low, the lock will beep 10 times after unlocking to remind you to replace them.
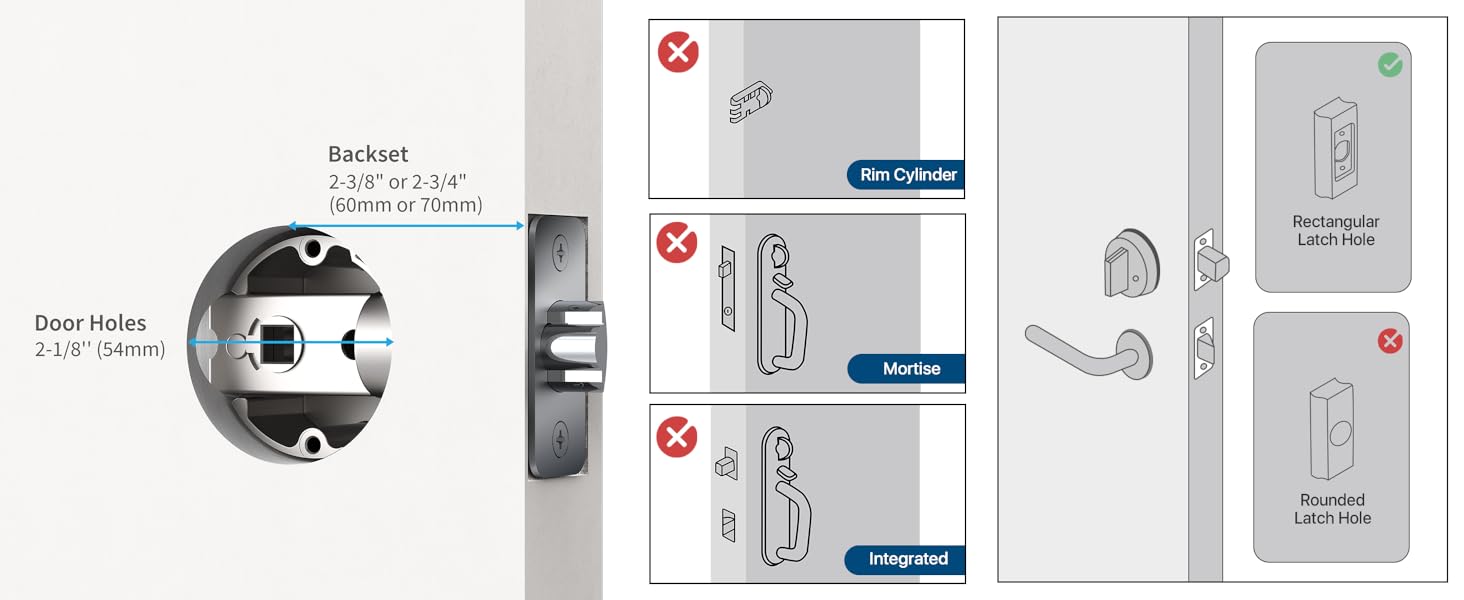
Image: A visual representation of the low-power alarming feature, showing a battery icon with low charge and a lock on a door.
- Remove the battery cover on the interior assembly.
- Remove the old AAA batteries.
- Insert 4 new AAA batteries, ensuring correct polarity.
- Replace the battery cover.
Note: Always use high-quality alkaline batteries for optimal performance and longevity.
5.2 Cleaning
To maintain the appearance and functionality of your lock:
- Wipe the touchscreen and exterior surfaces with a soft, damp cloth.
- Avoid using abrasive cleaners, solvents, or chemical sprays, as these can damage the finish and electronic components.
6. Troubleshooting
| Problem | Possible Cause | Solution |
|---|---|---|
| Lock does not respond to keypad entry. | Low batteries; incorrect code entered; keypad malfunction. | Replace batteries. Re-enter code carefully. Use mechanical key. Contact support if issue persists. |
| Lock beeps 10 times after unlocking. | Low battery warning. | Replace all 4 AAA batteries immediately. |
| Door does not auto-lock. | Passage mode is active; auto-lock feature disabled (if configurable); mechanical obstruction. | Deactivate Passage Mode. Check lock settings (refer to full manual). Ensure door frame is clear. |
| Handle is stiff or difficult to turn. | Improper installation; mechanical issue. | Recheck installation steps, especially the latch and spindle alignment. Ensure no screws are overtightened. |
| Cannot change programming code or add user codes. | Incorrect programming code entered; lock in an error state. | Verify the programming code. Try removing and reinserting batteries to reset. |
7. Specifications

Image: A graphic highlighting the durability features of the HIDALIFE lock, including 250,000 usage cycles, 240-hour salt spray test, Zinc Alloy material, ANSI Grade 2 Latch, and 2000N appearance pressure resistance.
| Brand | HIDALIFE |
| Model Name | HL668 |
| Lock Type | Keypad |
| Special Features | Keyless Entry, Anti-peep password, Touchscreen |
| Material | Zinc Alloy |
| Finish Type | Zinc Alloy Integrated (Matte Black) |
| Dimensions (L x W x H) | 8.3 x 7.7 x 3.8 inches |
| Item Weight | 4.36 pounds |
| Power Source | 4 x AAA Batteries (not included) |
| Door Hole Compatibility | 2-1/8" (54mm) |
| Door Thickness Compatibility | 1-3/8" (35mm) - 2" (50mm) |
| Backset Compatibility | 2-3/8" (60mm) or 2-3/4" (70mm) |
| Usage Cycles | 250,000 |
| Salt Spray Test | 240 Hours |
| ANSI Grade | Grade 2 Latch |
| Appearance Pressure Resistance | 2000N |
8. Warranty and Support
8.1 Warranty Information
Specific warranty details for the HIDALIFE Keyless Entry Door Lock HL668 are typically provided with your purchase documentation or on the manufacturer's official website. Please refer to these resources for information regarding warranty coverage, terms, and conditions.
8.2 Customer Support
If you encounter any issues during installation or operation, or if you require technical assistance, please contact HIDALIFE customer support. Contact information can usually be found on the product packaging, the manufacturer's website, or through your point of purchase.