1. Introduction
Thank you for choosing the Haplized Kitchen Island Cart. This manual provides detailed instructions for the assembly, operation, and maintenance of your new kitchen island. Please read this manual thoroughly before assembly and use to ensure safe and correct operation.
This versatile kitchen island cart features a spacious rubber wood countertop, two storage drawers, a towel rack, a three-tier spice rack, an enclosed cabinet with an adjustable shelf, and smooth-rolling lockable casters for mobility and stability. It is designed to enhance your kitchen's functionality and storage capacity.
2. Safety Information
Please observe the following safety precautions to prevent injury and damage to the product:
- Read all instructions carefully before assembly and use.
- Keep all packaging materials away from children to prevent choking hazards.
- Assemble the unit on a soft, clean surface to prevent scratches.
- Ensure all screws and fasteners are securely tightened before use. Periodically check and re-tighten as needed.
- Do not overload shelves or drawers. Distribute weight evenly.
- Always lock the wheels when the cart is in a stationary position to prevent accidental movement.
- Keep liquids away from electrical outlets integrated into the countertop.
- Do not stand or climb on the unit.
- Use only as intended for kitchen storage and preparation.
3. Package Contents
Before beginning assembly, verify that all parts are present and undamaged. If any parts are missing or damaged, please contact customer support.
- Main Frame Panels (Side panels, back panel, bottom panel)
- Rubber Wood Countertop
- Drop-Leaf Extension Panel
- Drawer Components (Fronts, sides, backs, bottoms)
- Cabinet Door
- Adjustable Shelf
- Towel Rack
- Spice Rack Shelves (3 tiers)
- Wine Glass Holders
- Casters (4, with 2 lockable)
- Power Outlet Unit (if included)
- Hardware Pack (Screws, dowels, cam locks, drawer slides, hinges, handles, etc.)
- Assembly Tools (Hex key, screwdriver - usually not included, but sometimes a basic one is)
4. Assembly Instructions
Assembly typically requires two adults. Follow the numbered steps provided in the separate assembly guide included with your product. The general sequence is as follows:
- Prepare the Workspace: Clear a spacious area and lay out all components and hardware.
- Assemble the Base Frame: Connect the side panels, bottom panel, and back panel using the provided hardware.
- Install Casters: Attach the four casters to the bottom of the assembled base frame. Ensure the two lockable casters are positioned on the front side for easy access.
- Assemble Drawers: Construct the two drawers and install the drawer slides onto both the drawers and the main frame. Insert the drawers into their respective slots.
- Attach Cabinet Door: Install hinges onto the cabinet door and attach it to the main frame.
- Install Shelves and Racks: Place the adjustable shelf inside the cabinet. Attach the towel rack, spice rack shelves, and wine glass holders to their designated positions.
- Mount Countertop: Secure the main rubber wood countertop to the top of the frame.
- Attach Drop-Leaf Extension: Install the drop-leaf extension panel to the side of the main countertop, ensuring the support mechanism functions correctly.
- Install Power Outlet (if applicable): If your model includes a power outlet, carefully install it into the pre-cut opening on the countertop and route the power cord.
- Final Checks: Verify all connections are secure and the unit is stable.

Image 4.1: Fully assembled Haplized Kitchen Island Cart, showcasing its storage features and countertop.

Image 4.2: The kitchen island cart with its drop-leaf extension unfolded, demonstrating its use as an expanded surface.

Image 4.3: Detail of the adjustable open storage rack, showing how shelves can be repositioned.

Image 4.4: The kitchen island cart with its drop-leaf extension folded down, illustrating its compact configuration.
5. Operating Instructions
5.1 Moving the Cart
To move the kitchen island cart, ensure the two lockable casters are in the "UNLOCKED" position. Gently push the cart to your desired location. Once positioned, push the levers on the two lockable casters to the "LOCKED" position to secure the cart and prevent accidental movement.
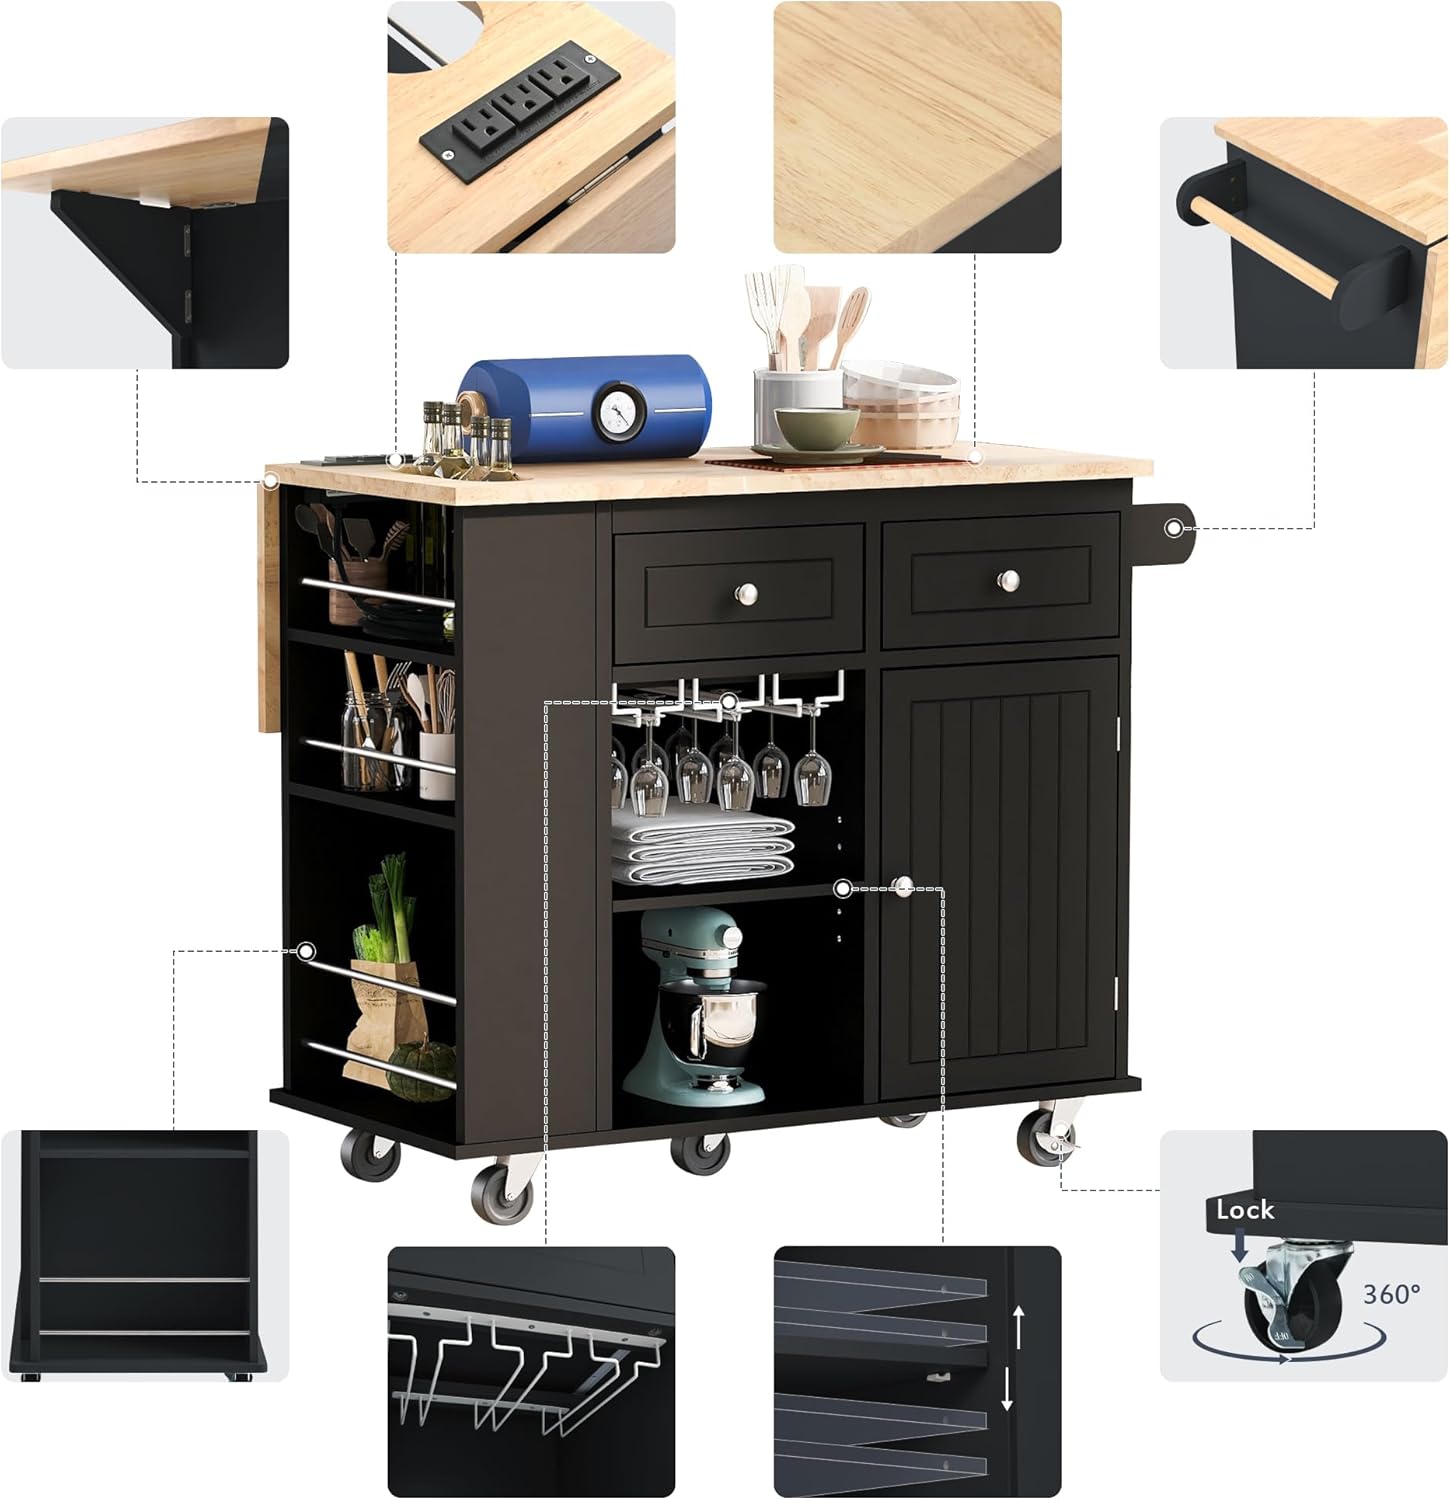
Image 5.1: Detail of a lockable caster, showing the "Lock" and "Unlock" mechanism.
5.2 Using the Drop-Leaf Countertop Extension
The cart features a drop-leaf extension to provide additional workspace or dining area. To extend, lift the drop-leaf panel until it is level with the main countertop and engage the support mechanism underneath. To fold down, disengage the support and gently lower the panel.
5.3 Utilizing Storage Features
- Drawers: Use the two smooth-gliding drawers for storing utensils, cutlery, or other small kitchen items.
- Cabinet: The enclosed cabinet provides discreet storage. The internal shelf is adjustable; reposition it to accommodate items of various heights.
- Spice Rack: The three-tier open spice rack is ideal for organizing spices, oils, or small bottles for easy access.
- Towel Rack: Use the side-mounted towel rack for kitchen towels or cloths.
- Wine Glass Holders: Hang wine glasses upside down in the designated holders for convenient storage and display.
5.4 Power Outlet (if applicable)
If your model includes an integrated power outlet, plug the cart's power cord into a standard wall outlet. You can then use the outlets on the countertop to power small kitchen appliances. Ensure the power cord is not a tripping hazard and avoid exposing the outlets to liquids.

Image 5.2: An exploded view highlighting various features of the kitchen island cart, such as the power outlet, towel rack, and storage options.
6. Maintenance and Care
Proper care will extend the life and appearance of your kitchen island cart.
- Cleaning: Wipe surfaces with a dry, soft cloth. For stubborn stains, a slightly damp cloth followed by immediate drying is recommended. Avoid abrasive cleaners or harsh chemicals.
- Spills: Clean up spills immediately to prevent damage to the wood and engineered wood surfaces.
- Hardware: Periodically check all screws, bolts, and fasteners to ensure they are tight. Re-tighten as necessary to maintain stability.
- Casters: Keep casters free of debris to ensure smooth movement.
- Countertop: The rubber wood countertop is durable but can be damaged by excessive heat or sharp objects. Use cutting boards and trivets as needed.
7. Troubleshooting
If you encounter any issues with your Haplized Kitchen Island Cart, refer to the following common problems and solutions:
| Problem | Possible Cause | Solution |
|---|---|---|
| Cart is wobbly or unstable. | Loose fasteners; uneven floor. | Ensure all screws and bolts are securely tightened. Move the cart to a level surface. |
| Drawers do not slide smoothly. | Drawer slides misaligned; debris in tracks. | Check that drawer slides are correctly installed and aligned. Clean any debris from the tracks. |
| Casters do not roll freely. | Debris caught in wheels; casters locked. | Remove any hair or debris from the caster wheels. Ensure lockable casters are in the "UNLOCKED" position. |
| Drop-leaf panel does not stay up. | Support mechanism not fully engaged. | Ensure the support bracket is fully extended and locked into place under the drop-leaf panel. |
If the problem persists or is not listed here, please contact Haplized customer support for assistance.
8. Specifications
- Model Number: WF305556AAG-AV
- Brand: Haplized
- Product Dimensions (Extended): 40"D x 29.33"W x 33.7"H (101.6cm D x 74.5cm W x 85.6cm H)
- Frame Material: Engineered Wood, Rubberwood, Wood
- Countertop Material: Rubber Wood
- Color: Black
- Shelf Type: Tiered Shelf (Spice Rack), Adjustable Shelf (Cabinet)
- Casters: 4 universal casters, 2 with locking mechanism
- Features: 2 Drawers, 3-Tier Open Spice Rack, Towel Rack, Door Cabinet, Wine Glass Holders, Drop-Leaf Extension, Integrated Power Outlet (model dependent)
- Care Instructions: Wipe with Dry Cloth
- UPC: 650076196635
Image 8.1: Dimensional drawing of the kitchen island cart, showing key measurements and features.
9. Warranty and Support
Haplized stands behind the quality of its products. For specific warranty information, please refer to the warranty card included with your purchase or visit the official Haplized website. If you have any questions, require replacement parts, or need technical assistance, please contact Haplized customer support:
- Website: Visit the Haplized Store on Amazon (for general inquiries and product information)
- Email/Phone: Please refer to your product packaging or the Haplized website for the most current contact information.


