
Introduction
The Celestron StarSense Autoguider is an all-in-one accessory designed to simplify and enhance your telescope experience for both observation and astrophotography. This compact device connects to your Celestron mount to improve pointing accuracy, enable automatic alignment, and facilitate sharp, long-exposure astrophotography. It is suitable for both experienced astrophotographers and beginners.
The StarSense Autoguider features a 4-element optical design by Mark Ackermann, a highly sensitive Sony IMX290-DLL monochrome CMOS image sensor, and an onboard computer. These components work together to provide precise guiding and clear images.

Image: The Celestron StarSense Autoguider, a compact black device with mounting hardware.
What's in the Box
Upon unpacking, please ensure all components are present:
- StarSense Autoguider Unit
- Mounting Hardware

Image: The StarSense Autoguider unit and its included mounting accessories.
Key Features
- StarSense Technology: Utilizes patented StarSense technology for automatic telescope alignment.
- 3-Minute Automatic Alignment: Aligns the telescope to the night sky in approximately three minutes without user intervention.
- Precise GoTo: Enhances mount pointing accuracy, placing celestial objects in the center of the field of view, even with high magnification eyepieces or small photographic sensors.
- Assisted Polar Alignment: Simplifies the polar alignment process for German equatorial mounts, reducing setup time.
- Integrated Autoguiding: Performs minute adjustments to mount tracking, eliminating the need for additional autoguiding accessories during long exposures.
- Advanced Optics: Features a 4-element optical design by Mark Ackermann for high performance.
- Sensitive Sensor: Equipped with a Sony IMX290-DLL monochrome CMOS image sensor.
Setup
- Mounting the Autoguider: Securely attach the StarSense Autoguider to your Celestron telescope mount using the provided mounting hardware. Ensure it is firmly in place to prevent movement during operation.
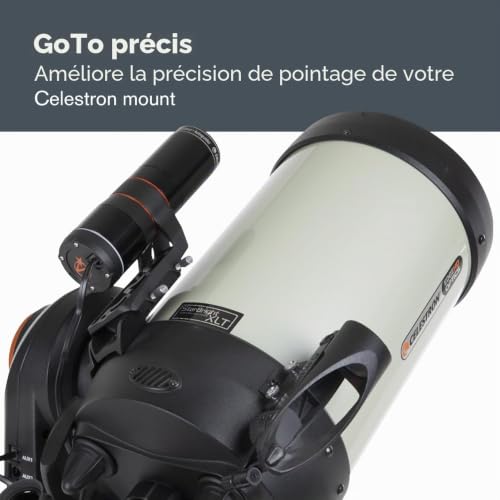
Image: The StarSense Autoguider attached to a Celestron telescope.
- Connecting to the Mount: Connect the Autoguider to your compatible Celestron automated mount. Compatible mounts include Celestron CGX-L, CGX, CGEM II, Advanced VX, CPC GPS XLT, CPC Deluxe HD, NexStar Evolution, and NexStar SE.
- Power On: Ensure your mount and the Autoguider receive power. The Autoguider is battery-powered.
- Firmware Update (Recommended): Before initial use, it is highly recommended to check for and install the latest firmware updates for both your NexStar+ hand controller and the StarSense Autoguider. Use the Celestron Firmware Manager (CFM) for this process. This can resolve potential compatibility issues, especially with CPWI software.
- Initial Alignment: The StarSense Autoguider will automatically align itself with the night sky. This process typically takes about three minutes. The device "sees" constellations and matches them to its internal database to orient the telescope.
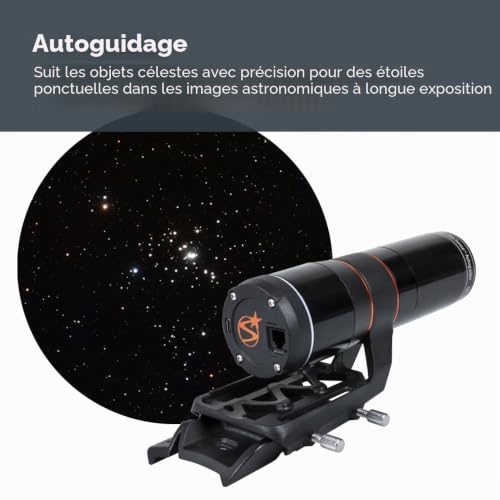
Image: Depiction of the StarSense Autoguider scanning the night sky for automatic alignment.
- Assisted Polar Alignment (Equatorial Mounts): For German equatorial mounts, the Autoguider simplifies polar alignment. Follow the on-screen instructions on your hand controller or CPWI software to complete this process.
Operating Instructions
- Controlling the Autoguider: You can control the StarSense Autoguider using:
- Your NexStar+ hand controller.
- The CPWI telescope control software via a wired PC connection or WiFi.
- Precise GoTo Functionality: Once aligned, use the GoTo function on your hand controller or CPWI software to select celestial objects. The Autoguider's Precise GoTo system will accurately center the object in your eyepiece or camera sensor.
- Autoguiding for Astrophotography: For long-exposure astrophotography, the Autoguider will automatically make tiny adjustments to your mount's tracking to keep your target locked. This eliminates star trailing and ensures sharp images.
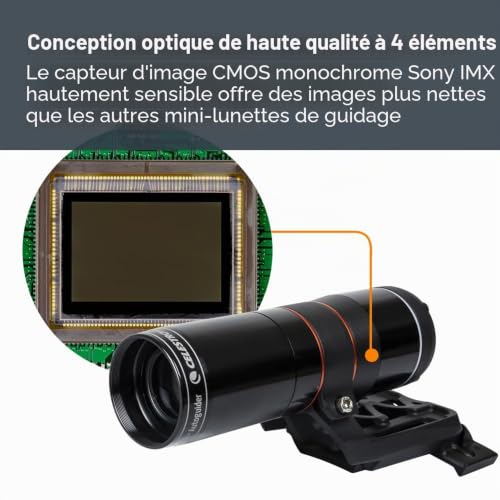
Image: The StarSense Autoguider actively guiding a telescope during an astrophotography session.
- Making Adjustments: When making manual adjustments to the telescope or moving to a new target, remember to temporarily stop the autoguiding function to prevent conflicts with manual inputs.
- Integration with Accessories: The Autoguider is designed to work seamlessly with other Celestron accessories, providing a unified solution for your telescope setup.
Maintenance
- Cleaning: Use a soft, lint-free cloth to gently clean the optical surfaces. Avoid abrasive materials or harsh chemicals. For stubborn spots, a specialized optical cleaning solution can be used sparingly.
- Storage: When not in use, store the Autoguider in a dry, dust-free environment, preferably in its original packaging or a protective case.
- Battery Care: If the unit is battery-powered, ensure batteries are replaced as needed. For rechargeable units, follow manufacturer guidelines for charging and storage to maximize battery life.
- Firmware: Periodically check the Celestron website for new firmware updates to ensure optimal performance and access to new features.
Troubleshooting
| Problem | Possible Cause | Solution |
|---|---|---|
| Autoguider not aligning automatically. | Insufficient clear sky view; firmware outdated; connection issue. | Ensure a wide, unobstructed view of the sky. Check all cable connections. Update firmware for both the Autoguider and NexStar+ hand controller. |
| Issues when using with CPWI software. | Firmware incompatibility; software conflict. | Ensure all firmware is up-to-date. Some users report better performance without CPWI for certain setups; try controlling via NexStar+ hand controller directly if CPWI issues persist. Verify USB cable integrity. |
| Poor guiding performance or star trailing. | Improper polar alignment; mount balance issues; environmental factors (wind). | Perform a precise polar alignment. Ensure your telescope mount is properly balanced. Minimize external vibrations. |
| Autoguider not recognized by mount/hand controller. | Loose connection; power issue; firmware mismatch. | Check all cables and ensure they are securely connected. Verify power supply to both the Autoguider and the mount. Update firmware. |
Specifications
- Brand: Celestron
- Model Name: 94008
- Product Dimensions (L x W x H): 21.6 x 7.6 x 10.2 centimeters
- Focus Type: Manual Focus
- Power Source: Battery Powered
- Finderscope: Reflex
- Lens Coating Description: StarBright XLT
- Objective Lens Diameter: 40 millimeters
- Zoom Ratio: 40
- Compatible Devices: Celestron Mounts (CGX-L, CGX, CGEM II, Advanced VX, CPC GPS XLT, CPC Deluxe HD, NexStar Evolution, NexStar SE), NexStar+ Hand Controller, CPWI Telescope Control Software, other Celestron accessories.
- GTIN/UPC: 050234940085
Warranty and Support
The Celestron 94008 StarSense Autoguider comes with a 2-year warranty. For warranty claims or technical support, please contact Celestron customer service directly.
Additional resources, including the official user manual (PDF), may be available on the Celestron website or via the following link:Official User Manual (PDF)
For the latest software and firmware updates, visit the official Celestron support page.
Important Note on Videos
While a video thumbnail was identified, the necessary video source URL (e.g., m3u8 format) and creator information (e.g., "creator_type":"Seller") were not provided in the product data. Therefore, no official product video could be embedded in this manual. Please refer to the manufacturer's website for any available video tutorials or demonstrations.


