1. Product Overview
The Vikye B250B4 is an M-ATX desktop motherboard designed to support Intel LGA 1151 socket processors, including 6th, 7th, 8th, and 9th generation Core i3, i5, i7, Celeron, and Pentium CPUs. It features dual-channel DDR4 memory support, a PCIe X16 Gen 3.0 slot for graphics cards, and an NVMe M.2 slot for high-speed storage.

Top-down view of the Vikye B250B4 motherboard, showcasing the LGA 1151 CPU socket, DDR4 RAM slots, PCIe X16 slot, and M.2 interface.

Angled view of the Vikye B250B4 motherboard, highlighting its M-ATX form factor and compatibility with Intel 6th, 7th, 8th, and 9th generation Core i3, i5, i7, Celeron, and Pentium processors.
2. Setup Guide
2.1 Unpacking
Carefully remove the motherboard from its packaging. Ensure all accessories, including the I/O shield and SATA cable, are present.
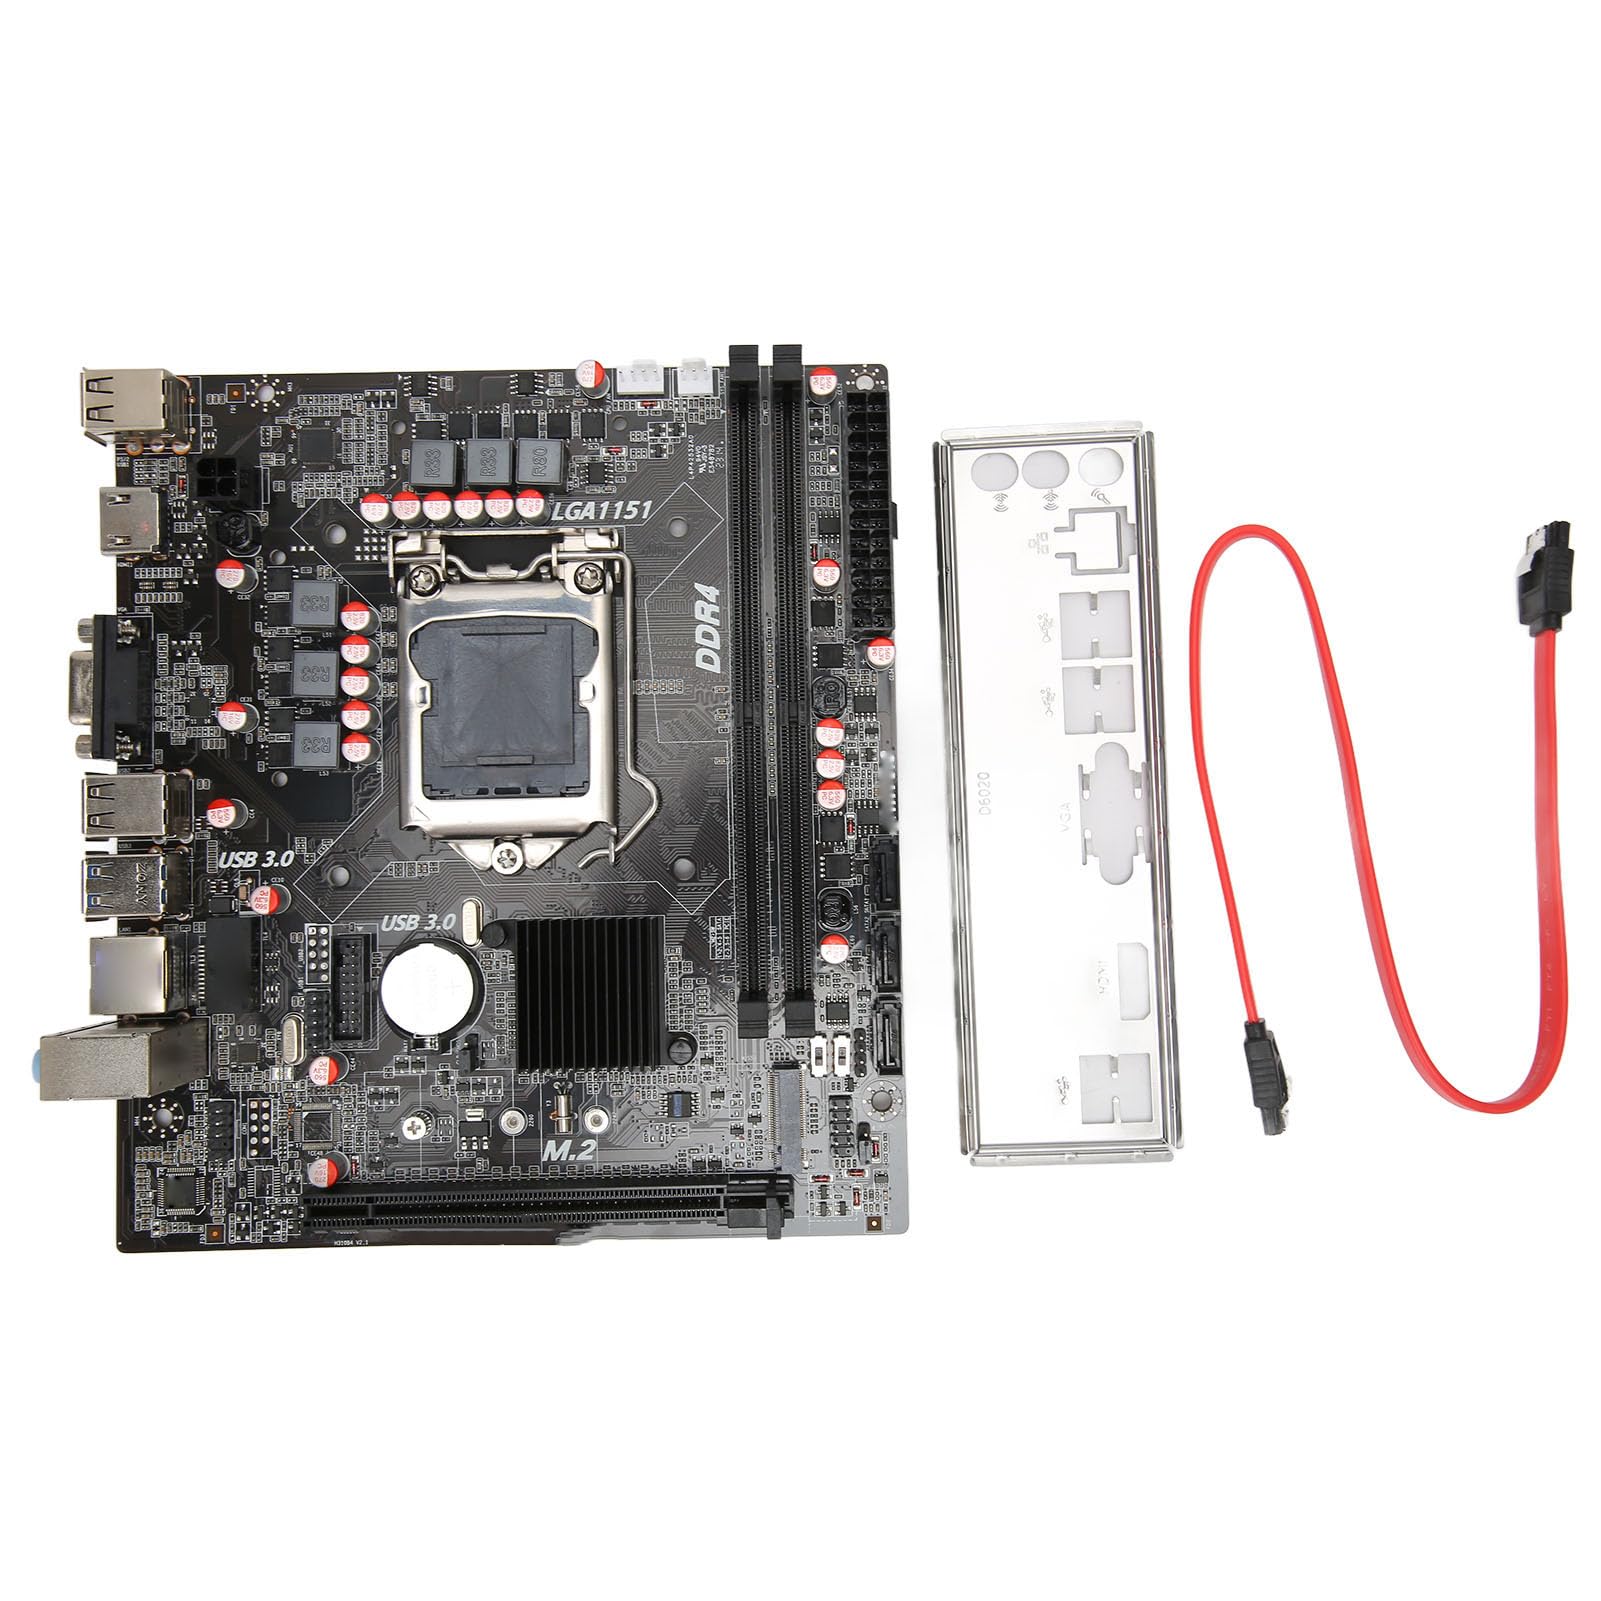
Contents of the motherboard package, including the Vikye B250B4 motherboard, an I/O shield, and a SATA data cable.
2.2 Component Installation
- CPU Installation: Open the LGA 1151 socket lever. Align the CPU's golden triangle with the triangle mark on the socket. Gently place the CPU into the socket without force. Close the lever to secure the CPU.
- CPU Cooler Installation: Install the compatible CPU cooler according to its manufacturer's instructions.
- RAM Installation: Open the clips on the DDR4 memory slots. Align the notch on the RAM module with the key in the slot. Press down firmly on both ends of the module until the clips snap into place. For dual-channel performance, install modules in matching slots (e.g., A1 and B1).
- M.2 SSD Installation: Insert the M.2 SSD into the M.2 slot at an angle. Push it down and secure it with the provided screw. This slot supports NGFF and NVMe protocols.
- Graphics Card Installation: Insert your PCI-E X16 graphics card into the designated slot. Ensure it is fully seated and secure it with a screw to the chassis.
- SATA Device Connection: Connect your SATA hard drives or SSDs to the SATA3.0 ports using SATA data cables.

Detailed diagram of the Vikye B250B4 motherboard, labeling all major ports and connectors including 24-pin and 4-pin power, DDR4 slots, SATA3.0 ports, PCIe X16, M.2 interface, USB 2.0, USB 3.0, VGA, LAN, Audio, and front panel headers.
2.3 Power and Peripheral Connections
- Power Supply: Connect the 24-pin ATX power connector and the 4-pin CPU power connector from your power supply to the corresponding ports on the motherboard.
- Front Panel Connectors: Connect the power button, reset button, power LED, and HDD LED cables from your PC case to the front panel header pins on the motherboard. Refer to the motherboard diagram for correct pin alignment.
- USB and Audio: Connect the front panel USB 2.0, USB 3.0, and audio headers from your PC case to the respective pins on the motherboard.
- Rear I/O Connections: Connect your monitor to the graphics card (or integrated graphics via VGA/HD Multimedia Interface if no discrete GPU is used), keyboard, mouse, and other USB devices to the rear USB ports. Connect your network cable to the LAN port and speakers/headphones to the audio jacks.

Rear I/O panel view of the Vikye B250B4 motherboard, displaying the available USB ports, VGA, LAN, and audio jacks.
3. Operating Instructions
3.1 Initial Boot and BIOS/UEFI Setup
- After assembling all components, power on your system.
- During startup, press the designated key (usually DEL or F2) repeatedly to enter the BIOS/UEFI setup utility.
- In the BIOS/UEFI, you can configure boot order, system time, CPU settings, memory settings, and other hardware parameters. Save changes and exit.
3.2 Driver and Operating System Installation
- Insert your operating system installation media (USB drive or DVD).
- Follow the on-screen prompts to install your preferred operating system (e.g., Windows 10).
- After OS installation, install the necessary drivers for the motherboard chipset, LAN, audio, and any discrete graphics cards. These drivers are typically available on the manufacturer's website or included with the motherboard.
4. Maintenance
4.1 Cleaning
Regularly clean your computer's interior to prevent dust buildup, which can lead to overheating and component failure. Use compressed air to remove dust from the motherboard, CPU cooler, and case fans. Ensure the system is powered off and unplugged before cleaning.
4.2 BIOS/UEFI Updates
Periodically check the manufacturer's website for BIOS/UEFI updates. Updates can improve system stability, add support for new hardware, or fix bugs. Follow the update instructions carefully to avoid damaging the motherboard.
5. Troubleshooting
5.1 System Does Not Power On
If the system fan and Q-LED/Q-CODE indicator do not respond when the power button is pressed, follow these steps:
- Confirm that the power adapter is correctly plugged into the 24-pin ATX power connector and the 4-pin CPU power connector on the motherboard.
- Keep only the CPU, CPU cooler fan, and one RAM module installed on the motherboard. Remove all other peripherals and external cards, including mouse, keyboard, card reader, flash drive, external hard drive, external PCI-E cards, etc.
- Remove all cables from the motherboard, including network cables, audio cables, and display cables (HD Multimedia Interface, VGA, DVI, DP).
- Attempt to power on the computer. If it starts normally, the issue may be related to one of the removed components or cables. Reintroduce them one by one to identify the faulty component.
6. Specifications
| Feature | Specification |
|---|---|
| Model | B250B4 |
| Motherboard Size | Approx. 190 x 170 mm (M-ATX) |
| CPU Socket Type | LGA 1151 (Supports Intel 6th, 7th, 8th, 9th Gen Core i3/i5/i7, Celeron, Pentium) |
| Network Card | 100 Megabit Network Card |
| Graphics Card Slot | PCIe X16 Gen 3.0 |
| Memory Type Supported | 2 x DDR4 (Dual Channel) |
| Maximum Memory Capacity | 32 GB (16 GB x 2) |
| Memory Clock Speed | 667 MHz (Note: Actual speed depends on CPU and RAM modules) |
| SATA Interface | SATA3.0 x 3 |
| USB Interface (Rear) | USB3.0 x 2, USB2.0 x 4 |
| USB Interface (Front Pins) | USB2.0 x 1, USB3.0 x 1 |
| Power Interface | 24 + 4 pin (Six-phase power supply) |
| Expansion Interface | HD Multimedia Interface x 1, VGA x 1, M.2 Interface (NGFF, NVMe protocol support) |
| Battery Type | CR2032 Button Cell (Integrated) |
| Battery Capacity | 240 mA |
| Platform | Windows 10 |
| Item Model Number | Vikyetkdwfr948i |

Image of the motherboard with dimensions, showing its approximate size of 190mm x 170mm (7.48 inches x 6.69 inches), confirming its M-ATX form factor.
7. Warranty Information
This Vikye motherboard comes with a 1 Year Warranty Against Manufacturer Defects. Please retain your proof of purchase for warranty claims. For specific terms and conditions, refer to the warranty documentation provided with your product or contact Vikye customer support.
8. Support
For further assistance, technical support, or to explore other Vikye products, please visit the official Vikye store: