1. Product Overview
The HALO LCR 2-inch Regressed Canless LED Downlight offers a sleek, recessed lighting solution without the need for traditional can housings. This versatile LED downlight is suitable for both indoor and covered outdoor spaces, featuring selectable color temperatures and dimmable functionality.
Key Features:
- Canless design for easy installation.
- 6 selectable color temperatures (2700K-6500K).
- Dimmable down to 5% with most dimmers (0-10V and phase-cut).
- IC-rated for direct contact with insulation.
- Wet location listed for use in showers and covered outdoor areas.
- ENERGY STAR certified with a 50,000-hour lifespan.
2. Important Safety Instructions
Read all instructions carefully before installation. Failure to follow these instructions may result in electric shock, fire, or other hazards.
- WARNING: Risk of electric shock. Disconnect power at the fuse or circuit breaker before installation or servicing.
- Installation must be performed by a qualified electrician in accordance with national and local electrical codes.
- Do not install in areas with direct exposure to water spray unless specifically rated for such conditions.
- Ensure all electrical connections are secure and properly insulated.
- Do not modify the fixture or its components.
- This device is not intended for use with emergency exits.
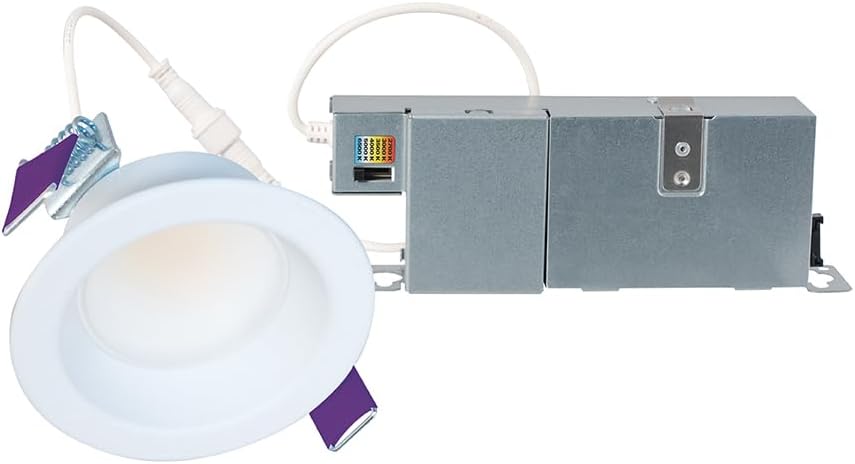
3. Package Contents
Verify that all components are present before beginning installation:
- HALO LCR 2-inch Regressed Canless LED Downlight
- Remote Driver/Junction Box
- Installation Hardware (e.g., spring clips, wire connectors)
4. Setup and Installation
The HALO LCR downlight is designed for easy installation in drywall or suspended ceilings without the need for a recessed housing or J-box.
Tools Required (suggested):
- Hole Saw (2.75 inches / 7 cm diameter)
- Screwdriver
- Wire Strippers
- Measuring Tape
- Safety Glasses
Step-by-Step Installation:
- Turn off power: Ensure power to the installation area is disconnected at the circuit breaker.
- Cut ceiling hole: Use a 2.75-inch (7 cm) hole saw to cut a circular opening in the ceiling at the desired location.
- Wire the junction box: Open the remote driver/junction box. Connect the building's electrical supply wires (hot, neutral, ground) to the corresponding wires inside the junction box using appropriate wire connectors. Secure the junction box to a ceiling joist or other structural element if required by local codes, or simply place it through the ceiling hole.
- Select Color Temperature (CCT): Before inserting the light fixture, locate the CCT selection switch on the remote driver/junction box. Choose your desired color temperature (2700K, 3000K, 3500K, 4000K, 5000K, or 6500K).
- Connect fixture to driver: Plug the connector from the downlight fixture into the corresponding receptacle on the remote driver/junction box.
- Insert fixture: Gently push the spring clips on the sides of the downlight fixture upwards and insert the fixture into the ceiling hole. The spring clips will secure the fixture in place.
- Restore power: Turn the power back on at the circuit breaker.


5. Operating Instructions
Color Temperature Selection (CCT)
The HALO LCR downlight features a selectable color temperature switch located on the remote driver/junction box. This switch allows you to choose from six different color temperatures: 2700K (Soft White), 3000K, 3500K, 4000K, 5000K, and 6500K (Daylight). Make your selection before the final installation of the fixture into the ceiling.
Dimming
This downlight is compatible with most standard dimmers, supporting both 0-10V and phase-cut dimming systems. It can be dimmed smoothly down to 5% of its full brightness. Ensure your dimmer switch is compatible with LED lighting for optimal performance.
6. Care and Maintenance
The HALO LCR LED Downlight is designed for long-term, maintenance-free operation with a rated lifespan of 50,000 hours, eliminating the need for bulb changes.
- To clean the fixture, ensure power is off and wipe gently with a soft, dry or slightly damp cloth. Do not use abrasive cleaners or solvents.
- Regularly inspect the fixture for any signs of damage or loose connections.
7. Troubleshooting Guide
If the downlight is not functioning correctly, refer to the following common issues and solutions:
| Problem | Possible Cause | Solution |
|---|---|---|
| Light does not turn on | No power to the fixture | Check circuit breaker and wall switch. Ensure all wiring connections in the junction box are secure. |
| Light flickers or dims erratically | Incompatible dimmer switch or loose wiring | Ensure your dimmer is compatible with LED lighting. Check wiring connections. |
| Incorrect color temperature | CCT switch set incorrectly | Access the remote driver/junction box and adjust the CCT selection switch to the desired setting. |
| Light is too dim or too bright | Dimmer setting or CCT selection | Adjust the dimmer switch. Consider if a different CCT setting might appear brighter or dimmer to the eye. |
If issues persist, contact HALO customer support.
8. Product Specifications
| Feature | Detail |
|---|---|
| Model | LCR208RD9FSE020 |
| Brand | HALO |
| Size | 2 Inch |
| Wattage | 9.26 watts |
| Brightness | 800 Lumens |
| Color Temperature (CCT) | 6 Selectable (2700K, 3000K, 3500K, 4000K, 5000K, 6500K) |
| Dimmability | Yes, down to 5% (0-10V and Phase-Cut) |
| Voltage | 120 Volts |
| Material | Aluminum, Acrylic (Shade) |
| Finish | Smooth White |
| Product Dimensions | 3.51"L x 3.51"W x 2.24"H |
| Item Weight | 1.06 pounds |
| Indoor/Outdoor Usage | Indoor, Covered Outdoor |
| Certifications | IC Rated, Wet Location Listed, ENERGY STAR |
| Lifespan | 50,000 hours |
| UPC | 080083259144 |

9. Warranty and Support
The HALO LCR 2-inch Regressed Canless LED Downlight is backed by a 5-year limited warranty. This warranty covers defects in materials and workmanship under normal use.
Customer Support
For technical assistance, warranty claims, or further information, please contact HALO customer service. HALO products are designed, tested, and supported in the USA.
Visit the official HALO store for more products and information: HALO Store


