1. Introduction
Thank you for purchasing the TECHMADE Digital Alarm Clock with Wireless Charging. This device is designed to provide a convenient and modern solution for timekeeping, alarm functions, and smartphone charging. Please read this manual carefully before use to ensure proper operation and to maximize the product's lifespan.
2. Package Contents
Please check the package for the following items:
- TECHMADE Digital Alarm Clock with Wireless Charging (Model: W258)
- USB Power Cable
- User Manual

Image: The retail packaging of the TECHMADE Digital Alarm Clock, showing the product and its key features on the box.
3. Product Overview
Familiarize yourself with the components and controls of your new alarm clock.
Front View

Image: Front view of the TECHMADE Digital Alarm Clock, displaying the time and temperature on its LED screen. A smartphone is placed on top, indicating wireless charging.
Top View and Controls

Image: Top view of the TECHMADE Digital Alarm Clock, highlighting the wireless charging pad and control buttons for power, mode, and settings.
- LED Display: Shows time, temperature, and alarm indicators.
- Wireless Charging Pad: Located on the top surface for compatible smartphones.
- Control Buttons: (Refer to diagram on top of device for specific labels) Typically include Power/Brightness, Mode, and Up/Down buttons for setting time and alarms.
4. Setup
4.1 Power Connection
- Connect the provided USB power cable to the power input port on the back of the alarm clock.
- Plug the other end of the USB cable into a compatible USB power adapter (not included) or a powered USB port.
- The display will light up, indicating the device is powered on.
4.2 Initial Time and Date Setting
Upon first power-on or after a power interruption, you may need to set the correct time and date. Refer to the 'Operating Instructions' section for detailed steps on setting time and date.
5. Operating Instructions
5.1 Setting Time and Date
- Press the 'Mode' button to cycle through time, date, and alarm settings.
- When the time display is flashing, use the 'Up' and 'Down' buttons to adjust the hours and minutes. Press 'Mode' again to confirm each setting.
- Repeat the process for setting the year, month, and day.
- To switch between 12-hour and 24-hour format, press the 'Up' button while the time is displayed.
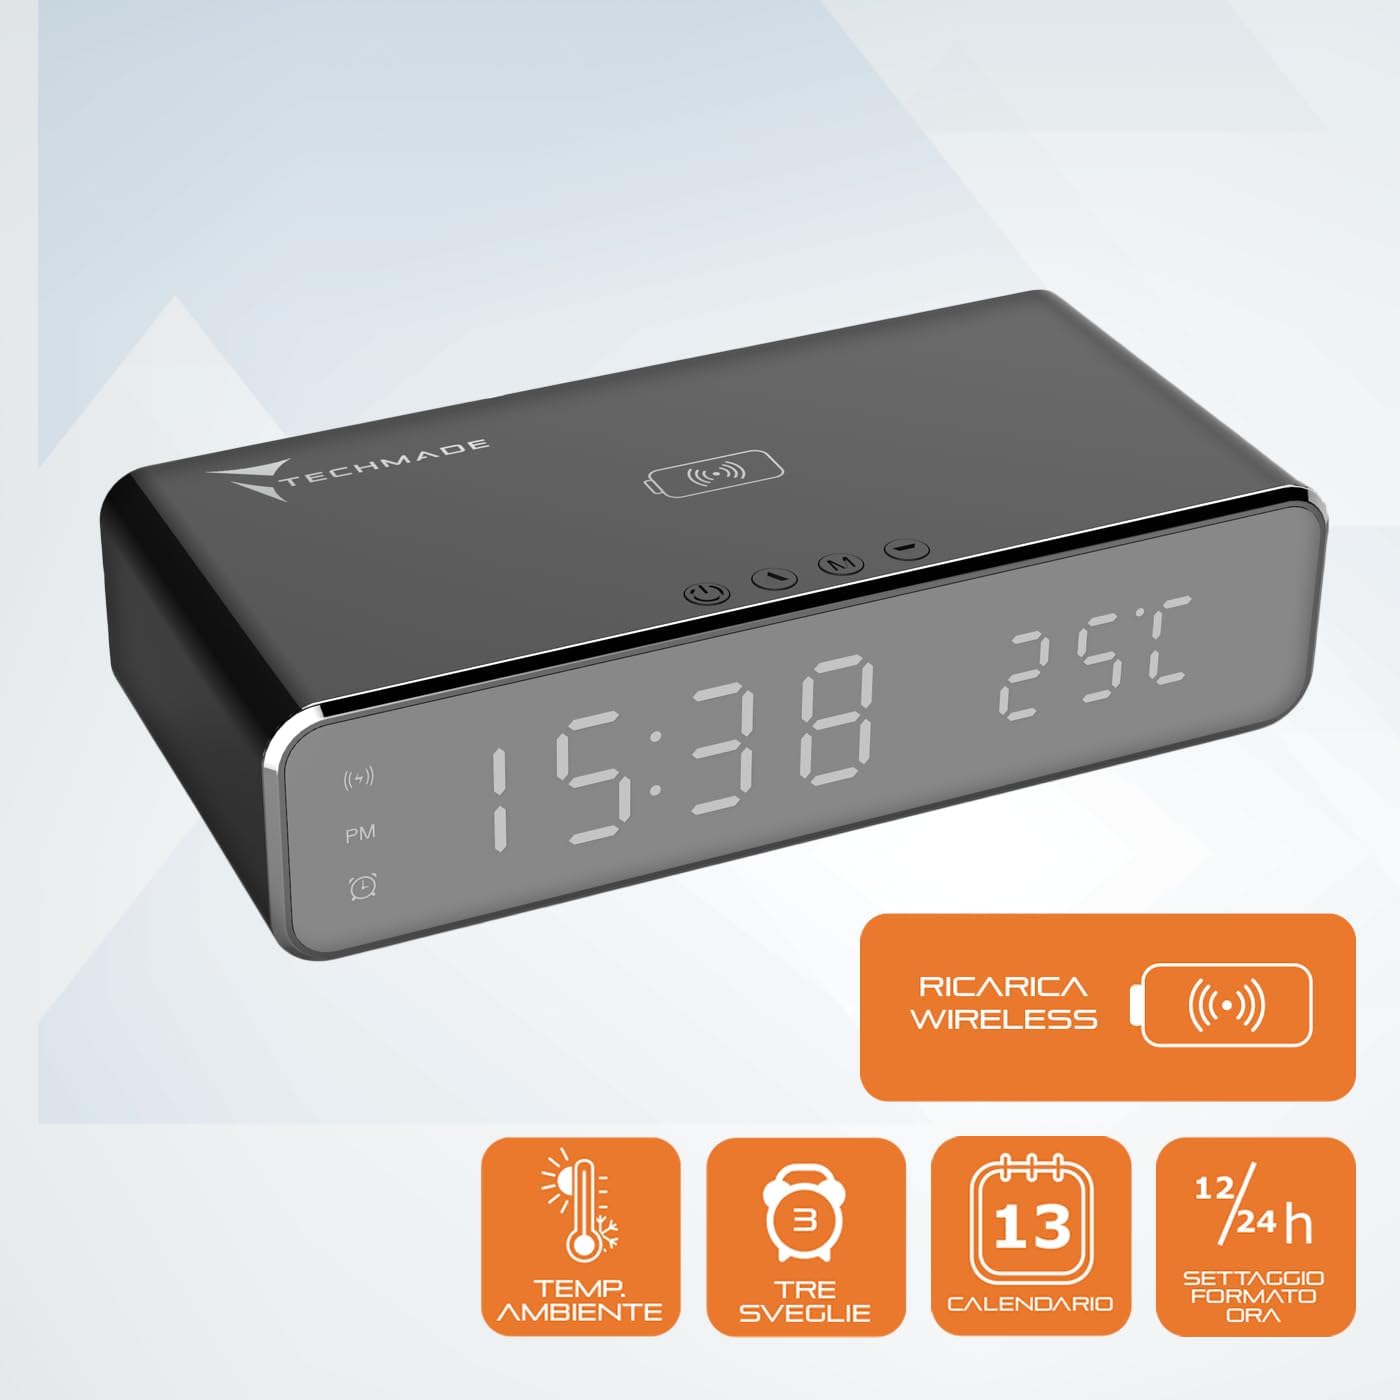
Image: The digital display of the alarm clock showing the current time and ambient temperature, along with icons indicating various features like wireless charging and alarm settings.
5.2 Setting Alarms (Up to 3)
- Press the 'Mode' button until 'AL1', 'AL2', or 'AL3' appears on the display.
- Press and hold the 'Mode' button until the alarm time starts flashing.
- Use the 'Up' and 'Down' buttons to set the desired alarm hour and minute. Press 'Mode' to confirm each.
- After setting the time, you can enable or disable the alarm by pressing the 'Up' or 'Down' button. An alarm icon will appear on the display when activated.
5.3 Snooze Function
When the alarm sounds, press any button (except the 'Power' button to turn off the alarm completely) to activate the snooze function. The alarm will temporarily stop and sound again after a few minutes (default snooze time is usually 5-9 minutes, refer to product specifications for exact duration).
5.4 Adjusting LED Display Brightness and Night Light
The LED display brightness can be adjusted to suit your preference, especially for night use. The integrated night light provides a soft glow.

Image: The TECHMADE Digital Alarm Clock placed on a nightstand in a dimly lit room, demonstrating its night light feature and subtle display illumination for a comfortable sleep environment.
- Press the 'Power/Brightness' button to cycle through different brightness levels for the LED display.
- Some models may have a dedicated night mode that automatically dims the display during specific hours or allows the display to be turned off completely for undisturbed sleep. Consult the specific button functions on your device.
5.5 Wireless Charging
The alarm clock features a wireless charging pad compatible with Qi-enabled smartphones.

Image: A smartphone is placed on top of the TECHMADE Digital Alarm Clock, showing a charging icon on its screen, indicating active wireless charging.
- Place your Qi-enabled smartphone directly onto the wireless charging pad located on the top surface of the alarm clock.
- Ensure the phone is centered on the charging pad for optimal connection.
- A charging indicator (e.g., a lightning bolt icon or battery icon) will appear on your phone's screen and/or the alarm clock's display to confirm charging has begun.
- Remove your phone once fully charged.
Note: Wireless charging efficiency may vary depending on phone model, case thickness, and placement. Avoid placing metal objects or cards with magnetic strips on the charging pad.
5.6 Temperature Display
The alarm clock displays the ambient room temperature. This feature is automatic and does not require manual setting.
6. Maintenance
- Cleaning: Wipe the device with a soft, dry cloth. Do not use abrasive cleaners, solvents, or strong chemicals, as they may damage the surface.
- Storage: If not in use for an extended period, disconnect the power cable and store the device in a cool, dry place.
- Handling: Handle the device with care. Avoid dropping it or exposing it to excessive force, moisture, or extreme temperatures.
7. Troubleshooting
| Problem | Possible Cause | Solution |
|---|---|---|
| Display is off or not working. | No power; Power cable loose; Display brightness set to minimum/off. | Ensure power cable is securely connected. Check power source. Press the 'Power/Brightness' button to adjust brightness. |
| Wireless charging not working. | Phone not Qi-enabled; Phone not centered; Phone case too thick; Metal objects on pad. | Ensure phone supports Qi wireless charging. Reposition phone. Remove thick cases or metal objects. |
| Alarm not sounding. | Alarm not activated; Volume too low. | Ensure alarm is set and activated (alarm icon visible). Check if there's a volume setting (if applicable). |
| Incorrect time/date. | Time/date not set correctly; Power interruption. | Follow instructions in 'Setting Time and Date' to reset. |
8. Specifications
| Feature | Detail |
|---|---|
| Brand | Techmade |
| Model Number | W258 |
| Color | Black |
| Product Dimensions | 19 x 3.81 x 4 cm |
| Item Weight | 300 g |
| Display Type | Digital LED |
| Power Source | Battery Powered (likely USB-powered with battery backup) |
| Special Features | Alarm, Timer, Wireless Charging, Adjustable LED Display, Night Light, Temperature Display |
| Alarm Groups | Up to 3 |
| Time Format | 12/24 Hour selectable |
9. Warranty and Support
For warranty information and customer support, please refer to the documentation provided with your purchase or contact the retailer/manufacturer directly. Keep your proof of purchase for any warranty claims.


