1. Introduction
This manual provides essential instructions for the safe and efficient operation, setup, maintenance, and troubleshooting of your Smartstitch S-1501 Commercial Embroidery Machine. Designed for professional use, this machine features 15 needles, a large 14"x20" embroidery area, a maximum speed of 1200 stitches per minute (SPM), a 12" touch screen, Wi-Fi connectivity, a 270-degree wide-angle cap system, laser positioning, automatic color change, and a smart control system. Please read this manual thoroughly before operating the machine.
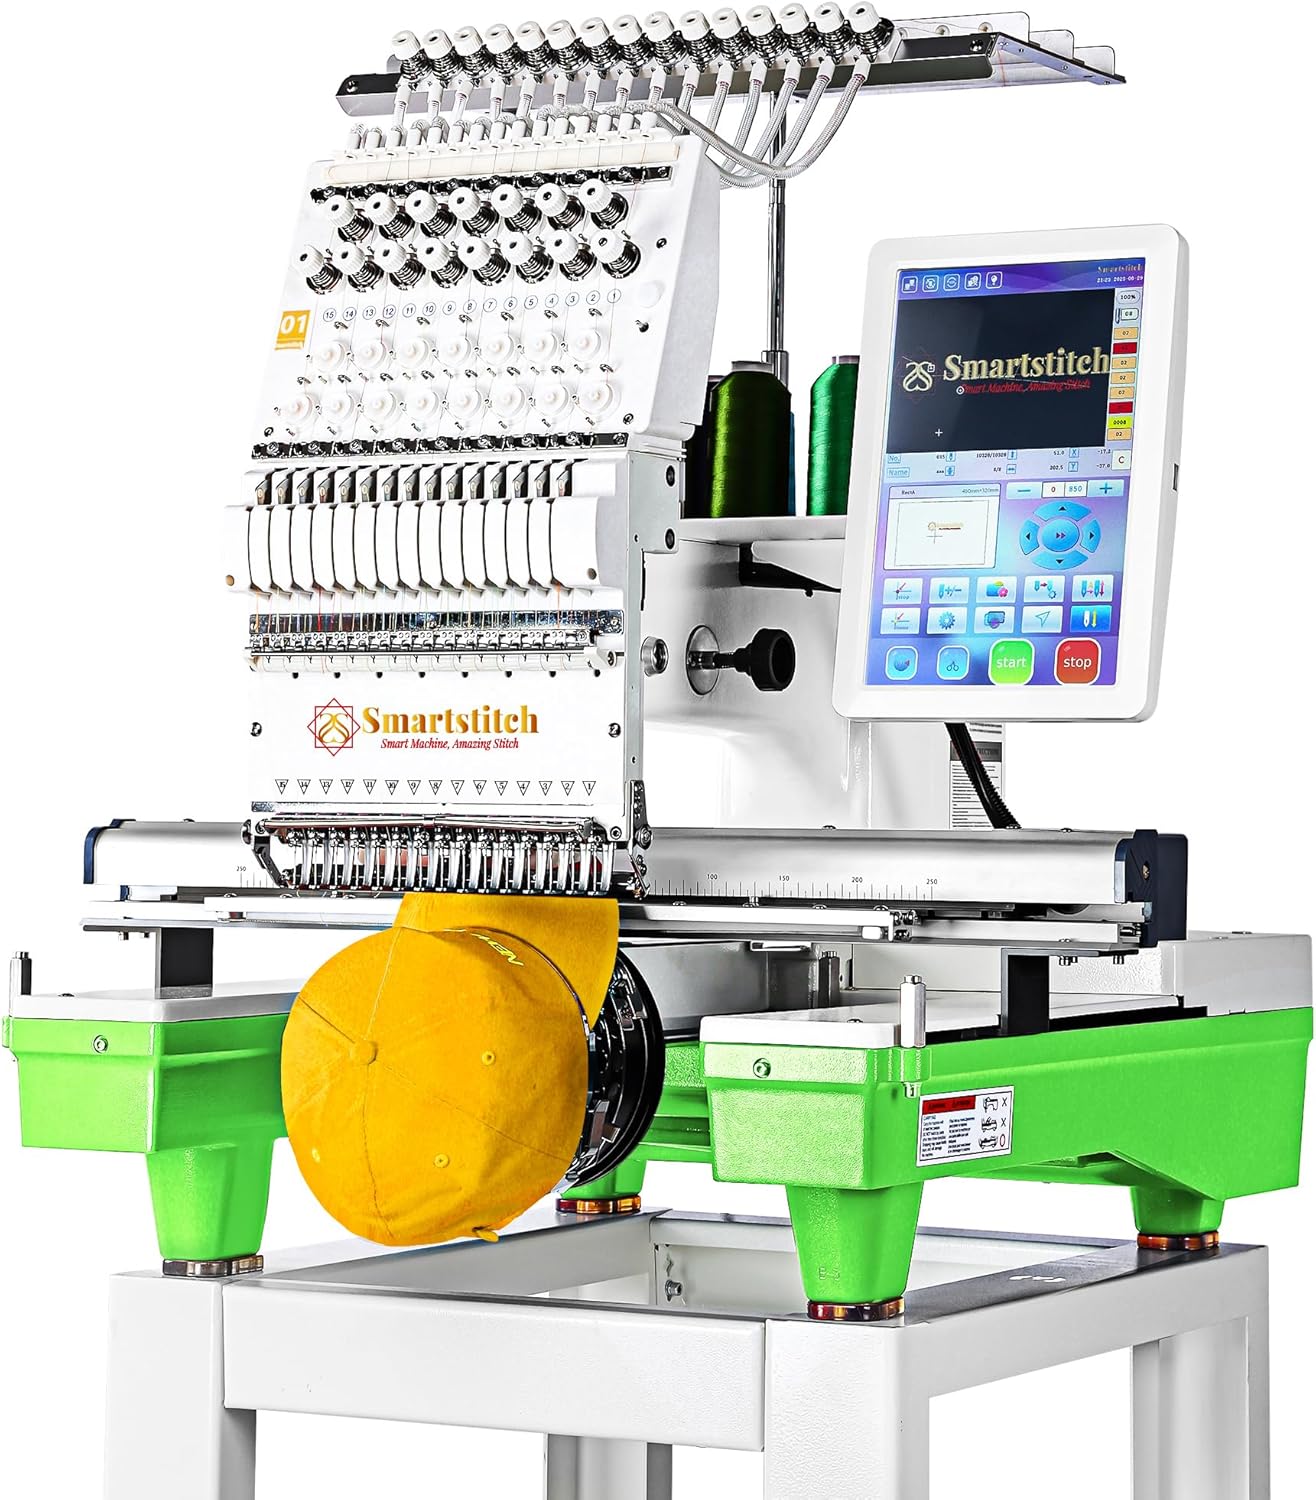
Figure 1: Smartstitch S-1501 Commercial Embroidery Machine
2. Safety Instructions
Always observe the following safety precautions to prevent injury or damage to the machine:
- Ensure the machine is placed on a stable, level surface capable of supporting its weight (approximately 209 lbs).
- Keep hands and loose clothing away from moving parts, especially needles and the embroidery head, during operation.
- Disconnect power before performing any maintenance, cleaning, or when the machine is not in use.
- Do not operate the machine in wet or damp conditions.
- Use only approved accessories and replacement parts.
- Keep children and pets away from the machine during operation.
3. Package Contents
Your Smartstitch S-1501 machine package includes the following items:
- Smartstitch S-1501 Embroidery Machine
- Flat Embroidery Accessories: Flat Embroidery Table, Aluminum Frame (19.7"x13.8"), Fixed Aluminium Bars.
- Cap Embroidery System: Cap Drive with Shaft, Cap Hoop, Cap Stand (270-degree wide angle).
- Hoop Sets: Two sets of various sized hoops for T-shirt and flat embroidery (e.g., 18.9"x12.6", 10.2"x10.2", 6.3", 4.7", 3.9", 2.4" armrests).
- Other Accessories: Rolling Stand, Tool Box (with maintenance tools), Bobbin Winder, Operation Manual, Starter Kit (machine embroidery threads, stabilizers, bobbin threads).

Figure 2: Overview of included accessories
4. Setup
The Smartstitch S-1501 is a heavy machine (209 lbs). It is highly recommended that two people assist with unpacking and assembly to prevent injury or damage.
4.1 Unboxing and Assembly
- Prepare the Area: Choose a spacious, stable location for assembly.
- Remove Top Board: Carefully remove the buckles on the top of the wooden crate in sequence using a screwdriver. Lift the top wooden board away.
- Remove Accessories: Take out the flat embroidery working table, operation manual, tool box, three support beams, one shelf, and two support stands.
- Remove Side Boards: Remove the buckles from the front, left, and right wooden boards in sequence. Carefully remove each board.
- Remove Remaining Accessories: Take out the oval hoop with trial work, the first hoop set, and the aluminum frame.
- Remove Rear Board: Remove the buckles from the rear board and take it away.
- Uncover Machine: Carefully remove the plastic bag covering the machine.
- Secure Machine to Stand: The machine is bolted down into the pallet underneath with two screws. Use the 10mm Allen wrench from the accessory case to remove these bolts in a counter-clockwise direction, one by one.
- Position Machine: With assistance, carefully lift the machine onto the rolling stand.
Video 1: Smartstitch S-1501 Embroidery Machine Unboxing and Initial Setup. This video demonstrates the careful process of unpacking the machine from its wooden crate and preparing it for assembly.
4.2 Threading the Machine
Refer to the operation manual for detailed threading instructions for each of the 15 needles. Proper threading is crucial for optimal stitch quality and to avoid thread breaks.

Figure 3: The 12" Touch Screen provides a Fast Operation Guide for quick reference.
5. Operating Instructions
The Smartstitch S-1501 features a 12" touch screen with an updated and advanced computer system for intuitive operation.
5.1 Basic Embroidery Process
- Choose Pattern: Select your desired embroidery design from the machine's memory or load it via USB/Wi-Fi (DST/DSB files supported).
- Choose Frame: Select the appropriate hoop size and type (e.g., cap, flat, T-shirt) for your project and attach it to the machine.
- Color Sequence: Define the color sequence for your design using the touch screen interface. The machine supports automatic color change.
- Start Embroidery: Confirm settings and initiate the embroidery process.

Figure 4: Step-by-step embroidery workflow on the touch screen.
5.2 Advanced Features
- Laser Positioning: Utilize the laser positioning system for precise design placement.
- Wi-Fi Connectivity: Transfer designs from your computer to the machine wirelessly.
- 270 Wide Angle Cap System: Specialized system for embroidering on 3D caps.
- Smart Control System: Ensures high-precision stitching and quality.

Figure 5: The machine is capable of embroidering on various materials including denim, canvas, leather, vinyl, 3D caps, and T-shirts.

Figure 6: Workflow for 3D Cap Embroidery.

Figure 7: The Repeat Embroidery function allows for efficient production of multiple identical designs.
6. Maintenance
Regular maintenance ensures the longevity and optimal performance of your embroidery machine.
- Cleaning: Regularly clean the machine, especially around the needle area, bobbin case, and tension discs, to remove lint and thread debris.
- Lubrication: Follow the lubrication schedule outlined in the detailed operation manual. Use only recommended lubricants.
- Needle Replacement: Replace needles regularly, especially if they become dull or bent, to maintain stitch quality and prevent fabric damage.
- Tool Box: The included tool box contains various tools necessary for routine maintenance and minor adjustments.
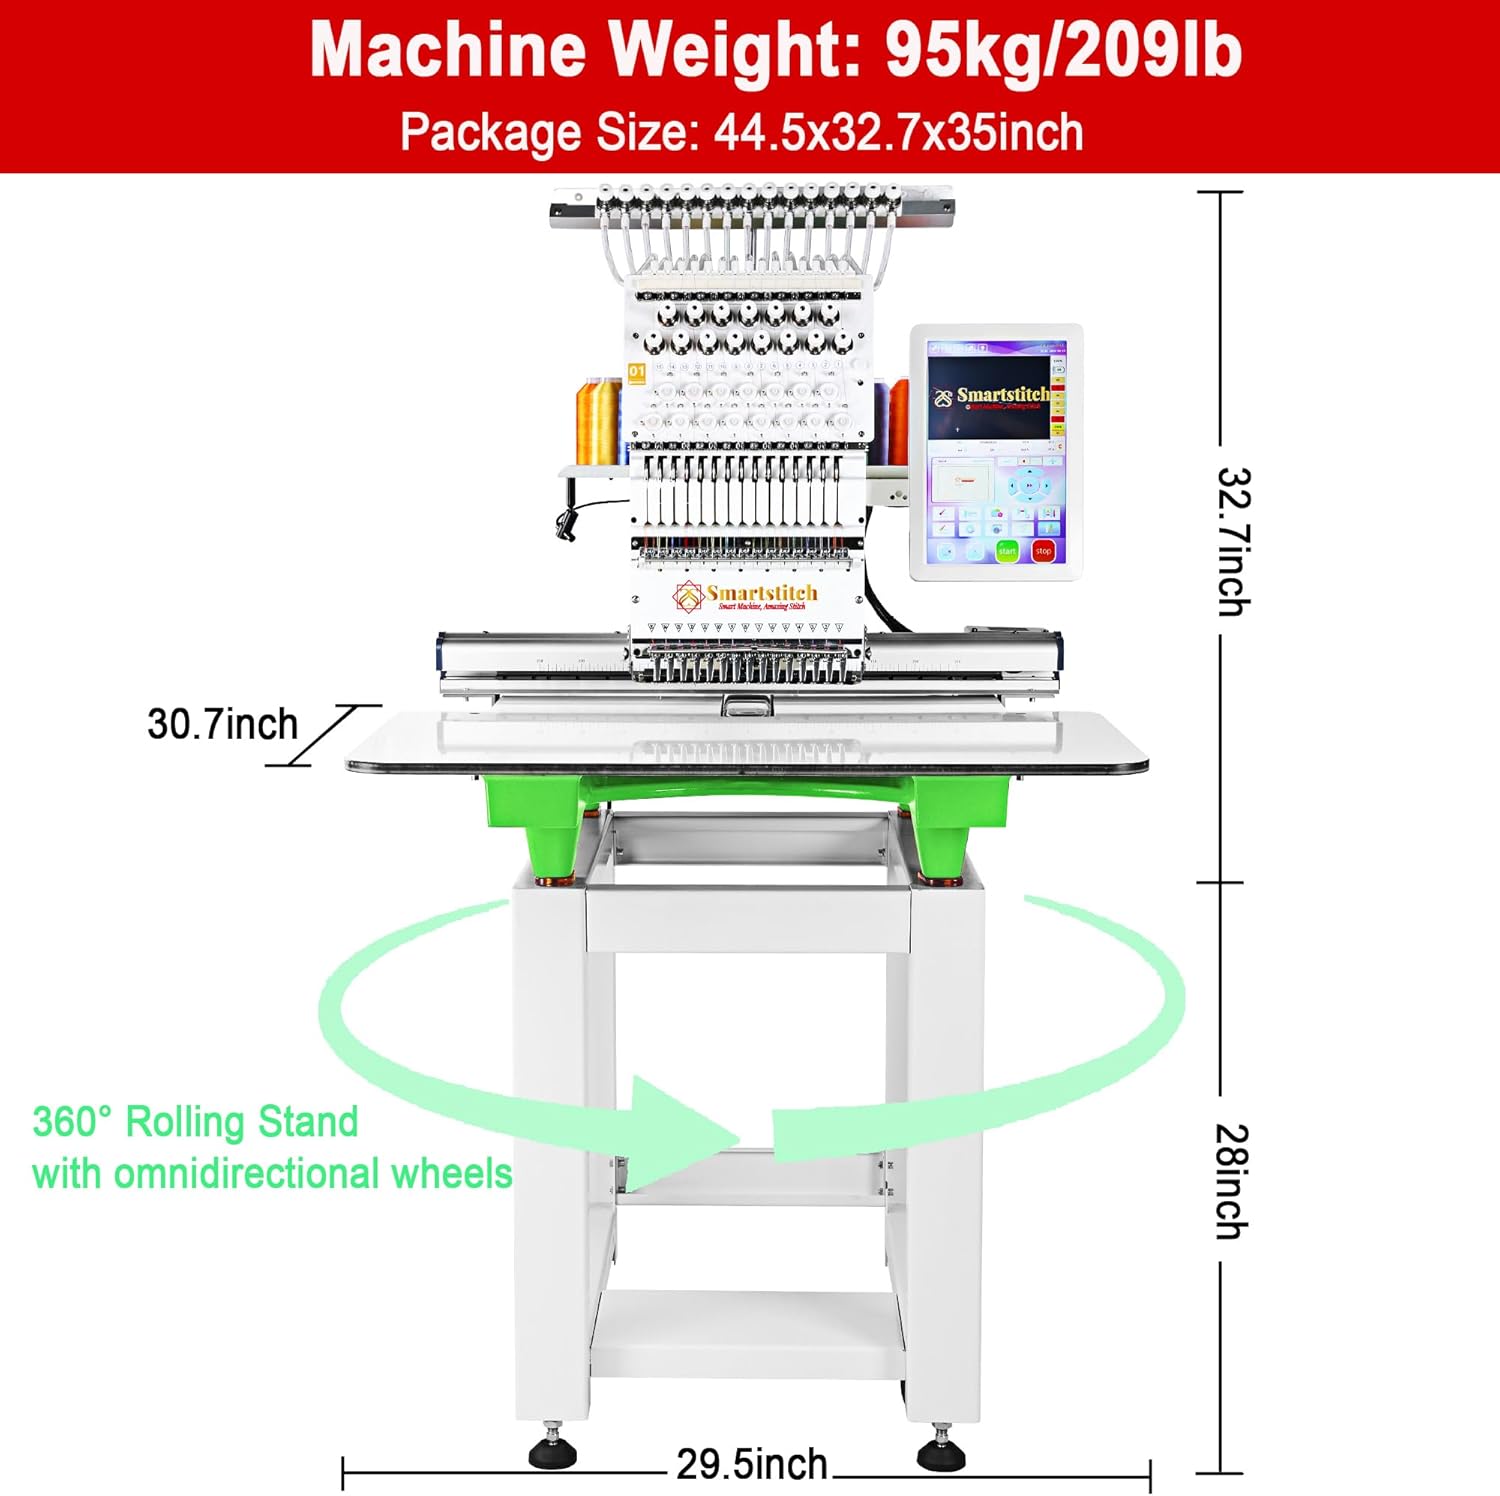
Figure 8: The machine's design allows for easy access to components for maintenance.
7. Troubleshooting
For common issues, refer to the troubleshooting section in your operation manual. If you encounter problems that cannot be resolved, contact Smartstitch customer support.
- Thread Breaks: Check threading path, needle condition, tension settings, and ensure proper hooping.
- Poor Stitch Quality: Verify tension, needle type, stabilizer use, and machine cleanliness.
- Machine Errors: Note any error codes displayed on the touch screen and consult the manual or support.
8. Specifications
| Feature | Specification |
|---|---|
| Model Number | SS-EM-15N-GN |
| Needles | 15 |
| Max Embroidery Area | 14" x 20" |
| Max Speed | 1200 SPM |
| Touch Screen | 12" |
| Connectivity | USB, Wi-Fi |
| Cap System | 270 Wide Angle |
| Laser Positioning | Yes |
| Automatic Color Change | Yes |
| Product Dimensions | 28.74 x 36.61 x 35.04 inches |
| Item Weight | 209 pounds |
| Manufacturer | Smartstitch |
| UPC | 630456812485 |
9. Warranty and Support
Smartstitch is committed to providing comprehensive support for your embroidery machine.
9.1 Training and Technical Support
- Operation Manuals: Detailed manuals are provided with your machine.
- Video Trainings: Access a library of video tutorials to guide you through various operations.
- Online Engineers: Experienced engineers are available for online assistance.
- Local Technical Support: Local support options may be available; contact Smartstitch for details.
- Smartstitch Embroidery Machine Club: Join the official Facebook group for community assistance, advice, and direct interaction with trainers and US-based ambassadors.
- Live Demo Appointments: Live demonstrations of the machine can be arranged.

Figure 9: Smartstitch offers support through YouTube videos and a Facebook community.

Figure 10: Overview of Smartstitch's technical support and training services.
9.2 Returns and Packaging
If you need to return the machine, please retain the original wooden pallet, inner boxes for accessories, metal buckles, and fixed bolts. These items must be intact for a return. Pictures and videos may be required to ensure all accessories are returned and the machine is undamaged and properly secured in its original packaging.


