1. Important Safety Information
- Always store firearms unloaded and separate from ammunition.
- Keep the safe locked at all times when not in use.
- Do not store the manual keys inside the safe. Keep them in a secure, separate location.
- Ensure children and unauthorized individuals do not have access to the safe or its keys.
- Replace batteries promptly when the low battery warning is indicated to ensure continuous operation.
2. Package Contents
Verify that all items are present in the package:
- STABAR Biometric Handgun Safe
- User Manual
- Manual Keys (2)
- Mounting Hardware (Screws, Wall Anchors)
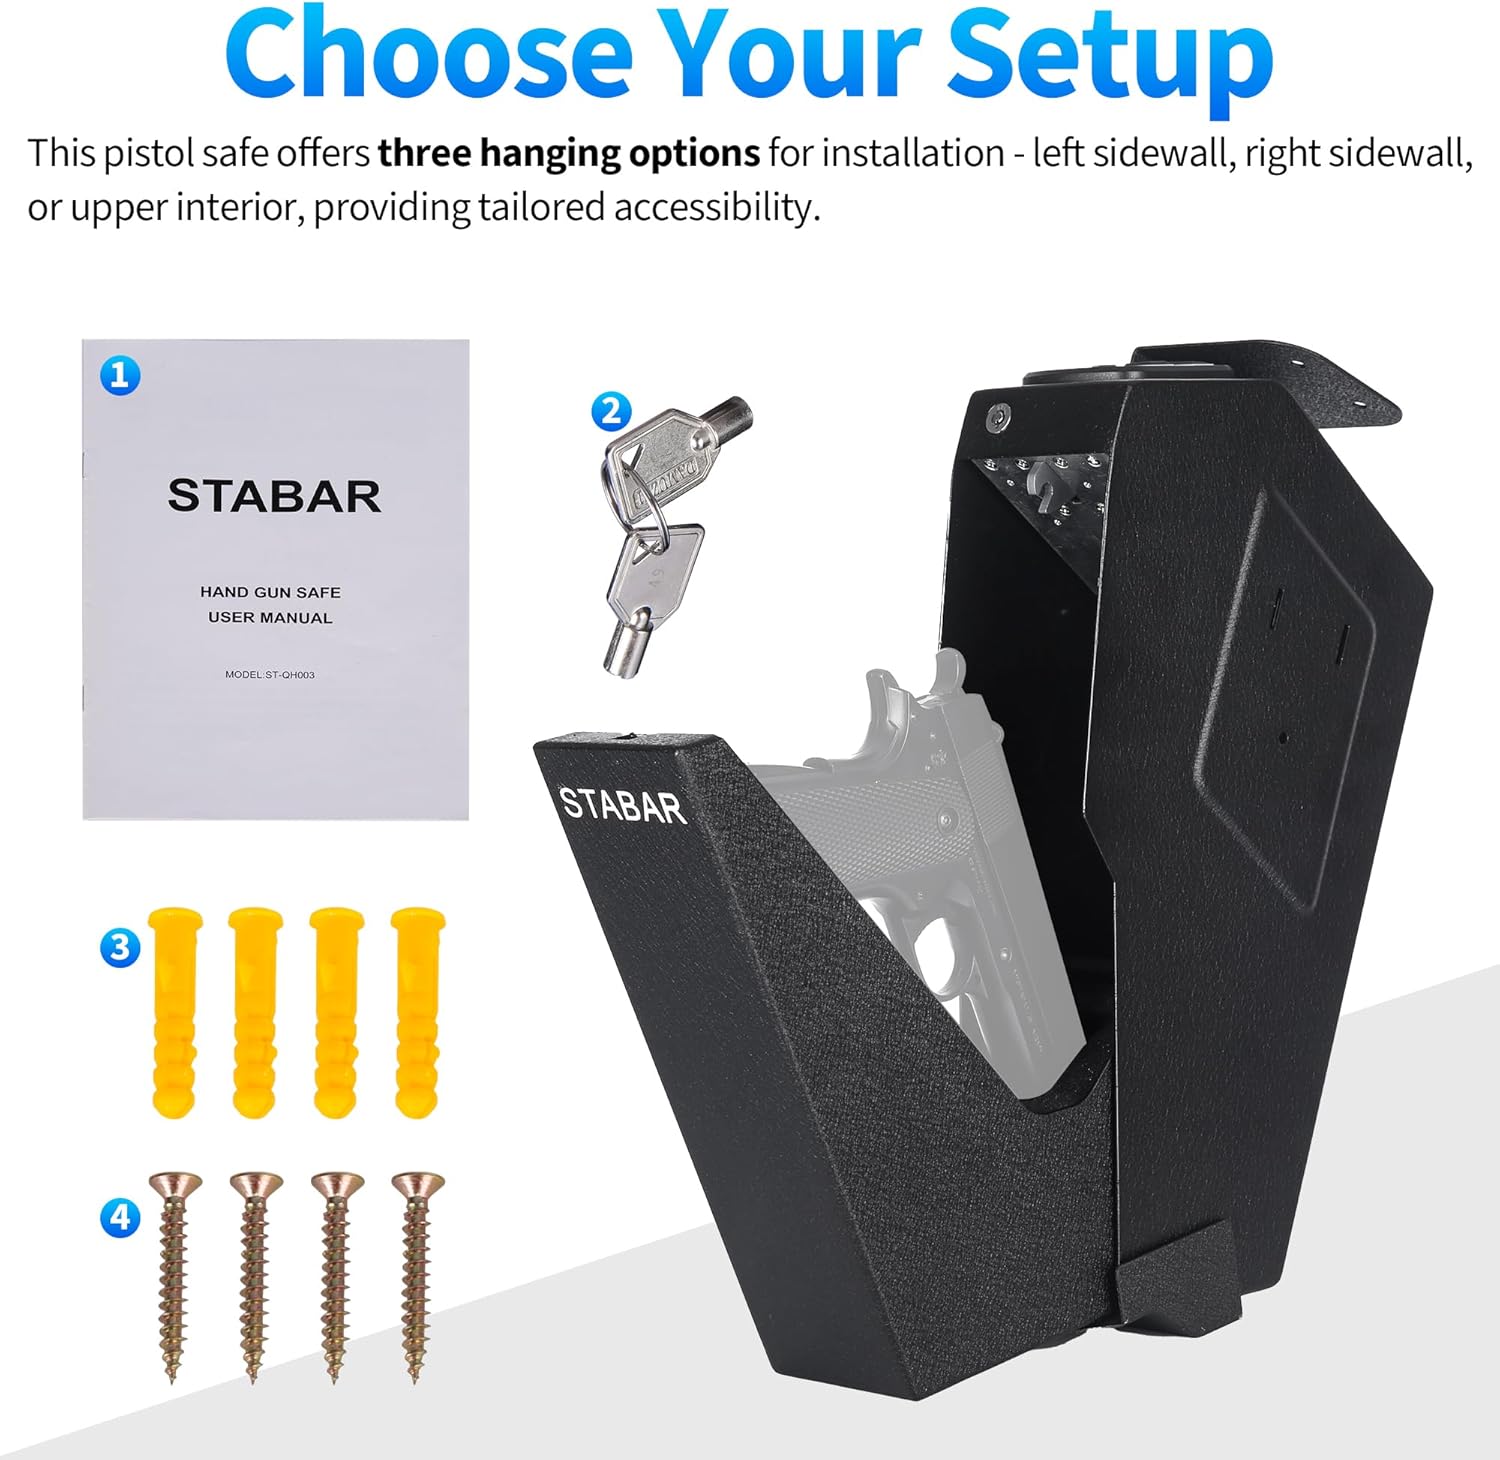
Figure 2.1: Included components: safe, manual, keys, and mounting hardware.
3. Product Overview
The STABAR Biometric Handgun Safe provides secure storage for firearms with multiple access options. It is constructed from carbon steel for durability and features biometric fingerprint recognition, a customizable PIN code, and traditional key access.

Figure 3.1: The STABAR handgun safe with a firearm stored inside.

Figure 3.2: The safe in an open position, revealing the firearm.
4. Dimensions and Capacity
The safe is designed to accommodate handguns up to 9.5 inches in length. Interior foam padding protects firearms from scratches.

Figure 4.1: Product dimensions for the STABAR handgun safe.
5. Installation
The safe offers versatile installation options, including wall mounting (left or right side) or vertical hanging under a desk or nightstand.
5.1 Mounting Options
- Wall Mount: Securely attach to a wall stud using the provided hardware.
- Under Desk/Nightstand: Mount vertically to the underside of a desk, nightstand, or shelf.
5.2 Installation Steps
- Choose a suitable mounting location that is discreet and provides easy access. Ensure the surface can support the weight of the safe and its contents.
- Position the safe in the desired location and mark the drilling points for the mounting hardware.
- Drill pilot holes according to the size of the provided screws and wall anchors.
- Secure the safe to the mounting surface using the screws and anchors. Ensure it is firmly attached and does not wobble.

Figure 5.1: Safe mounted to a nightstand.
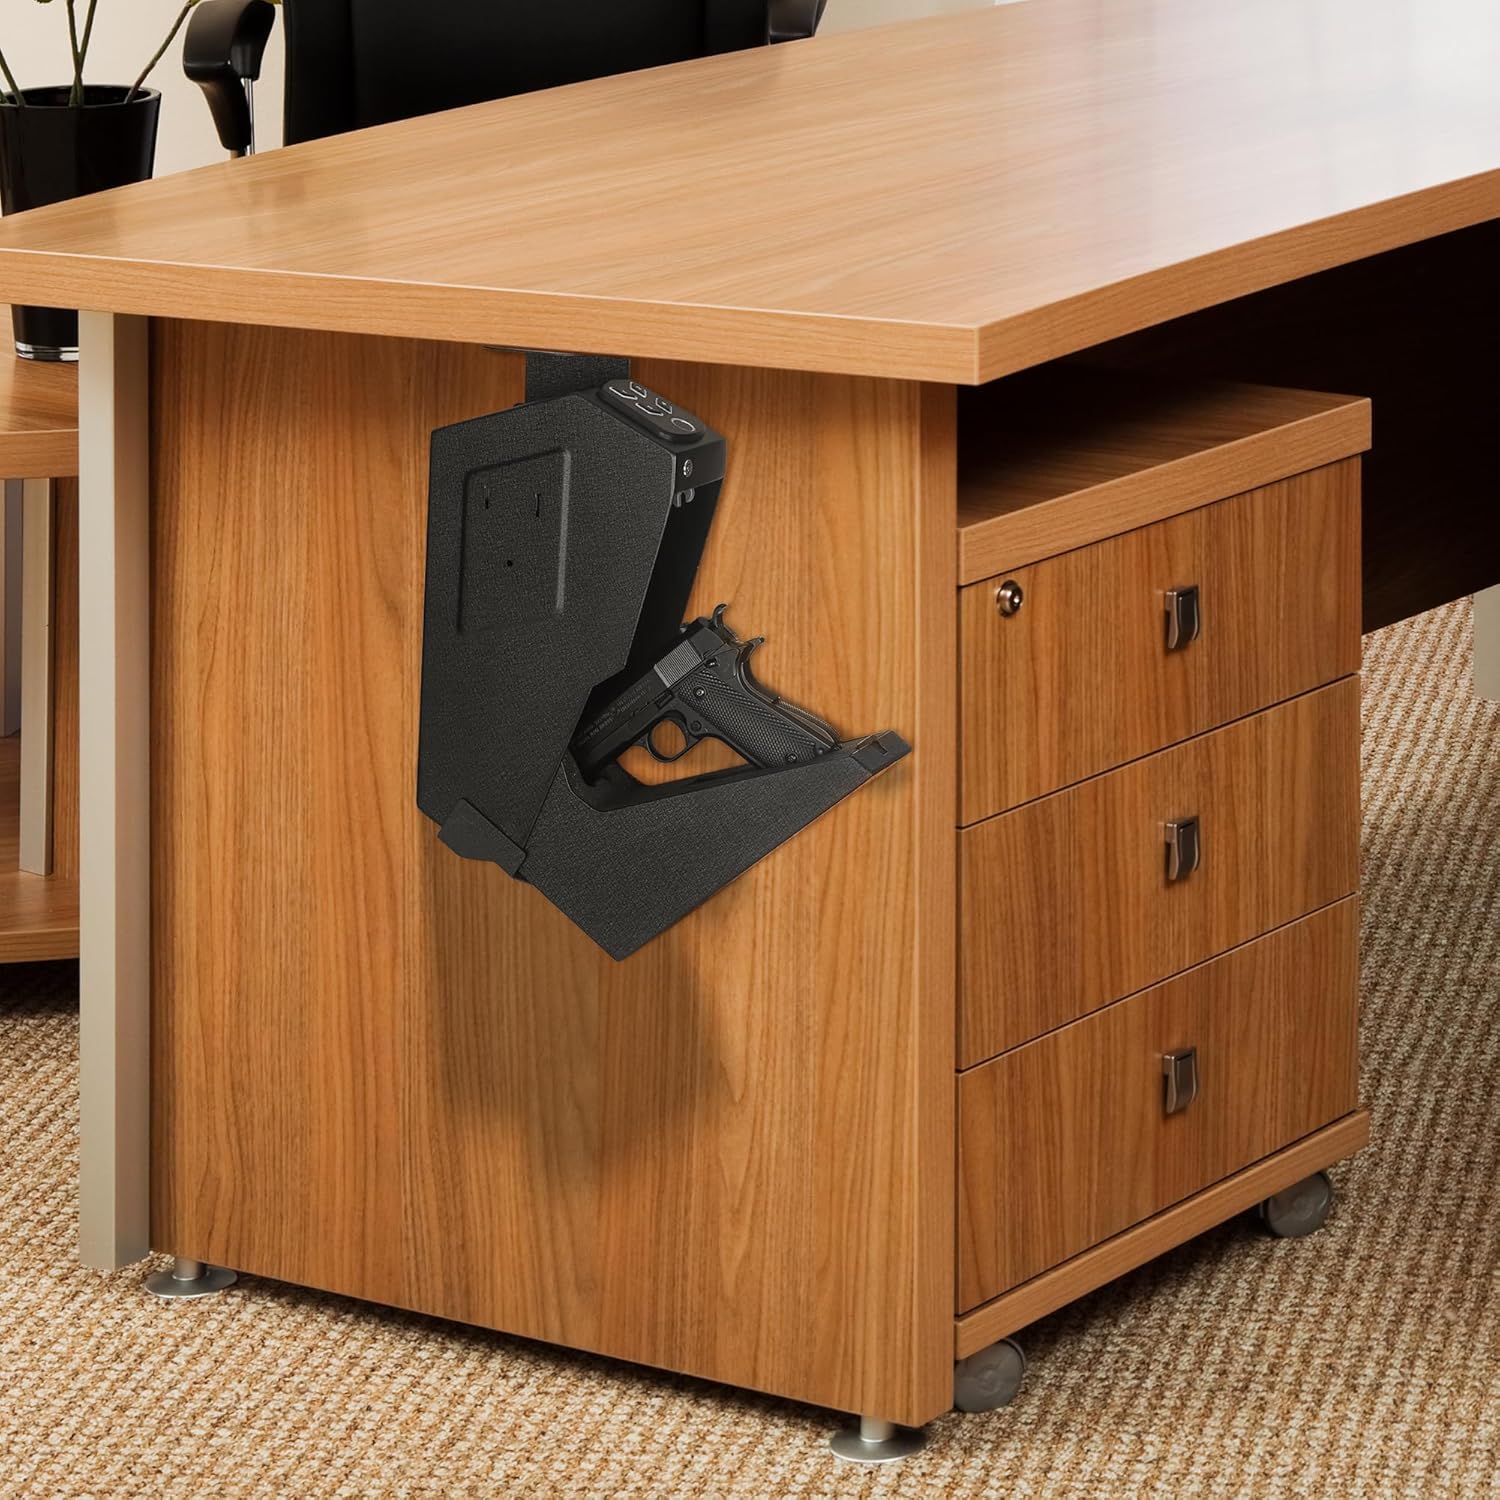
Figure 5.2: Safe mounted under a desk.

Figure 5.3: Safe mounted under a desk in an open position.
6. Initial Setup
6.1 Battery Installation
The safe requires batteries for electronic operation. Locate the battery compartment, typically on the inside of the door or a side panel. Insert the required batteries (usually AA or AAA, not included) according to the polarity markings.
6.2 First-Time Opening with Key
For initial access or in case of battery failure, use the manual key. The keyhole is discreetly located. Refer to the troubleshooting section for common issues regarding keyhole location.
7. Operating the Safe
The safe offers three methods for quick access: fingerprint, PIN code, and manual key.

Figure 7.1: Multiple access options: fingerprint, PIN, and key.

Figure 7.2: Detailed view of the fingerprint sensor, keypad, and keyhole.
7.1 Fingerprint Enrollment
- Open the safe using the manual key or current access method.
- Locate the programming button (often inside the battery compartment or near the hinge). Press and hold it for approximately 1 second.
- Place your finger on the fingerprint sensor. The safe will typically beep or light up to indicate successful scanning.
- Repeat placing and lifting your finger multiple times (usually 3-5 times) from different angles until the safe confirms enrollment (e.g., a long beep or green light).
- Test the enrolled fingerprint to ensure it opens the safe. The safe can store up to 100 fingerprints.
7.2 PIN Code Setup
- Open the safe.
- Press and hold the programming button for approximately 1 second.
- Enter your desired 3-6 digit PIN code on the keypad.
- Press the '#' or 'Enter' button to confirm.
- Re-enter the PIN code and press '#' or 'Enter' again to verify. The safe will confirm successful setup.
- Test the new PIN code to ensure it opens the safe.
7.3 Opening with Fingerprint
Place an enrolled finger firmly on the fingerprint sensor. The safe will unlock and open automatically if the fingerprint is recognized.
7.4 Opening with PIN Code
Enter your registered PIN code on the keypad, then press the '#' or 'Enter' button. The safe will unlock and open automatically.
7.5 Opening with Manual Key
Insert the manual key into the keyhole and turn it to unlock the safe. This method is used for initial access, battery failure, or if electronic access methods are unavailable.
8. Alarm Features
The safe includes security features to deter unauthorized access:
- Incorrect Entry Alarm: If 5 incorrect fingerprint attempts or 3 incorrect PIN code attempts are made, the safe will trigger an alarm.
- Tamper-Proof Alarm: The safe is designed to detect tampering attempts and will activate an alarm.
- Silent Mode: The safe can be set to silent mode to disable audible feedback during operation. Refer to the full manual for instructions on activating silent mode.
- Low Battery Warning: An indicator (light or sound) will alert you when the batteries are low, prompting replacement.

Figure 8.1: Alarm and warning features of the safe.
9. Maintenance
- Battery Replacement: Replace all batteries with new ones when the low battery warning is active. Do not mix old and new batteries.
- Cleaning: Wipe the exterior of the safe with a soft, dry cloth. Avoid using abrasive cleaners or solvents. Keep the fingerprint sensor clean and dry for optimal performance.
- Keyhole Maintenance: Ensure the keyhole remains free of debris. Do not force the key if it does not turn smoothly.
10. Troubleshooting
- Safe does not open with fingerprint:
- Ensure your finger is clean and dry.
- Try different angles and positions of your finger on the sensor.
- Re-enroll your fingerprint if issues persist.
- Ensure batteries are not low. - Safe does not open with PIN code:
- Double-check the entered PIN code.
- Ensure batteries are not low.
- If you forgot the PIN, use the manual key to open and reset the PIN. - Safe does not open with manual key:
- Ensure you are using the correct key.
- The keyhole for this model (ST-QH003) is located on the side of the keypad module, not directly below the numbers or fingerprint area. Do not attempt to force the key into the fingerprint sensor or other areas, as this can damage the safe. - Safe is beeping continuously:
- This may indicate low battery. Replace batteries immediately.
- It could also be an alarm triggered by incorrect entries or tampering. - Safe is not responding:
- Check battery installation and ensure they are fresh.
- If completely unresponsive, use the manual key.
11. Specifications
| Brand | STABAR |
| Model Number | ST-QH003 |
| Lock Type | Electronic, Key |
| Color | Black |
| Material | Carbon Steel |
| Special Features | Anti-Theft, Biometric Fingerprint, PIN Code, Auto-Open Door |
| Mounting Type | Wall Mount |
| Item Weight | 7.5 Pounds |
| Alarm | Incorrect Entry Alert |
| Water Resistance Level | Not Water Resistant |
| Firearm Capacity | Up to 9.5 inch handguns |
12. Warranty and Support
For warranty information or technical assistance, please contact STABAR customer support. Refer to the product packaging or the official STABAR website for contact details. Our dedicated customer support team is available to assist with any inquiries or concerns.


