1. Introduction
This instruction manual provides detailed information on the operation, setup, and maintenance of your KETOTEK Digital Humidity and Temperature Controller. This device is designed for precise environmental management, offering control over both humidity and temperature. Made from durable ABS material, it is suitable for various applications where accurate environmental regulation is essential.
2. Safety Information
- Read all instructions carefully before use.
- Ensure the power supply voltage matches the device's requirements (230V).
- Do not immerse the device or its probe in water or other liquids.
- Avoid exposing the device to extreme temperatures or direct sunlight.
- Do not disassemble or modify the device. Refer all servicing to qualified personnel.
- Keep out of reach of children.
- Unplug the device from the power outlet before cleaning or when not in use for extended periods.
3. Product Overview and Components
The KETOTEK Digital Humidity and Temperature Controller features a clear digital display, intuitive control buttons, and an external probe for accurate readings. It integrates a standard power outlet for connecting external devices like humidifiers, dehumidifiers, heaters, or coolers.

Figure 3.1: KETOTEK Digital Humidity and Temperature Controller with its external sensor probe.
3.1. Device Layout

Figure 3.2: Detailed view of the controller's display and buttons.
- Display Screen: Shows measured humidity/temperature, set points, and operating modes.
- MODE Button: Used to switch between operating modes and confirm settings.
- SET Button: Enters setting mode for parameters.
- UP/CLK Button: Increases values or switches between Celsius/Fahrenheit. Also used for calibration.
- DOWN Button: Decreases values.
- Output Indicator: Lights up when the output socket is active.
- Power Outlet: Connects to external devices (humidifier, dehumidifier, heater, cooler).
- Sensor Probe: Measures ambient humidity and temperature.
4. Typical Applications
The KETOTEK controller is versatile and can be used in various environments requiring precise humidity and temperature control.

Figure 4.1: Examples of the controller's use in greenhouses, homes, incubation setups, and reptile habitats.
- Incubators: Maintain stable conditions for hatching eggs.
- Greenhouses: Regulate climate for optimal plant growth.
- Terrariums/Reptile Habitats: Create suitable environments for pets.
- Home Use: Control humidity and temperature in specific rooms or storage areas.
5. Setup
- Unpack: Carefully remove the controller and sensor probe from its packaging.
- Connect Probe: Plug the sensor probe cable securely into the designated port on the controller.
- Position Probe: Place the sensor probe in the area where you wish to monitor and control humidity and temperature. Ensure it is not obstructed and has good air circulation.
- Power On: Plug the controller into a standard 230V power outlet. The display will illuminate.
- Connect Device: Plug the appliance you wish to control (e.g., humidifier, dehumidifier, heater, fan) into the power outlet on the front of the controller.
6. Operating Instructions
The controller offers four main operating modes and various customizable settings.
6.1. Operating Modes

Figure 6.1: Examples of the four operating modes and alarm displays.
- HC Mode (Humidity Control): Manages humidity levels. Can be set for humidification or dehumidification.
- TC Mode (Temperature Control): Manages temperature levels. Can be set for heating or cooling.
- TC Alarm (Temperature Alarm): Activates an alarm if temperature exceeds or falls below set thresholds.
- HC Alarm (Humidity Alarm): Activates an alarm if humidity exceeds or falls below set thresholds.
Press the MODE button to cycle through these main display modes.
6.2. Setting Humidity/Temperature Parameters
To set the desired start and stop values for humidity or temperature:
- Press the SET button once. The "Start" value will flash.
- Use the UP/CLK or DOWN buttons to adjust the "Start" value.
- Press SET again. The "Stop" value will flash.
- Use the UP/CLK or DOWN buttons to adjust the "Stop" value.
- Press SET a third time to save the settings and exit. If no button is pressed for 10 seconds, the device will automatically save and exit.
Control Range: Humidity: 20~95% RH; Temperature: -10°C~50°C (14°F~122°F).
6.3. Temperature Unit Switch (°C / °F)
To switch between Celsius and Fahrenheit:
- In the main display interface, press and hold the UP/CLK button for approximately 3 seconds. The temperature unit will change.
6.4. Calibration Function
To calibrate humidity and temperature readings:
- Press and hold both the UP/CLK and MODE buttons simultaneously for approximately 3 seconds to enter calibration mode.
- The humidity correction value will flash. Use UP/CLK or DOWN to adjust the humidity offset (-10~10%RH).
- Press MODE to switch to temperature correction. The temperature correction value will flash. Use UP/CLK or DOWN to adjust the temperature offset (-9.9~9.9°C).
- Press and hold the MODE button again to save the calibration settings and exit.
6.5. Alarm Function
The device can sound an alarm if measured humidity or temperature exceeds predefined thresholds.
- To set alarm thresholds, navigate to the TC Alarm or HC Alarm display mode using the MODE button.
- Press SET to enter alarm setting mode.
- Adjust the upper and lower alarm limits using the UP/CLK and DOWN buttons.
- Press SET to confirm each value and exit.
If the measured value goes beyond the set alarm range, the controller will emit an audible alarm.
6.6. Data Storage and Reset
- Data Storage: All configured settings are automatically saved and retained even after a power outage.
- Reset Function: To reset the device to factory default settings, consult the manufacturer's website or support for specific instructions, as this may vary.
7. Maintenance
- Cleaning: Disconnect the device from power before cleaning. Wipe the surface with a soft, dry cloth. Do not use abrasive cleaners or solvents.
- Probe Care: Keep the sensor probe clean and free from dust or debris to ensure accurate readings. Avoid bending or damaging the probe cable.
- Storage: When not in use, store the controller in a cool, dry place, away from direct sunlight and extreme temperatures.
8. Troubleshooting
| Problem | Possible Cause | Solution |
|---|---|---|
| Display shows "Err" or error code | Sensor not connected, sensor damaged, or measured data is out of range/short circuit. |
|
| Controller not powering on | No power supply or faulty power outlet. |
|
| Connected appliance not turning on/off | Incorrect settings, appliance malfunction, or controller output issue. |
|
| Inaccurate readings | Sensor dirty, sensor placement, or calibration needed. |
|
9. Specifications
| Model Number | FR-KT3400 |
| Brand | KETOTEK |
| Power Supply | 230V AC |
| Max Output Load | 16A / 230V |
| Humidity Control Range | 20% RH ~ 95% RH |
| Temperature Control Range | -10°C ~ 50°C (14°F ~ 122°F) |
| Humidity Correction Range | -10% RH ~ 10% RH |
| Temperature Correction Range | -9.9°C ~ 9.9°C |
| Material | ABS |
| Dimensions (Controller) | Approx. 13.1cm (H) x 6.2cm (W) x 3.2cm (D) |
| Probe Cable Length | Approx. 137cm |
| Weight | 270 grams (package) |
| Country of Origin | China |
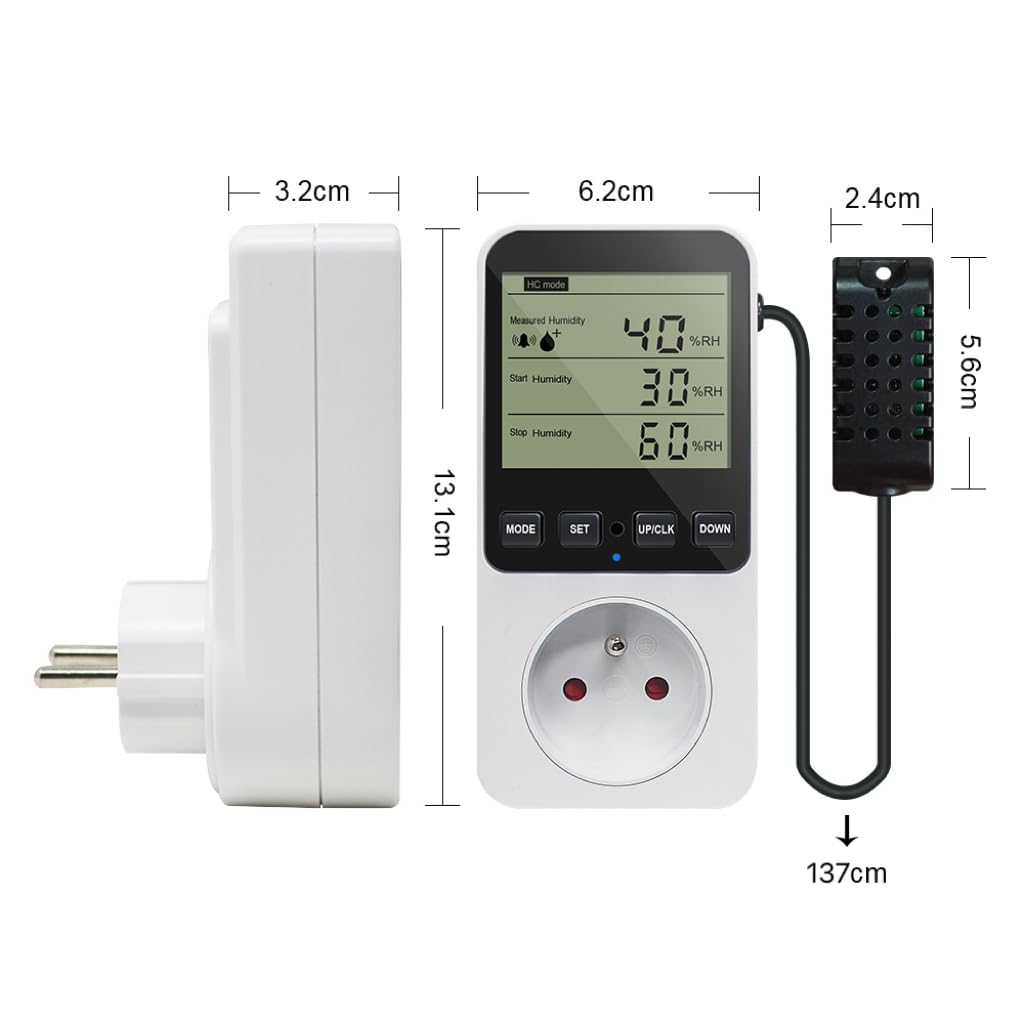
Figure 9.1: Physical dimensions of the KETOTEK controller and its sensor probe.
10. Warranty Information
Specific warranty details for this product are not provided in the available information. Please refer to the retailer's return policy or contact the manufacturer directly for warranty terms and conditions.
11. Customer Support
For technical assistance, troubleshooting beyond this manual, or inquiries regarding your KETOTEK Digital Humidity and Temperature Controller, please contact KETOTEK customer support through their official website or the retailer where the product was purchased.


